
Making a strawberry ice cream bar at home has quickly become one of my favorite ways to cool down during the hot summer months. I remember the first time I tried it—I wanted something fun, delicious, and completely customizable. The thought of blending creamy strawberry ice cream with a crunchy outer coating sounded like the perfect treat. And let me tell you, it exceeded all my expectations!
The best part about homemade strawberry ice cream bars is that you can control every step, from choosing the freshest strawberries to picking the perfect coating. Unlike store-bought versions, these bars are free from unnecessary preservatives and can be as healthy or indulgent as you want. Plus, it’s a great way to bring family and friends together. Whether you’re serving them at a summer barbecue or enjoying them as a midday snack, these strawberry ice cream bars are sure to be a hit.
In this post, I’ll walk you through how to make your own strawberry ice cream bars, step by step. You don’t need any special equipment—just a few simple ingredients and a little time. Trust me, once you try making these at home, you’ll never go back to store-bought ice cream bars again!
Ingredients You’ll Need for a Homemade Strawberry Ice Cream Bar
Key ingredients for the perfect strawberry ice cream filling
When making a homemade strawberry ice cream filling, there are three essential ingredients that stand out: fresh strawberries, cream, and vanilla. These ingredients come together to create the perfect balance of flavors and textures. Here’s why each one is important and how they contribute to the creamy, rich base that makes strawberry ice cream so delicious.
Fresh strawberries: The heart of the flavor
The star of the show in any strawberry ice cream filling is the strawberry. Fresh strawberries provide a natural, vibrant flavor that forms the foundation of the ice cream. Whether you choose to puree them for a smooth texture or chop them for some extra chunks, the quality of your strawberries will make all the difference.
When selecting strawberries, I always go for the ripest, juiciest berries I can find. Local, in-season strawberries have the best flavor and sweetness. I often find that these give my ice cream a richer, more authentic taste. You’ll notice that fresh strawberries make a huge difference compared to using frozen berries, which can sometimes taste a bit bland.
Cream: Adding smoothness and richness
For a truly indulgent strawberry ice cream, cream is the essential ingredient that delivers that luxurious, creamy texture. I prefer using heavy cream for its higher fat content. It helps the ice cream develop that soft, velvety mouthfeel that makes each bite feel decadent.
When mixed with the strawberries, the cream helps mellow the tartness of the fruit, providing a perfect contrast to the sweet and tangy strawberry flavor. It’s important to whip the cream just right, making sure it’s smooth and thick without being overbeaten. This creates a stable texture that won’t melt too quickly when you scoop it.
Vanilla: The secret ingredient
While strawberries and cream are the main players, a dash of pure vanilla extract brings everything together. I can’t stress enough how much vanilla elevates the overall taste of the ice cream. It doesn’t overpower the strawberry flavor but enhances it, giving the ice cream depth.
Vanilla is a subtle yet powerful ingredient. It adds warmth and complexity, helping balance the sweetness of the cream and strawberries. Using pure vanilla extract rather than imitation vanilla makes a significant difference in the quality of the final product. I always recommend using high-quality vanilla to ensure that you get the most authentic flavor.
Putting it all together
When combined, these three ingredients—fresh strawberries, cream, and vanilla—create the perfect base for strawberry ice cream. The strawberries offer that refreshing burst of fruity flavor, the cream adds smooth richness, and the vanilla elevates the entire experience. The balance between sweetness, tartness, and richness is key, and these ingredients come together in a way that’s truly special.
Next time you’re making strawberry ice cream, remember that the quality of each ingredient plays a major role. Choose the freshest strawberries, the richest cream, and the purest vanilla. Trust me, the result will be a strawberry ice cream filling that’s irresistible!
The right coating for your strawberry ice cream bars
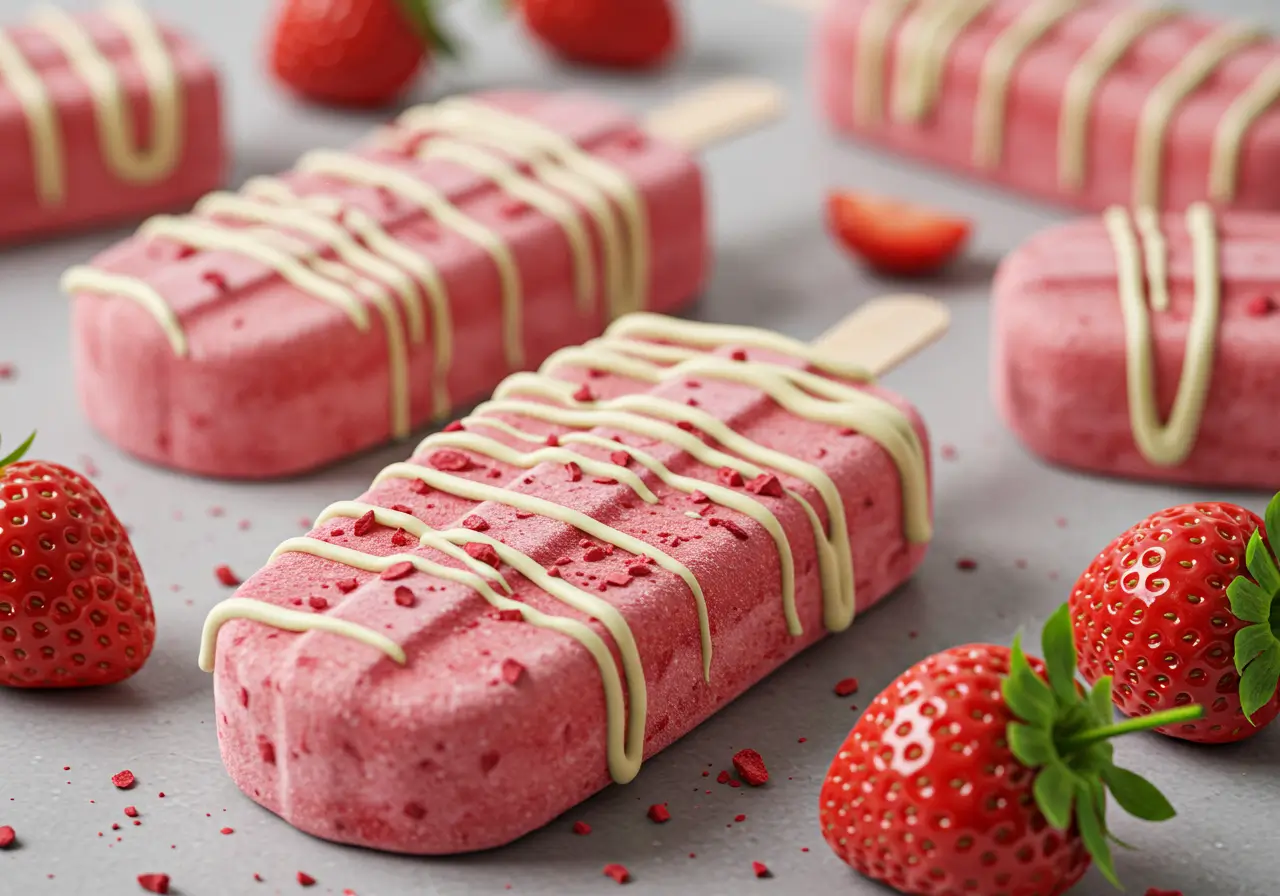
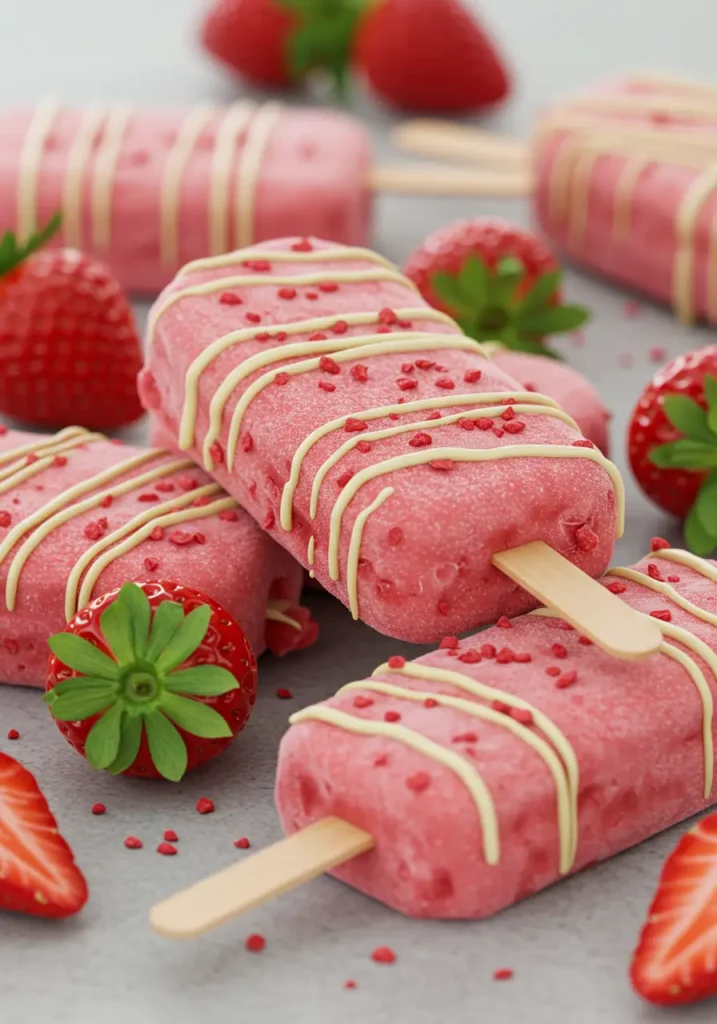
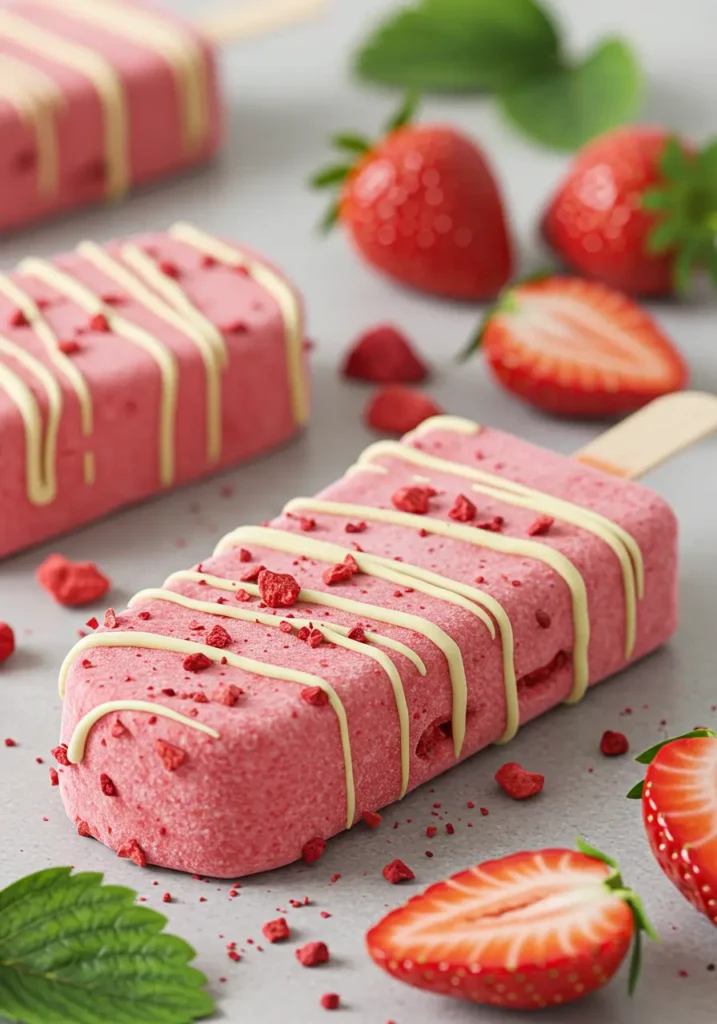
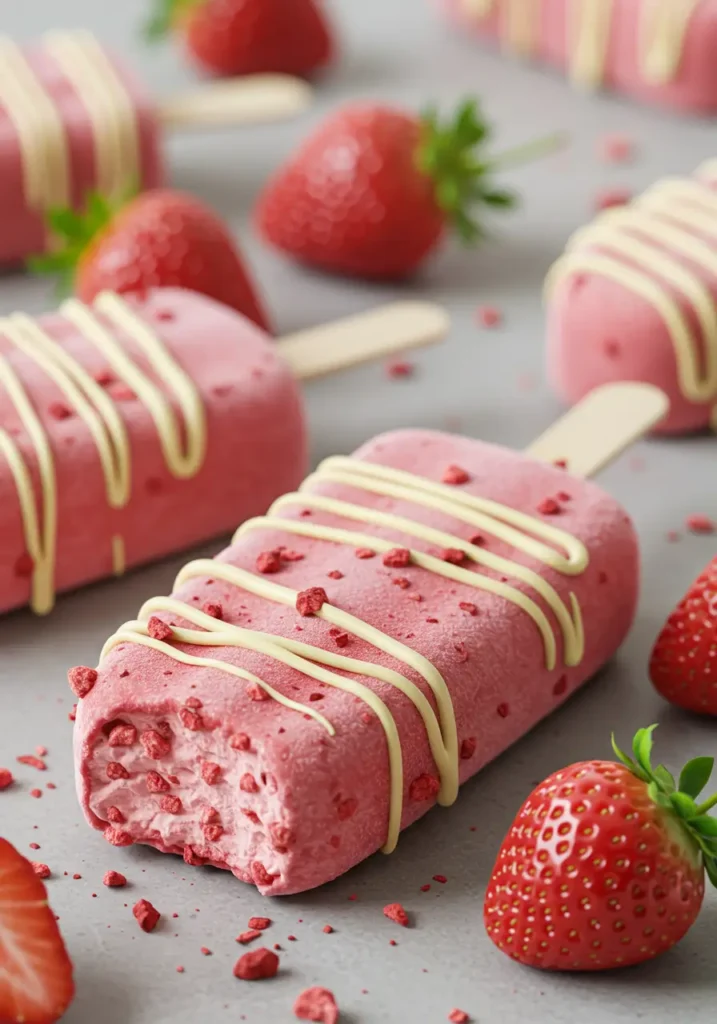
When you’re making strawberry ice cream bars, the coating is just as important as the filling. A great coating not only enhances the flavor but also adds texture and a touch of crunch. You want something that contrasts with the creamy, smooth texture of the ice cream inside. From crumbly shortcake to nuts, or even a luscious chocolate coating, there are several options to choose from. Here’s a deeper dive into each coating option and how to decide which one is right for your strawberry ice cream bars.
Crumbly shortcake: A buttery, delicate crunch
One of the most popular coatings for strawberry ice cream bars is a crumbly shortcake. This option gives a buttery, delicate crunch that complements the smooth, creamy strawberry ice cream. The texture of the shortcake is a perfect balance to the softness of the ice cream.
I always recommend using a homemade shortcake crumble rather than store-bought for a fresher, more flavorful taste. The shortcake will melt in your mouth with each bite, providing a satisfying contrast without overpowering the strawberry flavor. It’s not too sweet, making it the ideal base for a strawberry ice cream bar.
For an extra touch, I often mix in a bit of brown sugar or a pinch of salt to enhance the overall flavor. The salt adds just a hint of savory flavor that balances out the sweetness of the ice cream. If you’re looking for a lighter, airier crunch, try baking your shortcake crumbles to make them even more delicate.
Nuts: Adding a rich, savory crunch
Another excellent option for your strawberry ice cream bars is a nutty coating. Chopped almonds, pistachios, or hazelnuts work wonderfully with strawberry ice cream, adding both texture and depth to the flavor profile. The natural oils in the nuts bring out a rich, savory crunch that provides a satisfying bite.
I love using pistachios for a more exotic flair, but almonds are always a classic. The earthy flavor of the nuts pairs perfectly with the sweetness of the strawberry ice cream. You can lightly toast the nuts to enhance their aroma and flavor. The toasted nuts not only add a bit of warmth but also bring out a richer flavor that’s impossible to resist.
If you’re worried about the nuts falling off during the coating process, dip your ice cream bars in a light layer of melted chocolate first, then roll them in the nuts. This step ensures the nuts stick without falling off. It’s also a fun way to incorporate a little extra chocolate into your dessert!
Chocolate coating: A rich, indulgent finish
For many people, nothing beats the classic chocolate coating for their strawberry ice cream bars. Whether it’s dark, milk, or white chocolate, the glossy layer of chocolate around your ice cream bar adds an extra level of indulgence that is irresistible.
I find that using high-quality chocolate is key here. It melts smoothly and hardens perfectly once it cools, creating that satisfying snap when you take a bite. I always recommend tempering the chocolate to ensure that it has a nice sheen and sets perfectly. If you’re feeling adventurous, you can even add a little sea salt on top of the chocolate for an exciting sweet-salty combination.
Chocolate coatings can also be customized. If you want something a little different, try drizzling the chocolate over the bar in a thin, artistic pattern rather than coating it entirely. This adds a bit of fun while still offering the rich chocolate taste that pairs so well with strawberries.
How to choose the right coating
Choosing the right coating ultimately depends on your personal preference and the experience you’re going for. If you want something light and subtly sweet, go for a crumbly shortcake. If you’re craving a bit more texture and richness, nuts are a great choice. And if you’re looking to indulge and add an extra layer of luxury, you can’t go wrong with chocolate.
Remember that the coating should complement the strawberry ice cream bar, not overpower it. I always encourage experimenting with different textures to find the combination that works best for you. Whether you prefer a sweet, crumbly coating or a rich, savory finish, the perfect coating can take your strawberry ice cream bars to the next level!
Optional toppings to elevate your strawberry ice cream bar
When it comes to strawberry ice cream bars, the fun doesn’t stop at the base and coating. The right toppings can elevate your dessert, adding extra flavor, texture, and a little creativity. Whether you’re serving them for a special occasion or just for a fun treat, toppings like whipped cream, crushed cookies, and sprinkles can turn a simple dessert into something spectacular. Here’s how each of these options can transform your strawberry ice cream bars into a dessert masterpiece.
Whipped cream: Light and airy sweetness
Whipped cream is a classic topping that adds a light, airy sweetness to your strawberry ice cream bar. It’s the perfect contrast to the creamy and rich ice cream inside, providing a smooth, fluffy texture that melts in your mouth. The best part? You can make it as sweet or as light as you like by adjusting the sugar levels.
Personally, I love making homemade whipped cream. It’s incredibly easy and makes a huge difference in taste compared to store-bought versions. I start with heavy cream and a touch of vanilla extract, then whip it until it reaches the perfect consistency. For a little extra flavor, you could even add some powdered sugar or a hint of cinnamon or nutmeg.
If you want a fancier twist, try adding flavored whipped cream. For example, a hint of strawberry or vanilla can enhance the flavor of the ice cream, creating a truly harmonious taste. You could even pipe the whipped cream onto the ice cream bars for an elegant presentation, making them perfect for parties or special gatherings.
Crushed cookies: A crunchy and flavorful topping
Crushed cookies are another fantastic topping for your strawberry ice cream bars. Not only do they provide a satisfying crunch, but they also add flavor that complements the sweetness of the strawberry ice cream. Oreos, chocolate chip cookies, or even graham crackers can all make an excellent addition.
My personal favorite is crushed Oreos. The chocolatey crunch pairs beautifully with the sweet strawberry ice cream, creating a perfect balance. You can sprinkle the cookie crumbs on top of your bars for a simple yet delicious finish. Alternatively, roll the ice cream bars in the crushed cookies, creating a fun, textured layer that will surprise your taste buds.
For a different spin, try using flavored cookies. A lemon cookie topping adds a fresh, tangy twist, while cinnamon cookies bring warmth to the dessert. The key is to use cookies that have a slightly firmer texture to hold up against the ice cream without becoming soggy too quickly.
Sprinkles: Fun and colorful pop
If you’re looking for a fun and colorful touch, sprinkles are the way to go. This option not only adds a burst of color but also gives a delightful crunch that works perfectly with the creamy ice cream. You can choose from a variety of sprinkles, from classic rainbow sprinkles to chocolate jimmies, or even nonpareils for a tiny, delicate crunch.
I love using sprinkles when I’m serving these bars for a party or kids’ gathering. They’re easy to add and instantly make the dessert more exciting. The best part is that you can customize the sprinkles to fit any occasion. For a birthday, rainbow sprinkles are a perfect choice, while holiday-themed sprinkles, like red and green for Christmas or pastel sprinkles for Easter, can make your ice cream bars festive and fun.
Beyond just the colors, sprinkles can also add different textures to the experience. For a more grown-up flavor, consider using edible glitter or tiny candy pearls to create a sophisticated look while still keeping it playful.
How to mix and match toppings
One of the best parts about making strawberry ice cream bars is how customizable they are. You don’t have to settle for just one topping—mix and match different options to create the ultimate treat. For example, you could top your ice cream bar with whipped cream, crushed cookies, and a sprinkle of rainbow sprinkles for a perfect combination of creamy, crunchy, and colorful.
Sometimes, I like to get a little creative and experiment with different combinations. I’ve even tried adding chopped nuts, a drizzle of caramel, or a dusting of cocoa powder to elevate the flavors further. You can always adjust the toppings based on your personal preferences and the flavors you’re in the mood for.
If you’re making these for a group, you can set up a topping station and let everyone customize their own bars. This way, each person can create a combination that suits their taste, whether they prefer something sweet, crunchy, or colorful.
Conclusion: Have fun with your toppings
Toppings are the fun part of creating strawberry ice cream bars. Whether you prefer the light fluffiness of whipped cream, the satisfying crunch of crushed cookies, or the colorful fun of sprinkles, there’s no wrong way to top your bars. The best part is that you can get creative and experiment with different combinations to elevate the flavor and texture of your dessert. Don’t be afraid to mix things up, and enjoy the process of making your strawberry ice cream bars unique and delicious.
Making it Healthier: A Quick Look at Alternatives
When making strawberry ice cream bars, it’s not only about taste but also about the quality of ingredients you use. For those who want a healthier treat, there are several alternatives to consider. Whether you’re aiming to reduce sugar, go dairy-free, or simply make a lighter version, these options can elevate your ice cream bars while keeping them delicious.
Sweetened Condensed Milk: A Rich Yet Lighter Option
One of my favorite ways to add a creamy base to my strawberry ice cream bars is by using sweetened condensed milk. It provides that rich texture without having to add a lot of sugar. What I love about sweetened condensed milk is how it balances sweetness naturally, meaning I can skip additional sugar altogether or reduce it.
I remember the first time I swapped in condensed milk—it made my bars so creamy and smooth without overwhelming them with sugar. It’s perfect for anyone who wants a rich dessert but is mindful of their sugar intake. This is a simple, healthier alternative to using heavy cream, and it gives a deliciously thick texture that’s hard to beat.
Dairy-Free Alternatives: Coconut or Almond Milk
For those avoiding dairy, there are easy and tasty swaps that work wonderfully for a strawberry ice cream bar. Coconut milk, especially the full-fat variety, creates a rich and creamy base that pairs perfectly with strawberry. When I want a tropical twist, I love using coconut milk. It gives my ice cream bars a smooth texture and a subtle coconut flavor that adds a bit of fun to the classic strawberry taste.
Almond milk is another fantastic option. It’s a bit lighter than coconut milk but still creamy enough to create a satisfying texture. I prefer using unsweetened almond milk to keep the sugar content low while maintaining that smooth consistency. This is especially useful if you want to keep things dairy-free and still get a delicious outcome.
Reducing Sugar: Natural Sweeteners and Fruit
I often try to cut back on sugar without sacrificing flavor. One simple trick is to use ripe, fresh strawberries as a natural sweetener. They not only add sweetness but also provide a burst of fruity flavor that shines through in the ice cream bars. The best part? You don’t need to rely on any added sugars.
On some occasions, I also use natural sweeteners like honey or maple syrup. These alternatives provide sweetness but with fewer refined sugars than regular table sugar. If you’re looking for something lower in calories, stevia or monk fruit can be excellent options, offering sweetness without the guilt.
Another favorite of mine is using mashed bananas as a sweetener. Bananas are naturally sweet and lend a creamy texture to the mixture. They help make the bars even more decadent, and I love the flavor they add. If you’re in the mood for something a bit more adventurous, try adding dates. They’re naturally sweet and a great source of fiber, which makes them a perfect alternative to processed sugar.
Why These Alternatives Work
Making healthier strawberry ice cream bars is easier than you might think. By using sweetened condensed milk for a creamy base, opting for dairy-free alternatives like coconut or almond milk, and reducing sugar with fresh fruit or natural sweeteners, you can still enjoy the rich flavors without compromising your health goals.
I’ve found that these healthier alternatives don’t just cut back on the calories; they make the ice cream bars taste even better. You’ll notice the difference with every bite. The key is to experiment with different ingredients and find what works best for your taste buds. And trust me, when you get it right, you’ll feel just as satisfied without all the extra sugar and cream.
How to Make the Perfect Strawberry Ice Cream Bar at Home
Step-by-Step Guide to Creating Your Own Strawberry Ice Cream Bars
Creating your own strawberry ice cream bars at home is a rewarding and fun process. The best part is you get to control the ingredients, making them exactly how you want! Let’s dive into the first step: preparing the strawberry ice cream base.
1. Gather Your Ingredients
Before you get started, it’s important to gather all the ingredients. For a creamy, flavorful strawberry ice cream base, you’ll need:
- Fresh, ripe strawberries
- Heavy cream or coconut milk (if you’re going for a dairy-free option)
- Whole milk (or almond milk for a lighter version)
- Sweetened condensed milk (for extra creaminess and a natural sweetness)
- Vanilla extract for flavor
- A pinch of salt to balance out the sweetness
Make sure the strawberries are fresh and fully ripe to ensure the best flavor.
2. Blend the Strawberries
The next step is to blend the strawberries into a smooth, purée. I always recommend using fresh strawberries for this step because they bring in the natural sweetness and vibrant color that makes the ice cream bars so appealing.
Start by washing and hulling the strawberries. Then, cut them into smaller pieces to make them easier to blend. You can use a blender or a food processor for this. Blend the strawberries until you have a smooth consistency. If you prefer a chunkier texture, you can blend them less and leave some small pieces.
Once blended, set the strawberry purée aside and get ready for the next step!
3. Prepare the Creamy Base
Now it’s time to create the creamy ice cream base. In a separate bowl, mix the heavy cream (or coconut milk) with the whole milk. Add the sweetened condensed milk, vanilla extract, and a pinch of salt. The sweetened condensed milk is key here, as it helps to give the ice cream a creamy, indulgent texture while naturally sweetening the base without needing to add too much sugar.
Using a hand mixer or whisk, beat the mixture for a couple of minutes until it thickens up a bit and becomes well-combined. You’ll notice that it will become smooth and velvety—just the texture you want for a perfect strawberry ice cream base.
4. Combine the Strawberry Purée and Cream Mixture
Once you have your creamy base ready, gently fold the strawberry purée into the cream mixture. Stir it in until the color is evenly distributed. You want the creamy base and the strawberry flavor to be well combined. This step is where you create that beautiful pink hue and ensure each bite of the ice cream bar is filled with the sweet strawberry flavor.
If you want a more intense strawberry flavor, you can add more purée. You can also adjust the sweetness by adding a bit more sweetened condensed milk or honey if you prefer a sweeter base.
5. Chill the Mixture
Before pouring your ice cream mixture into molds, it’s a good idea to chill it in the refrigerator for about 1–2 hours. Chilling it helps the mixture thicken a little more, which will result in a smoother texture when freezing. It’s important to give it this time, as it will make a noticeable difference in the final product. You can also skip this step if you’re in a hurry, but the texture might not be as rich.
6. Pour the Mixture into Molds
Once your base is chilled, pour it into ice cream molds. I prefer silicone molds for easy removal, but any molds will work. Make sure you leave a little space at the top for expansion as the ice cream freezes. If you want to add extra flavor or texture, feel free to drop in some crushed strawberries, chocolate chips, or even a swirl of fruit preserves at this stage.
Once the molds are filled, place them in the freezer for at least 4–6 hours, or overnight for the best results. You’ll know your ice cream bars are ready when the mixture is completely firm to the touch.
7. Remove and Serve
After the waiting period, carefully remove the molds from the freezer. To release the ice cream bars from the molds, I find running warm water around the outside of the mold for a few seconds helps. Gently pull them out, and there you have it—a homemade strawberry ice cream bar ready to enjoy!
Choosing the Right Mold for Your Homemade Strawberry Ice Cream Bars
When making your own strawberry ice cream bars at home, choosing the right mold is an essential part of ensuring a successful and easy experience. The mold not only impacts the shape of your bars but also plays a major role in the ease of removal and overall presentation. Let’s dive into some helpful tips for picking the perfect mold for your homemade strawberry ice cream bars.
1. Consider the Material of the Mold
The material of your ice cream bar mold will determine how easily your bars come out once they are frozen. Common mold materials include silicone, plastic, and stainless steel, and each comes with its own pros and cons:
- Silicone Molds: These are often the best option because they are flexible and non-stick, making it much easier to remove your ice cream bars once frozen. Silicone molds come in a variety of shapes and sizes, and they are heat-resistant, so you can run warm water around the outside to help release the bars if needed.
- Plastic Molds: These are usually more rigid than silicone molds and can sometimes make removal a little trickier. However, if you pick high-quality plastic molds, they can still offer a good result. It’s important to look for molds with a smooth finish to avoid any texture getting stuck to the ice cream.
- Stainless Steel Molds: If you’re looking for a more durable option, stainless steel molds are great. They tend to be sturdier, but they might not be as easy to work with when it comes to removal. They can also be a little harder to clean. Still, they’re a solid choice if you want a more premium mold that’ll last a long time.
I personally recommend using silicone molds because they combine flexibility, ease of use, and excellent non-stick properties, which make the whole process so much smoother.
2. Choose the Right Shape and Size
The shape and size of your mold are important not only for aesthetics but also for portion control. Do you want your ice cream bars to be tall, skinny, or more of a classic rectangular shape? Consider how you want them to look before making your choice.
- Classic Rectangle or Square: If you’re looking for the traditional ice cream bar shape, rectangular or square molds are the best. These shapes are easy to hold and look great when serving. You can find a variety of sizes in these shapes, so you can control how large or small your bars will be.
- Novelty Shapes: If you’re feeling adventurous, you can also find molds in fun shapes like stars, hearts, or even animals. These are great for kids or for a themed party, but they can be a little trickier to remove the ice cream from without damaging the shape.
The size of the mold also matters. Standard ice cream bars tend to be about 3 to 4 inches long, but if you want smaller or larger portions, there are molds available in various sizes. I recommend choosing a mold that suits your ideal portion size but also gives you room to work with, especially if you’re layering or adding mix-ins.
3. Look for Easy-to-Use Features
You’ll also want a mold that makes the entire process easier. Some molds come with built-in sticks, making it a breeze to insert the sticks and keep them evenly spaced throughout the bars. This eliminates the hassle of manually poking the sticks into the frozen ice cream. Some even have features that help keep the sticks centered, which ensures that each bar is evenly balanced.
If the mold doesn’t come with built-in sticks, consider buying wooden or plastic popsicle sticks separately. Make sure the sticks are long enough to reach the bottom of the mold to ensure the ice cream bar remains intact when you remove it from the mold.
Additionally, look for molds that are easy to clean. You’ll be dealing with melted ice cream, so the last thing you want is a mold that’s difficult to clean after each use. Silicone molds usually have an advantage here, as they are generally easier to rinse off and don’t require much scrubbing.
4. Check the Flexibility and Non-Stick Properties
Flexibility is key when it comes to getting your homemade strawberry ice cream bars out of the mold without damaging them. As mentioned earlier, silicone molds are the most flexible, allowing you to gently squeeze the sides of the mold and pop the ice cream bar out with ease. Plastic molds, on the other hand, may require a little more work to loosen the ice cream without damaging it.
To ensure easy removal, look for molds that have a non-stick coating. Molds with this feature help reduce the likelihood of your ice cream bars sticking to the sides, making the process less frustrating.
5. Consider the Number of Molds You Need
Lastly, consider how many ice cream bars you plan to make at once. If you’re making a large batch, choose a mold with several slots so you can make multiple bars at the same time. On the other hand, if you’re only making a few, a single-bar mold may be enough.
Many silicone molds come in sets of 4 to 6 slots, which is great for small batches. If you’re expecting to serve a crowd, investing in a larger mold set could save you time and effort. I always recommend having a few extra molds on hand just in case, especially if you’re making ice cream bars for a party or event.
Choosing the right mold for your homemade strawberry ice cream bars can make the entire process much more enjoyable and help ensure the end result is perfectly shaped and easy to serve. Keep these tips in mind when selecting your mold, and you’ll be on your way to creating beautiful, perfectly formed ice cream bars that will impress everyone!
Coating the Bars: Tips for a Crispy, Delicious Outer Layer
When it comes to making homemade strawberry ice cream bars, one of the most exciting parts is creating the perfect crispy, crunchy coating. A great coating not only enhances the flavor but also adds texture, taking your homemade strawberry ice cream bars to the next level. Whether you’re going for a sweet shortcake crumble, a crunchy cookie layer, or a rich chocolate covering, the right coating can make all the difference. Let’s dive into some tips for getting that perfect crispy outer layer.
1. Using a Crunchy Shortcake Crumble
A shortcake crumble is an excellent choice for a classic, sweet, and slightly buttery coating. This crumble adds a delicate texture and a bit of sweetness that pairs beautifully with the rich, creamy strawberry ice cream inside. Here’s how you can coat your bars with a shortcake crumble:
- Prepare the Crumble: To start, you’ll need shortcake or pound cake, which you can either make from scratch or buy pre-made. Break it up into small pieces or crumbs. If you prefer a finer texture, pulse the shortcake in a food processor until it’s small and uniform.
- Coating Process: Once you’ve prepared the crumble, place your ice cream bars on a tray lined with parchment paper. Gently roll the bars through the crumble, pressing lightly to ensure the crumble sticks. You can also sprinkle it on top if you’re looking for more of a decorative layer. Be careful not to press too hard, as you don’t want to crush the ice cream inside.
- Chill: After coating, place your bars back in the freezer for at least 30 minutes. This helps the crumble set and harden, ensuring that every bite of your ice cream bar has a satisfying crunch.
2. Coating with Crushed Cookies
If you want an extra layer of crunch and a burst of flavor, crushed cookies are an amazing option. Whether you choose chocolate cookies, graham crackers, or any of your favorites, crushed cookies add a sweet, crunchy contrast to the smooth ice cream.
- Select the Right Cookie: Choose cookies that are already crunchy and not overly soft or chewy. Classic chocolate sandwich cookies, like Oreos, or even simple sugar cookies work great. Crushed graham crackers are also a fantastic option if you’re aiming for a lighter, less sweet coating.
- Crushing the Cookies: Place the cookies in a ziplock bag and use a rolling pin to crush them into small pieces. You don’t want them too fine, so aim for a mixture of small chunks and crumbs to create a more textured coating. Alternatively, you can pulse the cookies in a food processor for a quicker method.
- Coating Process: Like with the shortcake crumble, you can roll the ice cream bars in the crushed cookies or press the pieces onto the surface. If you want the coating to stick well, you can also dip your ice cream bars in a thin layer of melted chocolate before rolling them in the crushed cookies. This ensures the crumbs stick perfectly and also adds another layer of deliciousness.
- Freeze Again: After coating your ice cream bars with the crushed cookies, freeze them once more for at least 30 minutes. This helps the cookie pieces adhere and harden, giving the bars a satisfying crunch when you bite into them.
3. Adding a Chocolate Layer
For those who love a rich, indulgent treat, chocolate is always a great option. A smooth chocolate coating can transform your strawberry ice cream bars into a decadent dessert that’s perfect for any occasion. Here’s how you can coat your bars with a chocolate layer:
- Choose the Right Chocolate: Select a good-quality chocolate for coating, such as milk chocolate, dark chocolate, or even white chocolate. You can also use chocolate chips or bars, which can be melted easily. If you’re looking for something sweeter, milk chocolate works great, while dark chocolate adds a bit of depth and richness.
- Melting the Chocolate: To melt your chocolate, you can either use a double boiler or microwave method. If using the microwave, heat the chocolate in short bursts, stirring after each interval until it’s smooth and melted.
- Dipping the Bars: Once your chocolate is melted, dip your ice cream bars into the warm chocolate, ensuring the entire surface is coated. You can use a spoon to drizzle chocolate over the top of the bars if you prefer a thinner layer.
- Adding Texture: For a bit of extra texture, consider sprinkling the chocolate coating with toppings like crushed nuts, sea salt, or even additional crumbles. This not only enhances the flavor but also adds visual appeal.
- Freezing to Set: After dipping in chocolate, return your bars to the freezer immediately. The chocolate will harden quickly, locking in that delicious coating and creating a smooth, glossy finish.
4. Tips for the Perfect Coating
- Chill Your Ice Cream Bars: Before you coat your ice cream bars, make sure they’re properly frozen. They should be firm enough that they won’t melt too quickly when you’re handling them, ensuring that the coating sticks properly.
- Layering: Don’t hesitate to layer your coatings. For example, coat the bars first with a layer of melted chocolate, then roll them in cookie crumbs or shortcake crumble. This adds both texture and flavor, giving your strawberry ice cream bars that extra-special touch.
- Work Quickly: Chocolate coatings can melt fast, so it’s important to work quickly once you dip your bars. If you need to, you can place the bars back in the freezer for a few minutes to harden the coating before finishing the rest of the bars.
- Use Room Temperature Ingredients: When adding toppings or drizzling with chocolate, make sure your toppings and chocolate are at room temperature. This prevents them from melting the ice cream too quickly.
By following these tips, you’ll be able to coat your homemade strawberry ice cream bars with a delicious, crispy, and perfectly textured outer layer. Whether you go for a shortcake crumble, a crushed cookie coating, or a smooth chocolate finish, your ice cream bars will be transformed into a treat everyone will love!
Freezing and Serving Your Strawberry Ice Cream Bars
When making strawberry ice cream bars at home, freezing and serving them the right way is key. These steps ensure you get the best texture and flavor. Let’s break down how to freeze and serve your homemade bars so they are as delightful as possible.
1. Freezing Your Strawberry Ice Cream Bars
After shaping your bars, freeze them properly for the best results. Here’s how:
- Initial Freezing: Once the mixture is in the molds, place them in the freezer for 4-6 hours or overnight. This will make sure they are solid and firm enough to be handled and eaten without melting too quickly.
- Freezer Protection: Wrap the bars in wax paper or plastic wrap. This will prevent freezer burn and keep them fresh. You can also place the bars in an airtight container for added protection.
- Separation: If you have many bars, avoid them sticking together. Use parchment paper between layers. This will ensure easy access when you want to grab one.
2. Storing Your Strawberry Ice Cream Bars
For long-lasting freshness, proper storage is a must:
- Airtight Containers: Store your bars in airtight containers or freezer-safe bags. This prevents them from absorbing other smells in the freezer. It also helps preserve their texture and flavor.
- Freezing Time: The bars can stay in the freezer for up to 2-3 weeks. After that, the texture might begin to degrade, so make sure to enjoy them within that time frame.
- Labeling: If you’re making multiple batches, labeling the container is a smart idea. It helps you track when they were made and ensures you use them before they lose quality.
3. Serving Your Strawberry Ice Cream Bars
Serving your strawberry ice cream bars the right way ensures the best texture and eating experience:
- Let Them Sit: Before serving, take the bars out of the freezer and let them sit for about 2-5 minutes. This will soften them slightly, making them easier to bite into without the ice cream being too hard.
- Sharp Knife for Cutting: If you need to cut the bars into smaller pieces, use a sharp knife. It helps avoid the ice cream sticking to the knife. A quick dip in hot water will also make cutting easier.
- Toppings: Add toppings like sprinkles, whipped cream, or crushed cookies just before serving. This will keep them fresh and crunchy rather than letting them soften while freezing.
4. Handling Leftovers
If you have leftover strawberry ice cream bars, here’s how to store them:
- Wrap and Store: Always re-wrap leftover bars in plastic or wax paper, then place them in an airtight container. This ensures they stay fresh and delicious for the next time you want to enjoy them.
- Serving Leftovers: When you’re ready to serve the leftovers, let them thaw slightly before eating. You can also cut them into bite-sized pieces and serve them with fresh toppings.
By following these simple steps, you’ll enjoy strawberry ice cream bars that stay fresh, have the right texture, and are a perfect treat every time!
Variations of Strawberry Ice Cream Bars You Can Try
Strawberry Shortcake Ice Cream Bars: A Twist on the Classic
Strawberry shortcake ice cream bars are the ultimate treat if you’re craving something that combines the best of both worlds: a refreshing ice cream bar with the indulgent flavors of a strawberry shortcake. This twist on the classic dessert is sure to elevate your homemade ice cream bars and impress everyone who tries them. Let’s explore how you can incorporate a shortcake layer for that timeless, irresistible flavor combo.
1. Preparing the Shortcake Layer
To begin, you’ll need to create the shortcake layer. It’s this buttery, crumbly layer that pairs perfectly with the creamy strawberry ice cream filling.
- Choose the Right Shortcake: Traditional shortcake biscuits or sponge cake are ideal for this layer. If you want a more homemade feel, you can easily make your own shortcake by combining flour, sugar, baking powder, butter, and milk. A store-bought version can also save time if you’re in a hurry.
- Crumble the Shortcake: Once your shortcake is ready, break it into small, bite-sized crumbles. You want it to be soft and slightly moist but not too soggy. A rough crumble is ideal, as it adds texture without overwhelming the ice cream.
- Layering the Shortcake: After preparing your strawberry ice cream mixture, pour it into your molds and sprinkle a generous layer of shortcake crumbs on top. Gently press it into the ice cream so it adheres well. This helps it stay intact when you coat the bars later.
2. Building the Perfect Strawberry Ice Cream Bar with Shortcake
Once the shortcake layer is set, it’s time to focus on the strawberry ice cream base:
- Strawberry Ice Cream: For a rich strawberry flavor, blend fresh strawberries, heavy cream, sugar, and vanilla extract. Make sure the mixture is smooth but with small chunks of strawberry to add texture. This will pair beautifully with the crumbly shortcake layer.
- Layering the Ice Cream: After adding the shortcake layer, carefully spoon your strawberry ice cream over it. You want the ice cream to cover the shortcake evenly but not to mix too much. This layering technique gives your ice cream bars that perfect shortcake crunch on the outside and creamy ice cream on the inside.
- Freezing: Freeze your ice cream bars until firm. The shortcake layer will soften slightly as it sets, but it will still provide that crunchiness you love from traditional strawberry shortcake.
3. Coating Your Strawberry Shortcake Ice Cream Bars
The final step in creating your strawberry shortcake ice cream bars is the coating:
- Chocolate Coating: After freezing, dip the bars in melted chocolate to give them a rich outer shell. For added texture, you can sprinkle more shortcake crumbs or crushed cookies on top of the chocolate before it sets.
- Shortcake Crumbs: For extra flavor, you can also press more shortcake crumbs into the chocolate coating for that extra burst of flavor in every bite.
- Nutty Variation: If you want to give your strawberry shortcake ice cream bars a nutty twist, sprinkle finely chopped almonds or pecans over the chocolate coating. The nuts will add another layer of flavor and texture to the bars.
4. Serving and Storing
- Serving: When you’re ready to serve your strawberry shortcake ice cream bars, allow them to sit out for a minute or two to soften slightly. This makes the ice cream easier to bite into, while still keeping its firm, satisfying texture.
- Storing: If you have any leftovers, store the bars in an airtight container in the freezer. They should last up to two weeks, although we doubt they’ll last that long!
By incorporating the shortcake layer into your strawberry ice cream bars, you get the best of both worlds: the fresh, creamy strawberry ice cream and the sweet, crumbly shortcake that elevates every bite. This twist on the classic dessert is perfect for any occasion and will quickly become a favorite in your household. Whether you’re serving it at a party or enjoying it as a treat on a hot day, your strawberry shortcake ice cream bars will surely be a hit!
Vegan Strawberry Ice Cream Bars: Making It Plant-Based
If you’re craving strawberry ice cream bars but need a vegan or dairy-free version, you’re in luck. Vegan strawberry ice cream bars can be just as creamy, rich, and delicious as their dairy-filled counterparts. By using plant-based alternatives like coconut milk or almond milk, you can create a treat that everyone can enjoy, regardless of dietary restrictions. Let’s dive into how you can make these creamy, dairy-free strawberry ice cream bars at home.
1. Choose Your Base: Coconut or Almond Milk
When making a vegan version of strawberry ice cream, the key is to select a good base that will mimic the richness of dairy-based ice cream. Coconut milk and almond milk are two of the best choices for creating a creamy, smooth texture in your bars.
- Coconut Milk: Coconut milk is an excellent choice for vegan ice cream because it’s naturally rich and creamy. The coconut fat helps to create a smooth, indulgent texture that’s similar to traditional heavy cream. You can opt for full-fat coconut milk for an even creamier base, but light coconut milk will work too if you’re aiming for a lighter treat.
- Almond Milk: If you’re not a fan of coconut, almond milk is another great option. It has a lighter, more neutral flavor, which makes it perfect if you don’t want the coconut taste to overpower the strawberries. Almond milk won’t be quite as creamy as coconut milk, but you can easily enhance the texture by adding a bit of cornstarch or using almond cream for more richness.
2. Blending the Strawberry Mixture
To create that vibrant strawberry flavor, you’ll need to blend fresh strawberries with your chosen plant-based milk. Here’s how you can do it:
- Strawberries: Start with fresh, ripe strawberries. If fresh strawberries are out of season, frozen strawberries will work just as well. Blend the strawberries until smooth, leaving some small chunks for added texture. If you prefer a sweeter ice cream, you can add a bit of maple syrup or agave to taste.
- Blending the Mixture: Combine your blended strawberries with the coconut or almond milk. For the best results, make sure you have a 2:1 ratio of strawberries to milk. This balance will ensure that the flavor of the strawberries shines through without being watered down by too much milk.
- Thickening the Mixture: To make sure the mixture sets properly, you can use a thickening agent like cornstarch or arrowroot powder. This will help replicate the creamy consistency of traditional ice cream without using dairy.
3. Adding Sweeteners and Flavor Enhancements
While strawberries are naturally sweet, adding a bit of sweetener can enhance the flavor and ensure a creamy texture. As you mix your strawberry puree with the coconut or almond milk, here’s what you can include:
- Sweetener: For a plant-based sweetener, you can use maple syrup, agave nectar, or coconut sugar. These alternatives will give your ice cream bars that balanced sweetness without any refined sugars. Adjust the sweetness to your liking.
- Vanilla Extract: A splash of vanilla extract can help deepen the flavor and add a warm, comforting note to your vegan strawberry ice cream. It also enhances the overall richness of the mixture.
4. Pour and Freeze the Ice Cream Bars
Now that your strawberry mixture is ready, it’s time to pour it into your molds and freeze it:
- Mold the Ice Cream Bars: Pour the strawberry mixture into your ice cream bar molds, making sure each mold is evenly filled. If you want to get creative, you can swirl some extra fruit or a bit of coconut milk to create beautiful marbled patterns in your ice cream bars.
- Freezing: Place the filled molds in the freezer and allow them to freeze for at least 4 to 6 hours or until they are firm. For the best results, leave them in the freezer overnight.
5. Coating Your Vegan Strawberry Ice Cream Bars
The next step is coating your vegan ice cream bars for that extra crunch and flavor. You can stick with a classic chocolate coating or try something new:
- Chocolate Coating: Melt some dairy-free chocolate (look for chocolate chips or bars that are labeled vegan) and dip your frozen bars into the melted chocolate. You can add a little coconut oil to the chocolate to make it more fluid and easier to coat.
- Optional Toppings: Once you dip your bars in chocolate, consider rolling them in crushed nuts, shredded coconut, or even a sprinkle of vegan shortbread crumbs. These toppings add texture and extra flavor to your bars.
6. Storing and Serving Your Vegan Strawberry Ice Cream Bars
Once your vegan strawberry ice cream bars are coated and fully frozen, it’s time to store them properly:
- Storage: Store the bars in an airtight container or individually wrapped in parchment paper in the freezer. They’ll stay fresh for up to two weeks, though they’re so delicious they might not last that long!
- Serving: When you’re ready to serve, let the bars sit at room temperature for about 5 minutes before enjoying them. This will make them easier to bite into, and you won’t have to deal with the cold, hard texture straight from the freezer.
Why You’ll Love Vegan Strawberry Ice Cream Bars
Vegan strawberry ice cream bars are the perfect way to enjoy a dairy-free dessert that doesn’t compromise on flavor or texture. Whether you’re avoiding dairy for health reasons or following a plant-based diet, these bars are a satisfying alternative. With the creaminess of coconut or almond milk, the sweetness of ripe strawberries, and the crunch of a chocolate coating, these homemade vegan ice cream bars will quickly become a family favorite. They’re simple to make, incredibly customizable, and an absolute treat to enjoy on a hot day.
Healthy Strawberry Ice Cream Bars: Lowering Sugar and Fat
If you’re looking to enjoy a delicious dessert without the guilt, healthy strawberry ice cream bars are the perfect solution. You can satisfy your sweet tooth without overloading on sugar and fat. By making a few simple swaps in ingredients, you can create a lighter version of this treat that is still rich in flavor and texture. Let’s explore how to make strawberry ice cream bars that are both healthier and just as delicious.
1. Use Fresh Ingredients for a Natural Sweetness
Instead of relying on refined sugars, which can lead to a spike in blood sugar levels and unnecessary calories, focus on using fresh, whole ingredients that naturally sweeten the ice cream bars.
- Fresh Strawberries: Fresh strawberries not only bring vibrant color to your ice cream bars but also provide natural sweetness. You can blend the strawberries into a smooth puree and use that as the base for your ice cream. If you’re looking for even more sweetness, you can add a small amount of honey or maple syrup to enhance the flavor.
- Sweetening Alternatives: If you need to add some extra sweetness without the empty calories, consider using natural sweeteners like stevia, monk fruit, or erythritol. These options can replace sugar without adding unwanted calories or spikes in blood sugar levels. They’re perfect for people who want a low-sugar dessert but still crave sweetness.
2. Choose a Lighter Base: Dairy-Free and Low-Fat Options
Traditional ice cream bars often rely on heavy cream or full-fat milk, but you can easily swap these for lighter, healthier alternatives without compromising the creamy texture.
- Low-Fat Yogurt: Greek yogurt or low-fat yogurt can serve as an excellent base. They provide a creamy consistency, and their tangy flavor complements the strawberries. Additionally, yogurt is a great source of probiotics, which can benefit your digestive health. Look for unsweetened varieties to avoid added sugars.
- Plant-Based Milk: Almond milk, cashew milk, or coconut milk are excellent choices for a low-fat base. These plant-based milks are naturally lower in fat compared to full-fat dairy milk and add a smooth texture to the ice cream bars. If you prefer something richer, opt for unsweetened coconut milk or almond milk with a bit of added creaminess from coconut cream or cashew cream.
- Coconut Yogurt: For those following a dairy-free or vegan lifestyle, coconut yogurt can be a great choice. It’s rich and creamy, with a slightly tropical taste that pairs well with strawberries. Choose a coconut yogurt without added sugar to keep the dessert healthy.
3. Reducing Fat: Skip the Cream, Go for Healthier Fats
When making healthy strawberry ice cream bars, it’s essential to cut down on unhealthy fats found in heavy creams or full-fat dairy products. Here are some healthier fat alternatives that will still give your bars a delicious texture:
- Avocado: Believe it or not, avocado can create a smooth and creamy texture for ice cream. It’s rich in healthy monounsaturated fats, which are good for heart health. Avocado also adds a mild flavor that blends well with the sweetness of strawberries, making it a perfect ingredient to reduce the fat content in your bars while maintaining their creamy consistency.
- Coconut Oil: If you want to use a small amount of fat for texture, consider incorporating coconut oil. It has healthy fats and a subtle coconut flavor that complements the strawberries. Just a tablespoon or two will do wonders to enhance the texture without making it too greasy.
4. Incorporate More Fiber for Satiety
Fiber is an important component to make your healthy strawberry ice cream bars feel more satisfying. Fiber helps keep you feeling full longer, which is great for preventing overeating.
- Chia Seeds: Chia seeds are an excellent source of fiber and omega-3 fatty acids. You can mix a tablespoon or two of chia seeds into the base mixture. As the chia seeds absorb the liquid, they will also help thicken the mixture while adding additional nutritional value.
- Flaxseed: Ground flaxseed is another great addition to your bars. It’s rich in fiber, antioxidants, and healthy fats. By adding a small amount of ground flaxseed, you can boost the nutritional profile of your strawberry ice cream bars.
5. Control Portion Sizes: Make Mini Bars
One of the most effective ways to enjoy a healthy dessert is to control portion sizes. Instead of making large bars, try making mini versions of your strawberry ice cream bars. This way, you can indulge in a smaller serving with fewer calories but still satisfy your cravings.
- Mini Ice Cream Bars: Using smaller molds or even ice cube trays, you can make bite-sized strawberry ice cream bars that are perfect for portion control. The smaller size means fewer calories, and you’ll be less likely to overeat.
- Serving Size Tips: If you’re making standard-sized ice cream bars, try cutting each bar into smaller pieces before serving. This helps control portion sizes and gives you a satisfying bite without going overboard.
6. Add Healthy Toppings for Extra Flavor and Nutrition
Toppings are a fun way to add variety to your strawberry ice cream bars. Choose healthy toppings that complement the flavor while adding more nutritional value.
- Fresh Berries: Top your ice cream bars with extra strawberries or other berries like blueberries, raspberries, or blackberries. These fruits are packed with antioxidants, vitamins, and fiber, making them the perfect addition to a healthy treat.
- Nuts and Seeds: Crushed nuts, such as almonds or walnuts, are a great option for adding a bit of crunch. They also provide healthy fats, protein, and fiber. A sprinkle of chia seeds or sunflower seeds can also add extra nutrients to your bars.
- Shredded Coconut: Unsweetened shredded coconut adds texture and a tropical flavor to your healthy ice cream bars. It’s low in sugar and a good source of fiber and healthy fats.
7. Freeze and Enjoy: Storing Your Healthy Strawberry Ice Cream Bars
Once your healthy strawberry ice cream bars are ready, freeze them until they’re firm, which should take about 4 to 6 hours. Make sure they’re stored in an airtight container to prevent freezer burn and maintain their texture. These bars can be stored for up to two weeks in the freezer, but I bet they won’t last that long!
Why You’ll Love Healthy Strawberry Ice Cream Bars
Healthy strawberry ice cream bars are the perfect balance of flavor and nutrition. By lowering the sugar, reducing the fat, and adding fiber, you can create a guilt-free dessert that satisfies your sweet cravings. Whether you’re making them for a family treat, a summer party, or just for yourself, these bars are a delicious and healthy alternative to traditional sugary ice cream. So go ahead, enjoy a refreshing, wholesome treat, and feel good about what you’re eating!
Adding Toppings for Extra Crunch: Nuts, Granola, and More
Toppings can elevate your homemade strawberry ice cream bars, transforming them from a simple treat into a more exciting and dynamic dessert. If you’re someone who loves that satisfying crunch with every bite, you’re in for a treat. By adding nuts, granola, or other crispy elements, you can easily enhance the flavor and texture of your strawberry ice cream bars. Let’s explore some creative and delicious ways to incorporate these crunchy toppings for an irresistible combination of sweetness and texture.
1. The Power of Nuts: Adding a Crunchy, Nutty Twist
Nuts are a fantastic way to introduce texture to your ice cream bars, while also adding some nutritional benefits. They bring healthy fats, protein, and crunch that pair beautifully with the creamy strawberry ice cream.
- Almonds: Slivered or chopped almonds are a popular choice. They offer a mild, slightly sweet flavor that complements the strawberries without overpowering them. Toasting the almonds beforehand can intensify their flavor and add an extra layer of crunch.
- Pistachios: If you want something a bit more unique, try using chopped pistachios. Their vibrant green color and distinct flavor make them a standout addition to strawberry ice cream bars. The texture is crunchy, and the nutty taste pairs perfectly with the sweet, fruity base.
- Walnuts: Chopped walnuts provide a rich, earthy flavor. They are particularly delicious when lightly toasted to bring out their full flavor. The texture adds a nice contrast to the smoothness of the ice cream.
- Cashews: For a creamier crunch, cashews are a great option. They’re slightly softer than other nuts but still add a delightful bite. Roasting them can bring out their sweet and nutty flavor, making them an ideal topping for a strawberry ice cream bar.
To add a twist, try mixing different nuts together. A combination of almonds, cashews, and pistachios creates a complex and exciting crunch, making each bite a little different.
2. Granola: A Crunchy, Sweet, and Nutritious Addition
Granola isn’t just for breakfast—it’s also a perfect topping for your strawberry ice cream bars. It’s typically made with oats, nuts, seeds, and sometimes dried fruit, offering both a sweet crunch and a lot of texture. Adding granola brings a hearty bite that complements the creamy ice cream base and balances out the sweetness.
- Classic Granola: Choose a traditional granola with oats and a mixture of seeds like sunflower or pumpkin seeds. The natural sweetness from the honey or maple syrup used in granola adds depth to the overall flavor of the ice cream bars.
- Chocolate Granola: If you’re craving something with a little extra indulgence, consider adding chocolate granola. The slight bitterness of the cocoa can cut through the sweetness of the strawberry ice cream, creating a balanced flavor profile. The chocolate chips also melt slightly, adding an extra layer of decadence.
- Homemade Granola: If you’re feeling adventurous, making your own granola is surprisingly easy. You can control the amount of sugar and add your favorite ingredients like cinnamon, coconut flakes, or dried fruit to complement the strawberry ice cream bars. A homemade touch also ensures that your granola is fresh and packed with flavor.
Granola adds both crunch and heartiness to your ice cream bars, making them feel more like a full dessert than just a frozen treat.
3. Coconut Flakes: A Tropical Crunch
Coconut flakes are another crunchy topping that pairs beautifully with strawberry ice cream bars. They add a slight sweetness and a tropical flair that complements the fruitiness of the strawberries. Plus, coconut is rich in fiber, healthy fats, and antioxidants, making it a delicious and nutritious option.
- Shredded Coconut: Unsweetened shredded coconut adds a chewy, slightly crisp texture to your ice cream bars. Its subtle sweetness is the perfect match for the rich flavor of strawberries.
- Toasted Coconut: Toasting shredded coconut in the oven for just a few minutes brings out its natural sweetness and nutty aroma. It’s a great topping for those who love an extra depth of flavor and an even crunchier texture. Toasted coconut can add a fun visual contrast, too, as it browns and crisps up around the edges.
- Sweetened Coconut: For a sweeter version, you can opt for sweetened shredded coconut, though be mindful of the added sugar content if you’re watching your intake. It will bring an additional touch of sweetness to balance the tartness of the strawberries.
The tropical taste of coconut also enhances the overall experience, especially when combined with the fruity sweetness of strawberries.
4. Pretzels: A Salty-Sweet Crunch
For a more unconventional yet addictive topping, consider adding crushed pretzels. The salty crunch is the perfect counterbalance to the sweet, creamy strawberry ice cream bars. The combination of salty and sweet is always a winning choice.
- Traditional Pretzels: Crushed traditional pretzels can be sprinkled over the bars just before freezing. Their crunch adds a delightful texture, and their slight saltiness enhances the sweetness of the strawberries.
- Honey Mustard Pretzels: For a bold twist, try using honey mustard pretzels. They combine sweetness with a tangy bite that adds complexity to the flavor profile of your ice cream bars.
Pretzels offer an unexpected but thoroughly enjoyable crunch that can elevate your ice cream bars to a whole new level.
5. Cereal: A Fun, Crunchy Addition
If you’re looking for something a bit more playful, try adding your favorite breakfast cereal to the mix. Cereal is often lightweight and crunchy, and it can add a touch of nostalgia to your dessert.
- Cornflakes: Light and crunchy, cornflakes are a classic choice. Their delicate crunch and neutral flavor allow the strawberry ice cream to shine while still adding texture.
- Cinnamon Cereal: For an extra burst of flavor, cinnamon cereal can bring a warm, spiced kick to your ice cream bars. It complements the strawberries in a way that’s both sweet and slightly savory, offering a balance of textures.
Cereal is an easy way to add crunch without complicating your topping choices, and you can select whichever variety suits your taste.
6. Combining Toppings for Extra Fun
Feel free to mix and match different toppings to create your perfect combination of flavors and textures. For example, a mixture of crushed almonds, granola, and a sprinkle of coconut flakes offers a delightful array of crunch and flavor. The more textures you combine, the more dynamic your ice cream bars will become.
If you love variety, offer different topping options for friends and family to choose from. Set up a little topping station with bowls of nuts, granola, pretzels, coconut, and cereal so everyone can create their own personalized strawberry ice cream bars. It’s a fun and interactive way to enjoy a treat.
Why Crunchy Toppings Make All the Difference
Adding crunchy toppings to your strawberry ice cream bars not only enhances the flavor but also adds a fun textural contrast. Whether you’re using nuts, granola, or a combination of both, these toppings offer a satisfying crunch with every bite. Experimenting with different textures can take your homemade strawberry ice cream bars from ordinary to extraordinary. So, get creative and enjoy the endless possibilities!
Why You’ll Love Strawberry Ice Cream Bars as a DIY Dessert
Perfect for All Ages: A Fun, Easy Treat for Everyone
Making strawberry ice cream bars is a delightful activity that can be enjoyed by everyone, regardless of age. Whether you’re a child, a teenager, or an adult, there’s something magical about crafting your own frozen treats at home. It’s a fun and creative way to bond with family members while indulging in a delicious, customizable dessert. Let’s explore why strawberry ice cream bars make the perfect treat for all ages and how this simple activity can bring everyone together.
1. A Simple Process That Anyone Can Enjoy
One of the reasons strawberry ice cream bars are so appealing to families is how easy the process is. Unlike complex baking projects that require advanced skills or a long list of ingredients, making strawberry ice cream bars is straightforward and doesn’t require any specialized tools or techniques.
Children can get involved in every step, from blending the strawberry base to dipping the bars in their favorite coatings. Of course, adults can assist with handling the more delicate aspects, such as pouring or freezing the bars, but the steps involved are simple enough for kids to participate without feeling overwhelmed.
This simplicity also makes it a great way for families to spend time together in the kitchen. Parents can supervise and guide their children through the process, while the kids enjoy getting their hands involved, mixing and preparing the treat.
2. Endless Customization for Different Tastes
Another reason why strawberry ice cream bars are a hit with all ages is their versatility. From the base to the toppings, the options are practically endless. Some family members might prefer a rich, creamy vanilla base with strawberry chunks, while others might opt for a lighter dairy-free version made with coconut or almond milk.
The toppings and coatings are another area where everyone can get creative. Whether you like a traditional chocolate coating, a crunchy shortcake crumble, or a sprinkle of nuts, each person can customize their bar to their exact preferences. This level of personalization means that everyone in the family can have a strawberry ice cream bar that’s uniquely theirs.
For the adventurous eaters, you could even try experimenting with different flavor combinations, such as adding a swirl of caramel, a dash of cinnamon, or some crushed cookies. This creative freedom ensures that everyone, from the pickiest eaters to the more daring ones, can have fun creating their own perfect ice cream bar.
3. A Creative and Fun Activity to Share
Making strawberry ice cream bars is more than just about the end result—it’s about the experience of creating something together. This activity encourages creativity and teamwork. Family members can work together to blend the ingredients, choose toppings, and coat the bars in fun and different ways.
For example, kids can take turns rolling the bars in crushed nuts, or they can design their own combinations of toppings, allowing them to express their creativity. Adults can participate by guiding the kids through the steps, teaching them about the process, or simply joining in on the fun. Whether it’s mixing the ingredients or decorating the bars with colorful toppings, everyone can contribute to the process.
Even the act of waiting for the bars to freeze can become part of the fun. While the ice cream bars are freezing, families can sit down together, chatting and anticipating the delicious treat they’ve made. It’s a shared moment of excitement, and the best part is that the reward—enjoying the strawberry ice cream bars—is just around the corner.
4. Perfect for Special Occasions or Everyday Treats
Whether you’re celebrating a special occasion or simply enjoying a summer afternoon, strawberry ice cream bars are a versatile treat. They’re perfect for birthday parties, family get-togethers, or even just a fun weekend activity. The process is simple enough for a last-minute treat, but the homemade touch makes them feel special.
For birthdays, you could even create themed strawberry ice cream bars by using fun toppings or colors to match a particular theme. If you’re hosting a party, a strawberry ice cream bar station where everyone decorates their own bars can be a big hit. It’s an interactive and delicious activity that’ll keep everyone entertained.
On the other hand, if you’re just looking to unwind at home, making these ice cream bars can be a calming and enjoyable way to spend time together. The act of preparing and eating the treat becomes a relaxing ritual that everyone can enjoy.
5. A Great Way to Teach Kids About Food
Making strawberry ice cream bars at home provides an excellent opportunity to teach kids about ingredients and the process of preparing food from scratch. It’s a great way to encourage healthy eating habits by involving them in choosing the ingredients, especially if you decide to use natural or organic items.
You can teach them about the benefits of using fresh strawberries, why certain ingredients are healthier options, and how to balance sweetness with other flavors. Not only will they learn about cooking and food, but they’ll also develop a deeper appreciation for the effort that goes into making their favorite treats.
Moreover, this hands-on experience may inspire a greater interest in cooking and healthy eating habits later in life. Kids are more likely to enjoy eating healthy foods when they’ve had the chance to prepare them themselves, so strawberry ice cream bars are a perfect way to introduce kids to the fun side of cooking.
6. A Treat That Brings Families Together
At the end of the day, making and enjoying strawberry ice cream bars is a family bonding experience. It’s not just about eating a frozen dessert; it’s about sharing moments, memories, and creativity. Whether you’re in the kitchen together making your treat or sitting down after dinner to enjoy the fruits of your labor, it’s an activity that encourages togetherness.
The simplicity of the task means no one feels excluded, and everyone can have a hand in making the treat special. And as you all sit down to enjoy your creations, you can relish in the knowledge that the strawberry ice cream bars you’re eating were made with care and love—and probably a few giggles along the way.
Final Thoughts
Strawberry ice cream bars are more than just a delicious dessert—they’re an activity that brings people together. Whether you’re a child or an adult, there’s something about crafting these frozen treats that makes the experience enjoyable for everyone involved. From the joy of choosing toppings to the fun of creating something together, strawberry ice cream bars are the perfect treat to share with family and friends. Plus, the result is a refreshing, customizable dessert that’s sure to satisfy every craving. So, gather your family, roll up your sleeves, and start making these tasty treats today!
Customizing to Your Taste: Endless Flavor Options
One of the best parts about making your own strawberry ice cream bars is the endless possibilities for customization. While the classic strawberry flavor is delicious on its own, there’s so much room to experiment and make your treat uniquely yours. Whether you’re a fan of bold flavors, chocolate lovers, or looking for fruity twists, the options for creating the perfect strawberry ice cream bar are limitless. Let’s explore how you can personalize your ice cream bars with other fruits, chocolate, and a variety of coatings to elevate the taste and texture.
1. Fruit Add-ins: A Burst of Freshness
If you’re a fruit lover, why stop at strawberries? Adding other fresh fruits to your ice cream bars can bring vibrant flavors and colors, taking your frozen treat to the next level. Consider adding diced mango, blueberries, raspberries, or even kiwi. These fruits can blend into your strawberry ice cream base for added texture and flavor, creating a more complex, fruity profile.
For a twist on the classic, you could make a mixed berry ice cream bar by blending strawberries with blueberries, blackberries, and raspberries. The contrast in flavors will add a refreshing balance that’s sure to delight. If you’re craving something tropical, try adding pineapple chunks or coconut shavings to give your ice cream bars a vacation vibe.
Don’t limit yourself to just one fruit—feel free to experiment with combinations. Strawberry and peach, or strawberry and banana, are tasty pairings that can turn your ice cream bar into something special. If you want a creamy fruit infusion, consider blending the fruits into a puree and folding them into the ice cream for a smooth, flavorful base.
2. Chocolate Lovers Rejoice: Adding Cocoa for a Rich Flavor
For those who love chocolate, there’s no shortage of ways to incorporate it into your strawberry ice cream bars. The combination of strawberry and chocolate is a classic that never fails to impress. You can start by dipping your ice cream bars in melted dark, milk, or white chocolate for a rich, indulgent coating that pairs beautifully with the fruity base.
If you’re craving more of a chocolatey crunch, you can roll your bars in chocolate chips or cocoa nibs after dipping them in the melted chocolate. These crunchy elements will not only enhance the texture but also give you that extra chocolate punch. You could also mix chocolate pieces into the ice cream base itself, creating a marble effect that adds both flavor and texture.
If you’re feeling adventurous, try experimenting with flavored chocolate, such as mint chocolate or salted caramel chocolate. These variations will infuse your ice cream bars with an unexpected, delightful twist that will appeal to anyone looking for a more indulgent treat.
3. Coatings and Crunchy Toppings: Texture is Key
The coating on your ice cream bars isn’t just for decoration—it adds a significant layer of texture and flavor. You can go beyond the typical chocolate shell and explore a variety of coatings and toppings that will elevate the experience.
For a simple yet satisfying option, try dipping your ice cream bars in crushed graham crackers or shortcake crumbles. This gives them a light, crunchy exterior with a sweet, biscuit-like flavor that complements the creamy ice cream inside. It’s a perfect way to add a bit of nostalgia to your homemade treat.
If you’re looking for something more decadent, a layer of crushed nuts—such as almonds, pistachios, or hazelnuts—can add a satisfying crunch while bringing out a nuttier flavor that balances the sweetness of the strawberry. Not only do they enhance the texture, but they also provide a nice contrast to the smooth, creamy ice cream.
For a fun twist, consider using candy coatings like crushed-up Oreos, colorful sprinkles, or even crushed pretzels for a salty-sweet combo. These toppings give your ice cream bars a playful look and extra crunch, making them the perfect treat for a party or family gathering.
4. Spice it Up: Unique Flavor Combinations
If you’re the type of person who enjoys a little kick or unique flavor combos, why not spice things up? Adding spices like cinnamon, ginger, or even cayenne pepper to your strawberry ice cream bars can result in unexpected and delightful flavor profiles. A pinch of cinnamon can add warmth and depth to the fruity sweetness of the strawberries, while a touch of ginger brings a zesty, fresh kick to the mix.
For those who enjoy a sweet-and-savory flavor profile, you can incorporate herbs like basil or mint to create a refreshing, herbaceous ice cream bar. Mint and strawberry are a timeless combo, but adding a hint of basil will bring a new, unexpected twist to the bar. The herbal notes provide a refreshing contrast to the sweetness of the fruit.
Additionally, you can try flavor infusions by adding extracts like vanilla, almond, or even orange. These extracts provide subtle layers of flavor that pair perfectly with the main fruit base, creating a more complex, satisfying taste.
5. Creating Vegan or Dairy-Free Options
If you or someone in your family follows a vegan or dairy-free diet, you can still enjoy the delicious world of homemade strawberry ice cream bars. The great thing about making ice cream bars at home is that you can tailor them to suit any dietary preferences.
For a dairy-free alternative, replace the cream and milk with coconut milk, almond milk, or oat milk. Coconut milk will give your ice cream bars a tropical, creamy texture that pairs wonderfully with strawberries. You can even add coconut shavings to the ice cream bars for a bit of extra texture.
If you’re craving something a bit more indulgent, you can use coconut cream to create a rich, velvety ice cream base. If you’re not into coconut flavors, almond or cashew milk work just as well for creating a smooth base with subtle nutty undertones. To sweeten your dairy-free bars, opt for maple syrup, agave nectar, or stevia, depending on your preference.
6. Going Sugar-Free: Healthier Alternatives Without Compromise
If you’re aiming to cut back on sugar, it’s easy to adapt your strawberry ice cream bars to a low-sugar or sugar-free version. Instead of using granulated sugar, opt for natural sweeteners like stevia, monk fruit sweetener, or erythritol. These options allow you to enjoy the sweetness of your ice cream bars without the added calories or sugar.
For a truly sugar-free dessert, you can use frozen strawberries or sweetened frozen fruit to maintain the sweetness without the need for added sugar. Additionally, make sure to choose coatings and toppings that are low in sugar, such as unsweetened dark chocolate or sugar-free crushed nuts.
Final Thoughts
Customizing your strawberry ice cream bars allows you to create a treat that perfectly fits your tastes and dietary needs. From adding fresh fruit and chocolate to experimenting with different coatings and toppings, there are endless flavor combinations to try. Plus, you can adapt the recipe to suit any preferences, whether you’re craving something indulgent, fruity, or healthier. The ability to make these ice cream bars your own is what makes them so much fun to prepare—and even more fun to eat! So, don’t hesitate to get creative in the kitchen and explore the many ways you can make your strawberry ice cream bars truly your own.
A Cost-Effective Alternative to Store-Bought Frozen Desserts
When it comes to satisfying your sweet tooth, strawberry ice cream bars are an undeniable favorite. But while store-bought options are convenient, making your own strawberry ice cream bars at home can offer not only a more personalized touch but also a cost-effective alternative. Let’s dive into a comparison between homemade and store-bought strawberry ice cream bars in terms of cost, taste, and quality to show you why making them yourself can be a better choice.
1. Cost Comparison: Homemade Versus Store-Bought
One of the most significant advantages of making your own strawberry ice cream bars is the cost savings. At first glance, buying pre-packaged ice cream bars may seem affordable, but the price can quickly add up, especially if you’re buying high-quality or premium brands.
When you make homemade strawberry ice cream bars, you have complete control over the ingredients you use. For a batch of homemade bars, you’ll need basic ingredients like strawberries, cream, sugar, and optional toppings. These ingredients are often available in larger quantities, which means you can use them for multiple batches. This allows you to stretch your grocery budget further, as many of the ingredients—like the strawberries and cream—can be used for other recipes as well.
On the other hand, store-bought ice cream bars usually come in small packs, and the cost per bar tends to be higher. If you’re feeding a family or hosting a gathering, the cost of purchasing several boxes of ice cream bars can easily exceed the price of buying the ingredients for multiple batches of homemade bars. In the long run, making your own ice cream bars is much more economical, especially when you buy ingredients in bulk.
2. Taste Comparison: Fresh, Customizable Flavor Versus Mass-Produced
While store-bought ice cream bars have their place for convenience, they often don’t compare in taste to homemade versions. The flavor of store-bought bars can feel artificial or overly sweet due to the preservatives, artificial sweeteners, and flavorings used to extend shelf life. Furthermore, you’re limited to the flavor profiles available at the store, which might not match your preferences exactly.
When you make strawberry ice cream bars at home, you can taste the difference right away. Fresh, ripe strawberries provide a natural sweetness and flavor that you simply can’t get from mass-produced desserts. The richness of the cream, the ability to adjust sweetness, and the option to add real vanilla or other natural ingredients all contribute to a more authentic, satisfying taste. Homemade strawberry ice cream bars let you tailor the flavor to your liking, ensuring every bite is fresh and delicious.
Additionally, homemade bars give you the freedom to experiment with other ingredients and flavors. You can swap out traditional cream for dairy-free alternatives, add extra chunks of fruit, or even mix in chocolate chips or candy pieces. This level of customization means you’re in full control of the flavor, texture, and sweetness of each bar.
3. Quality Comparison: Fresh, Natural Ingredients Versus Preservatives
Quality is another area where homemade strawberry ice cream bars shine. When you make your own ice cream bars, you can choose the best, freshest ingredients. You’ll know exactly what goes into your treats—no mystery chemicals, preservatives, or artificial colors. You’re free to pick organic strawberries, hormone-free dairy, or even opt for plant-based alternatives if you’re looking to cater to specific dietary needs.
In contrast, store-bought ice cream bars, even the ones marketed as “premium,” often contain preservatives and artificial ingredients to maintain freshness over extended periods on the shelf. These chemicals may extend shelf life, but they can affect the overall taste and texture of the ice cream. When you enjoy a homemade ice cream bar, you get a pure, unadulterated treat, free of any artificial additives or unnecessary fillers.
Even if you’re trying to keep your treats healthier, homemade ice cream bars can be easily modified. You can reduce sugar, use lighter dairy options, or explore vegan ingredients to fit your dietary preferences, all without compromising on taste or quality. With store-bought bars, you’re at the mercy of whatever ingredients the manufacturer has chosen.
4. Portion Control and Customization
When buying pre-made ice cream bars, you’re often stuck with whatever portion size comes in the box. Sometimes, these portions might feel too small to satisfy your cravings, or they may be larger than you’d like if you’re watching your portion sizes. With homemade strawberry ice cream bars, you have complete control over the size and shape of your bars. Whether you want mini-sized bars for a lighter snack or a large, indulgent bar for a decadent treat, you can adjust the recipe to fit your needs.
In addition, homemade bars allow you to control the texture and consistency. You can decide how firm you want the ice cream to be by adjusting the freezing time or ingredient ratios. Store-bought bars, on the other hand, typically come with the same texture and consistency in every package, which can sometimes feel too icy, too soft, or overly processed.
5. Fun and Involvement: A DIY Experience for All
Another key benefit of making strawberry ice cream bars at home is the fun and creativity involved in the process. This becomes especially true when you’re making the bars with friends or family. You can involve your kids in the process of dipping the bars in chocolate, rolling them in crushed nuts, or experimenting with various toppings. It’s a fantastic activity that adds a personal touch to your dessert, making it even more enjoyable to eat. The process of creating something from scratch is rewarding, and it offers a sense of accomplishment that store-bought bars simply can’t match.
Final Thoughts
In conclusion, making your own strawberry ice cream bars is a cost-effective, delicious, and rewarding alternative to purchasing store-bought frozen desserts. With the ability to customize flavors, control the quality of ingredients, and save money in the long run, homemade ice cream bars offer distinct advantages over their mass-produced counterparts. By choosing to make them yourself, you not only get to enjoy a treat that’s fresher and more natural, but you also get to personalize it exactly to your tastes. So, next time you’re craving a frozen dessert, consider skipping the store and making your own strawberry ice cream bars at home—it’s a decision your wallet, taste buds, and health will thank you for!
Impress Your Friends and Family with These Homemade Treats
I still remember the first time I made homemade strawberry ice cream bars. It was a sunny weekend, and we were hosting a casual get-together. I wanted to serve something unique, so I decided to try making ice cream bars from scratch.
The Surprise Element
When I served the bars, everyone was surprised. “You made these yourself?” They asked. Most of them were used to store-bought frozen desserts. However, when they took a bite, their reactions were priceless. The creamy strawberry ice cream and crunchy coating made for a perfect treat.
The best part was the toppings. I had different options ready—crushed cookies, chopped nuts, and even a drizzle of chocolate. People loved the chance to customize their bars.
A Fun, Interactive Experience
It wasn’t just about the dessert; it became a fun activity. Guests started trying different combinations of toppings. Some went for a classic chocolate dip, while others piled on the sprinkles. The bars were perfect for everyone, and it sparked conversation. People were genuinely impressed by how easy it was to make such a delicious treat.
The fun didn’t end there. My friends and family were asking for the recipe and tips on how to make their own strawberry ice cream bars. That made me feel proud of the dessert I had made. They appreciated the effort I put into making something so simple but delicious.
A Memorable Gathering
That day, the strawberry ice cream bars were more than just a dessert; they were an experience. The whole family enjoyed making their own unique combinations, and the dessert became a conversation starter. By the end of the gathering, everyone was asking for my homemade ice cream bar recipe.
Since that first gathering, I’ve made these bars for various occasions—birthdays, holidays, and casual hangouts. Each time, they are met with excitement and compliments.
Why This Dessert is Perfect for Any Occasion
The beauty of these homemade strawberry ice cream bars is in their versatility. They can be made in advance, leaving you with more time to enjoy with your guests. Whether you’re hosting a casual BBQ or a fancy dinner party, these bars are the perfect dessert.
Not only do they taste great, but they also offer a fun, interactive experience for everyone. The endless topping possibilities make them customizable for all ages. Whether you’re serving kids or adults, this treat is guaranteed to bring smiles to everyone’s face.
Making strawberry ice cream bars is easy and affordable, and it adds a personal touch to any event. So, the next time you’re hosting a gathering, think about serving these homemade ice cream bars. You’ll impress your friends and family and make lasting memories.
Frequently asked question
Strawberry shortcake ice cream bars are made with a creamy strawberry ice cream base, coated in crumbled shortcake or biscuit pieces. They’re typically flavored with fresh strawberries and vanilla. The crunchy coating contrasts perfectly with the smooth, rich ice cream, creating a delicious dessert.
Strawberry ice cream has a creamy, sweet flavor with a smooth texture, while strawberry vape flavors tend to be sweeter and more intense, with a candy-like taste. The ice cream is rich and indulgent, while the vape version is more fruity and sharp, lacking the creamy richness.
The outer layer of a strawberry shortcake ice cream bar is typically made of crumbled shortcake or biscuit pieces. This crunchy coating enhances the smooth, creamy ice cream inside, adding both texture and flavor. Some versions may also have a chocolate coating or nutty layer for extra crunch.
An ice cream bar usually consists of a creamy ice cream base, such as vanilla or strawberry, coated in a crunchy outer layer like chocolate, crushed cookies, or shortcake crumbles. Optional toppings like sprinkles or nuts may be added for extra flavor and texture.
Conclusion:
Creating a strawberry ice cream bar at home is a delightful experience. There’s nothing quite like biting into a creamy, fruity, and crunchy treat made by your own hands. With just a few simple ingredients, you can enjoy the perfect combination of strawberry ice cream and an exciting outer coating. As I’ve learned, these bars are so versatile, and you can easily tailor them to your tastes. Whether it’s with a chocolate coating, a shortcake crumble, or a sprinkle of nuts, the options are endless!
Making strawberry ice cream bars allows you to enjoy a guilt-free dessert when you control the ingredients. You can reduce sugar, choose dairy-free options, or make healthier alternatives without sacrificing the taste. In my experience, homemade strawberry ice cream bars are always a hit at gatherings, and they’re easy to prepare with a little creativity.
If you’re looking to expand your ice cream-making skills, I highly recommend trying out a delicious chocolate vanilla strawberry ice cream. For a foolproof guide, check out this recipe on how to make it at home: How to Make the Best Chocolate Vanilla Strawberry Ice Cream at Home. It’s a great way to elevate your dessert game.
In the end, strawberry ice cream bars are a perfect treat for any occasion. Whether you enjoy them as a fun family activity or as a refreshing dessert, they’re sure to please everyone. So, get creative and start making your own strawberry ice cream bars today!

Strawberry Ice Cream Bars
Equipment
- Mixing bowl
- Hand blender or food processor
- Ice cube tray or popsicle molds
- Silicone spatula
- Freezer-safe container
- Measuring spoons
Materials
- 2 cups fresh strawberries hulled and chopped
- 1 cup heavy cream
- 1 cup whole milk
- ½ cup granulated sugar
- 1 tsp vanilla extract
- 1 tablespoon lemon juice optional
Instructions
Prepare the Strawberry Puree:
- In a blender or food processor, combine the fresh strawberries and lemon juice (optional). Blend until smooth, and then set aside.
Make the Ice Cream Mixture:
- In a mixing bowl, whisk together the heavy cream, whole milk, sugar, and vanilla extract until the sugar is dissolved and the mixture is smooth.
Combine the Strawberry Puree with the Ice Cream Mixture:
- Gently fold the strawberry puree into the ice cream mixture using a silicone spatula. Swirl the strawberry puree throughout for a marble effect, leaving some strawberry chunks for texture.
Fill the Molds:
- Pour the mixture into ice cube trays or popsicle molds. Tap the molds gently to remove any air bubbles. If you want to add more texture, you can swirl a little extra puree on top before freezing.
Freeze:
- Place the filled molds in the freezer and let them freeze for at least 4 hours or until solid.
Unmold and Serve:
- Once fully frozen, carefully remove the bars from the molds. Serve immediately, or store in a freezer-safe container for later enjoyment.
Notes
Add chocolate chips or a drizzle of melted chocolate on top of the bars after un-molding for a fun twist.
These bars can be customized with other fruit flavors like blueberries or raspberries for variation.
2 thoughts on “How to Make a Delicious Strawberry Ice Cream Bar at Home”