

Rising recipes hold the secret to perfect baked goods. Whether you’re baking a loaf of fluffy bread or crafting soft dinner rolls, the key to achieving light, airy textures lies in the rise. Mastering rising dough recipes lets you create bakes that are not only delicious but have the perfect texture.
In this post, we will explore five rising recipes that will elevate your baking. These recipes are simple to follow and will help you create perfect dough every time. Learn tips for managing yeast, proofing, and shaping dough to achieve a flawless rise. With these rising recipes, you’ll soon be able to bake like a pro and impress friends and family with soft, fluffy bread and pastries.
1. Classic Yeast Bread: The Perfect Rising Recipe
Understanding Yeast: The Key to a Perfect Rise
Yeast is the secret behind most rising recipes. It ferments the sugars in your dough, producing carbon dioxide gas. This gas causes the dough to rise, giving it a light and fluffy texture.
There are two main types of yeast: active dry yeast and instant yeast. Both types help your dough rise, but they behave a bit differently in the baking process.
Active Dry Yeast
Active dry yeast is the most common choice in home baking. It comes in granules that need activation before use. To activate it, dissolve the yeast in warm water (about 100°F to 110°F). After a few minutes, it will start bubbling, signaling it’s ready to rise.
Instant Yeast
Instant yeast, also known as fast-acting yeast, doesn’t need activation. You can mix it directly into your dry ingredients. It’s finer and more concentrated than active dry yeast, and it works faster.
Choosing the Right Yeast
If you have more time and want a slower rise, go with active dry yeast. If you need a quicker rise, instant yeast is a great option. Both types will give your dough the perfect rise if used correctly.
Step-by-Step Instructions: Making Fluffy, Risen Bread Dough
Making fluffy, risen bread dough doesn’t have to be difficult. With a few simple steps, you can achieve soft, airy bread every time. Follow these easy instructions for a perfect rise.
1. Mix Your Ingredients
Start by combining your dry ingredients. In a large bowl, mix your flour, salt, and sugar. Add the yeast to the flour mixture. If you’re using active dry yeast, be sure to activate it in warm water first. If you’re using instant yeast, you can mix it directly with the dry ingredients.
2. Add Wet Ingredients
Next, add your wet ingredients. Pour in warm water (about 110°F) and oil. The water should feel warm to the touch but not too hot. Stir everything together until a dough begins to form. If the dough feels too dry, add a small amount of water, one tablespoon at a time. If it’s too sticky, add a bit more flour.
3. Knead the Dough
Kneading is key to developing the gluten that gives bread its structure and texture. Turn your dough out onto a floured surface. Push down on the dough with the heel of your hand, fold it over, and repeat the process. Knead for about 8-10 minutes until the dough is smooth and elastic. If the dough sticks to your hands, dust your fingers lightly with flour.
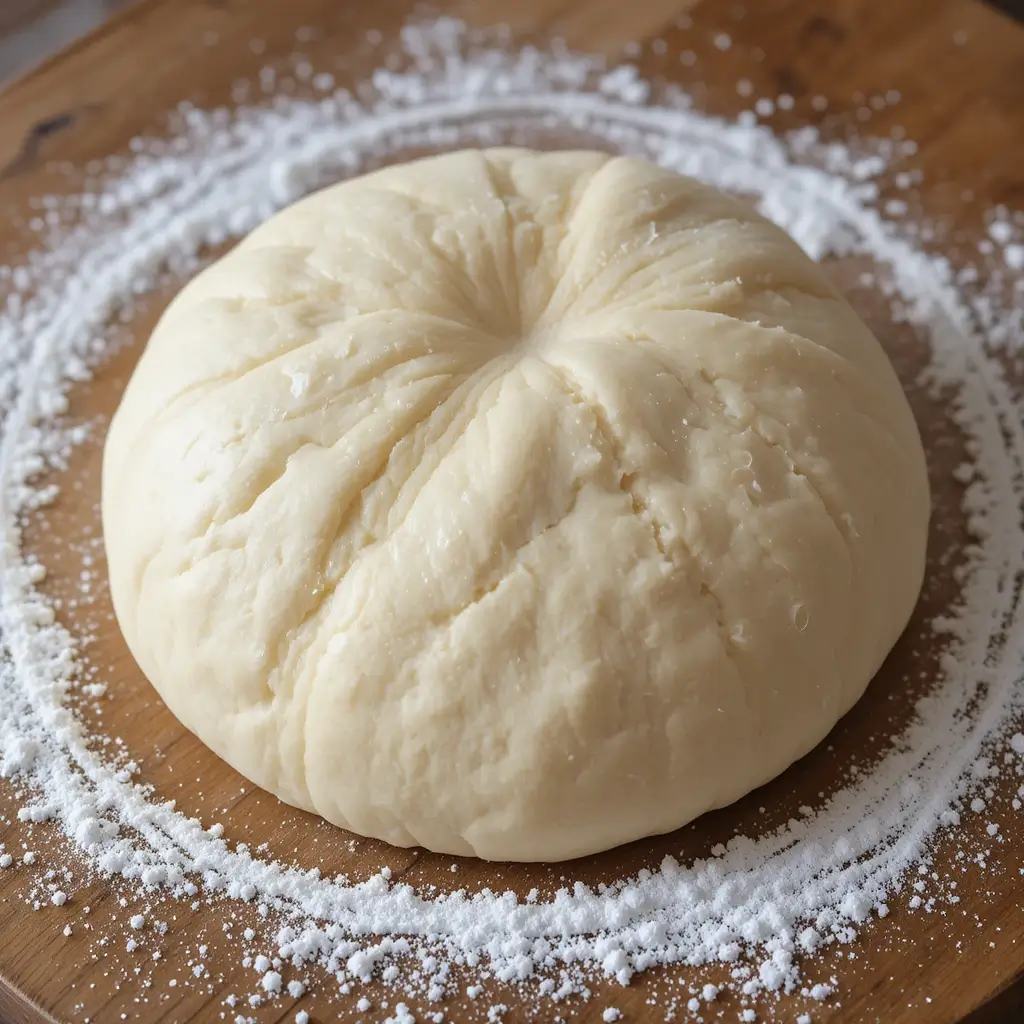
4. Let the Dough Rise
Place the kneaded dough in a lightly oiled bowl. Cover it with a clean kitchen towel and let it rise in a warm place. The dough should double in size within 1-2 hours. For a faster rise, place it in a slightly warmed oven. Don’t rush this step—letting the dough rise properly ensures it will be fluffy when baked.
5. Punch Down and Shape the Dough
Once the dough has doubled in size, punch it down to release the air bubbles. Turn it out onto a floured surface and shape it into a loaf or divide it into rolls. The shaping process helps create even rises during baking.
6. Final Rise
After shaping, place the dough in a greased pan or on a baking sheet. Cover it again with the towel and let it rise for another 30-60 minutes. The dough should puff up and fill the pan. This final rise ensures the bread will be light and fluffy.
7. Bake the Bread
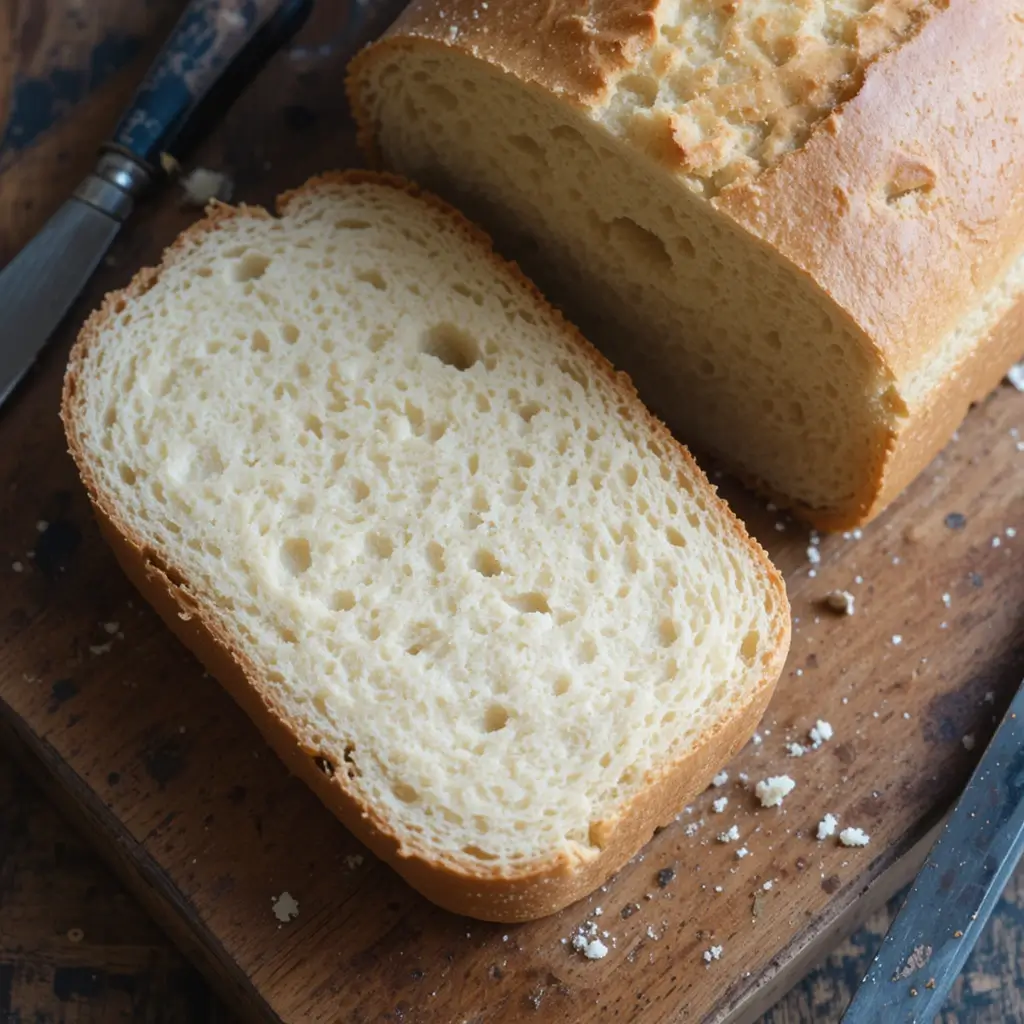
Preheat your oven to 375°F (190°C). Once the dough has finished its final rise, bake it for about 25-30 minutes. The bread will sound hollow when tapped on the bottom, which means it’s done. Let it cool on a wire rack before slicing.
Common Mistakes to Avoid: Ensuring the Perfect Rise
Achieving the perfect rise in your dough requires attention to detail. While it’s easy to get excited about your baking, certain mistakes can affect your results. Avoiding these common errors will help you create a light, airy texture every time.
1. Over-Proofing the Dough
One of the most common mistakes when making rising recipes is over-proofing the dough. Proofing is the process where the dough rises after kneading, and it’s critical for creating that fluffy texture. If the dough is left to rise for too long, the yeast will exhaust itself, and the dough may deflate once shaped. Over-proofed dough can lead to dense, flat bread.
To avoid over-proofing, monitor the dough as it rises. It should double in size, but it’s important not to wait too long after it has reached this point. If you notice that the dough starts to lose its puffiness or collapses when touched, it’s a sign it’s been over-proofed.
2. Under-Kneading the Dough
Kneading is essential for developing the gluten structure that gives bread its chewy texture. If you don’t knead the dough enough, it will lack the elasticity needed for a good rise. Under-kneaded dough won’t stretch properly, resulting in a dense, heavy loaf instead of a light, fluffy one.
To avoid this mistake, knead the dough for about 8-10 minutes until it becomes smooth and elastic. You should be able to stretch the dough without it tearing. If it’s too sticky or doesn’t bounce back when pressed, keep kneading until it reaches the right consistency.
3. Using Water That’s Too Hot or Too Cold
The temperature of the water you use to activate the yeast can make a huge difference in the rise. Water that’s too hot can kill the yeast, while water that’s too cold won’t activate it properly. Either way, the yeast won’t work as effectively, and your dough won’t rise as it should.
To avoid this, use water that’s between 100°F and 110°F for activating yeast. If you don’t have a thermometer, test the water by feeling it with your finger. It should feel warm but not hot.
4. Not Letting the Dough Rest After Kneading
After kneading, it’s crucial to let the dough rest and rise in a warm place. Skipping this step can prevent the dough from developing its full potential. Some bakers try to rush the process by baking the dough too soon, resulting in dense bread that lacks air pockets.
Be patient and allow the dough to rise until it doubles in size. A warm, draft-free environment will help the yeast do its job. A good trick is to place the dough in a slightly warm oven with a bowl of hot water next to it to maintain the ideal temperature.
5. Using Too Much Flour
While it’s important to add enough flour to prevent your dough from sticking, too much flour can make your bread dry and dense. Over-flouring the dough can prevent the yeast from working effectively, resulting in a heavy loaf.
When adding flour, do so gradually. Only add enough to keep the dough from sticking to your hands or work surface. The dough should be soft but not overly sticky. If you feel like you’ve added too much flour, you can always add a small splash of water to bring it back to the right consistency.
Avoiding these common mistakes will ensure you create the best rising dough possible. Remember, patience and attention to detail are key. By following the steps carefully and avoiding these pitfalls, you’ll be on your way to baking fluffy, delicious bread every time. Happy baking!
2. Fluffy Homemade Pizza Dough
Choosing the Right Flour: Bread Flour vs. All-Purpose Flour
The type of flour you use can significantly affect the texture, structure, and overall quality of your baked goods. When making rising recipes, particularly breads, choosing the right flour is crucial. While all-purpose flour works in many recipes, bread flour is often the better choice when you’re aiming for that perfect rise and chewy texture.

All-Purpose Flour: Versatile but Less Protein
All-purpose flour is the most common flour found in kitchens. It’s a blend of high and low-protein wheat and works well for a wide range of baked goods. You can use it for cakes, cookies, muffins, and even bread in a pinch.
However, when making rising recipes like bread, all-purpose flour may not give you the same results as bread flour. All-purpose flour contains less protein than bread flour. The protein content is important because it helps form gluten, the structure that gives bread its chewy texture and allows it to rise properly. If you use all-purpose flour, your bread may not rise as high, and the texture might be softer and less chewy than you’d like.
Bread Flour: Higher Protein for a Better Rise
Bread flour, on the other hand, is specifically designed for bread-making. It has a higher protein content (typically around 12-14%) compared to all-purpose flour, which typically contains 9-12% protein. This increased protein helps develop more gluten when the dough is kneaded, which contributes to a stronger, more elastic dough. A stronger dough means better structure for your rising recipes, leading to a higher, fluffier loaf.
The additional gluten strength from bread flour allows the dough to trap air better as it rises. This results in a light, airy texture in the final baked product. Bread flour is perfect for recipes that require a long rise or a chewy, hearty texture, such as artisan loaves, pizza dough, and baguettes.
When to Use All-Purpose Flour
While bread flour may yield the best results for rising recipes, there are times when all-purpose flour can work just fine. If you’re in a pinch and don’t have bread flour, you can use all-purpose flour, but keep in mind that the texture may be slightly different. For everyday, quicker breads (like no-knead bread or simple dinner rolls), all-purpose flour can still produce a good result.
Some bakers even like to mix all-purpose flour and bread flour to balance texture and ease of handling. For instance, if you’re looking for a slightly softer crumb but still want some chew, a 50/50 mix of all-purpose and bread flour can be a great compromise.
Other Types of Flour for Special Recipes
There are other types of flour you can experiment with, depending on the recipe you’re working on. For example:
- Whole Wheat Flour: Contains more fiber and nutrients, but it absorbs more liquid than white flours. It can result in denser, heavier bread unless mixed with all-purpose or bread flour.
- Rye Flour: Often used in rye bread recipes, it has a lower gluten content than wheat flour and produces denser, more moist loaves.
- Gluten-Free Flours: If you’re making gluten-free rising recipes, be sure to use a specific blend of gluten-free flours designed for baking, as they behave quite differently from traditional flours.
Choosing the right flour can be the difference between a light, fluffy loaf and a dense, heavy one. For best results, opt for bread flour when making rising recipes that require structure and chewiness. It will help your dough rise higher and create that perfect texture you’re after.
Proofing the Dough: Tips for the Perfect Rise
Proofing is one of the most critical steps in making rising recipes. This is the process where the yeast ferments the dough, causing it to rise and expand. Proper proofing gives bread its airy texture and volume, so getting it right is essential. Here are some tips to ensure your dough proofs correctly for that perfect rise.
1. Choose the Right Temperature
Yeast thrives in a warm environment, but it’s important to strike the right balance. If the temperature is too low, the yeast will be sluggish and take much longer to rise. If it’s too hot, the yeast may die, causing your dough to fail.
The ideal temperature for proofing dough is between 75°F and 85°F (24°C to 29°C). To create this environment, place the dough in a warm, draft-free area. Avoid areas that are too hot, like next to a stove or in direct sunlight. A simple trick is to place the dough in an oven with just the light on, or on top of the refrigerator where heat is naturally radiated. Alternatively, you can place a bowl of hot water in the oven to maintain a gentle warmth.
2. Cover the Dough to Retain Moisture
Covering the dough is essential for creating a proper proof. If the dough is exposed to air, it will dry out and form a crust on top, which can prevent it from rising properly. Use a clean, damp kitchen towel or plastic wrap to cover the dough. This helps retain moisture and creates the right conditions for the dough to expand.
If you’re using a plastic wrap, make sure it doesn’t touch the dough directly, as it may stick during the rise. You can also use a lid if you’re proofing the dough in a bowl or container.
3. Allow Enough Time for the Dough to Rise
While it might be tempting to rush the process, giving your dough enough time to rise is key to achieving the best texture. The dough should double in size, which usually takes between 1 to 2 hours, depending on the type of yeast used and the ambient temperature.
For slower rises, you can refrigerate the dough. Cold proofing can take anywhere from 8 hours to overnight, but this method helps develop deeper flavors. If you’re working on a tight schedule, though, a warm rise will give you quicker results.
4. Don’t Overproof the Dough
Overproofing happens when dough rises for too long. The yeast exhausts its food supply, which causes the dough to lose its structure and collapse. Overproofed dough will have a weak texture and can lead to bread that’s dense or deflated when baked.
To avoid overproofing, monitor the dough during the rise. It should double in size, and you can perform the “poke test” to check if it’s ready. Gently poke your finger into the dough. If the indentation remains and doesn’t bounce back, the dough is fully proofed. If it springs back too quickly, it needs more time. Also if it doesn’t spring back at all, it may have overproofed.
5. Check for Proper Dough Texture
As your dough rises, it’s important to pay attention to the texture. The dough should feel soft and elastic, not sticky or too dry. If the dough feels sticky, you can add a little more flour, but be careful not to add too much, as this can affect the texture and rise. If it feels too dry, add a small splash of water to achieve the right consistency.
When you punch down the dough after the first rise, it should deflate slightly but still have a smooth, soft feel. At this stage, you can shape it and allow it to rise again during the second proofing, which is usually shorter than the first rise.
6. Be Patient During the Final Proofing
The final proofing is just as important as the first rise. After shaping your dough, it will need another short rise to allow it to puff up before baking. This second rise usually takes 30 to 60 minutes, depending on the recipe. The dough should rise to the top of the pan or look visibly puffed when ready to bake.
Proper proofing is the key to achieving a perfect rise. By choosing the right temperature, allowing enough time, and watching carefully for signs of overproofing, you’ll ensure your dough gets the structure and texture it needs. Whether you’re making a rustic loaf or soft dinner rolls, mastering proofing will help your rising recipes shine.
Quick Pizza Dough Variations: Fast-Rising Options for Busy Bakers
Sometimes you need a pizza dough recipe that’s quick, easy, and delivers great results without the long waiting times. Whether you’re craving homemade pizza on a busy weeknight or you need a faster alternative for your rising recipes, these quick pizza dough variations will give you the perfect rise in less time. Here are some great options to consider for a fast and flavorful pizza dough.
1. No-Yeast Pizza Dough
If you’re in a pinch and don’t have yeast on hand, no-yeast pizza dough is a great alternative. This dough doesn’t require any rise time, making it a true time-saver. It uses baking powder as a leavening agent instead of yeast, which causes the dough to rise quickly and gives it a soft, tender texture.
How to Make It:
- Mix 2 cups of all-purpose flour, 1 tablespoon of baking powder, 1 teaspoon of salt, and 3/4 cup of warm water.
- Add 2 tablespoons of olive oil and stir until a dough forms.
- Knead for 3-5 minutes to ensure the dough is smooth and elastic.
- Roll out immediately and top with your favorite pizza ingredients.
- Bake at 475°F (245°C) for about 12-15 minutes until golden and crispy.
This quick dough will give you a delicious crust, though it may have a slightly different texture than traditional yeast-based dough. However, it’s a perfect option when you’re short on time but still want a fresh, homemade pizza.
2. Quick-Rise Yeast Pizza Dough
For those who prefer traditional yeast pizza dough but don’t have time for the long rise, quick-rise yeast is the answer. Quick-rise (or fast-acting) yeast works faster than regular active dry yeast, cutting down the proofing time. This yeast helps the dough double in size in about 30 minutes, which is much faster than the usual 1-2 hours.
How to Make It:
- In a bowl, mix 2 1/4 teaspoons of quick-rise yeast, 1 teaspoon of sugar, and 1 1/4 cups of warm water.
- Let it sit for 5 minutes until the yeast becomes bubbly.
- Stir in 3 cups of all-purpose or bread flour, 2 tablespoons of olive oil, and 1 teaspoon of salt.
- Knead the dough for 5-7 minutes until smooth.
- Allow the dough to rise for 30 minutes, then roll out and top with your favorite ingredients.
- Bake at 475°F (245°C) for 10-12 minutes.
Using quick-rise yeast will help you skip the longer proofing time, making this dough perfect for a speedy pizza-making experience.
3. 5-Minute Pizza Dough
For the quickest rise, consider trying a 5-minute pizza dough recipe. This dough requires no yeast at all and is mixed together in minutes, making it a super convenient option for last-minute pizza cravings. It uses self-rising flour, which already contains baking powder and salt, allowing you to skip the yeast and rise time entirely.
How to Make It:
- Combine 2 cups of self-rising flour, 1/2 teaspoon of salt, and 1 tablespoon of olive oil in a large bowl.
- Gradually add 3/4 cup of warm water and stir until a dough forms.
- Knead the dough for about 1-2 minutes until it’s smooth.
- Roll out and top with sauce, cheese, and your favorite toppings.
- Bake at 475°F (245°C) for 10-12 minutes until the crust is golden and crisp.
This ultra-fast dough doesn’t need any waiting time, and it results in a soft, slightly thicker crust that’s still wonderfully tasty.
4. Flatbread Pizza Dough
Another quick option is using flatbread dough for your pizza base. Flatbread dough often requires a shorter resting period, allowing you to make pizzas with minimal prep time. It’s a great option if you’re looking for a thinner, crispier crust.

How to Make It:
- Mix 2 cups of all-purpose flour, 1 teaspoon of salt, 1 teaspoon of sugar, and 1 teaspoon of baking powder in a bowl.
- Stir in 3/4 cup of warm water and 2 tablespoons of olive oil.
- Knead the dough for 3-4 minutes until smooth.
- Roll out thinly and cook on a hot baking sheet or skillet for 2-3 minutes on each side before adding your pizza toppings.
- Bake at 400°F (200°C) for about 7-8 minutes.
This pizza dough will give you a crisp, thin base, and the best part is it doesn’t require any rising or proofing time.
5. The 1-Hour Pizza Dough
For a traditional pizza dough that’s ready to go in just an hour, you can use a simple trick: let the dough rise in a warm oven. Using active dry or instant yeast, this dough will rise quickly, giving you a homemade pizza crust in about an hour.
How to Make It:
- Combine 2 teaspoons of active dry yeast, 1 teaspoon of sugar, and 1 1/4 cups of warm water in a bowl.
- Let it sit for 5-10 minutes until foamy.
- Stir in 3 cups of all-purpose flour, 1 teaspoon of salt, and 2 tablespoons of olive oil.
- Knead for 5-7 minutes until the dough is smooth.
- Place the dough in a lightly oiled bowl and cover it with a damp towel. Let it rise in a warm place for 45 minutes to 1 hour.
- Roll out the dough, top it, and bake at 475°F (245°C) for about 10-12 minutes.
This version provides the full flavor of a yeast dough without the long wait time.
Conclusion: With these quick pizza dough variations, you can make delicious pizza from scratch in a fraction of the time. Whether you’re using a no-yeast dough, quick-rise yeast, or even flatbread as your base, you’ll have a perfect pizza in no time. Try these variations next time you’re craving pizza but need something fast and easy. Happy pizza making!
3. Delicious Soft Dinner Rolls: Rising Made Easy
What Makes Dinner Rolls Soft? Understanding the Role of Yeast, Kneading, and Resting Times
Soft, fluffy dinner rolls are the epitome of comfort food, and achieving that light, pillowy texture requires careful attention to three key factors: yeast, kneading, and resting times. Each of these elements plays a crucial role in creating that perfect, melt-in-your-mouth texture. Here’s how they all come together to make your dinner rolls irresistibly soft.
1. Yeast: The Secret to Softness
The Yeast is the magic ingredient that makes dinner rolls rise and become soft. Yeast is a living organism that feeds on sugar and produces carbon dioxide gas as it ferments. This gas gets trapped in the dough, causing it to expand and form the light, airy structure we love in soft rolls.
The yeast also helps break down starches in the dough, which makes it more tender. Using the right type of yeast—either active dry yeast or instant yeast—is important for the best results. Yeast needs warmth to activate, so it’s crucial to use water that’s not too hot or too cold (around 100°F to 110°F or 37°C to 43°C). This ensures the yeast gets to work without being killed or failing to activate.
2. Kneading: Developing Gluten for Soft Texture
Kneading is an essential step in making soft dinner rolls. As you knead the dough, you’re developing gluten, which gives the dough structure and elasticity. Gluten is a protein found in wheat flour that forms a network of strands when kneaded. This network traps the gas produced by the yeast, helping the dough rise and hold its shape.
Kneading the dough properly also affects the texture of the rolls. Over-kneading can result in a tough texture, while under-kneading may cause the dough to be too loose and sticky, making it hard to shape. Knead the dough until it’s smooth and elastic, but don’t overdo it. A good way to check if the dough is ready is to stretch a small piece between your fingers. If it stretches without tearing, it’s ready to rest.
3. Resting Times: Allowing the Dough to Relax and Rise
Resting is just as important as kneading when it comes to achieving soft dinner rolls. After kneading, the dough needs time to rise. This is when the yeast works its magic and causes the dough to expand. Resting allows the gluten to relax, giving the dough the ability to rise freely and evenly.
There are typically two resting periods in bread-making: the first rise and the second rise. The first rise occurs after kneading, and the dough should be left to rest for about 1-2 hours, or until it doubles in size. The second rise happens after shaping the dough into rolls, and it usually takes around 30-45 minutes. This final rise ensures that the rolls are light and airy when baked.
Resting the dough in a warm, draft-free environment helps the yeast work efficiently. You can place the dough in a slightly warm oven or cover it with a damp towel to retain moisture. If the dough doesn’t get enough time to rise, the rolls may turn out dense and heavy. On the other hand, if the dough is left to rise for too long, it may overproof and lose its structure, resulting in flat, lifeless rolls.
4. The Importance of the Right Flour
The type of flour you use also plays a role in the softness of your dinner rolls. Bread flour, which has a higher protein content, creates a stronger dough with better structure, while all-purpose flour will yield a softer, lighter dough. For the softest dinner rolls, many bakers prefer a mix of all-purpose flour and bread flour to balance texture and structure.
Some recipes even call for adding a small amount of milk powder or a fat like butter, oil, or milk, which can enhance the softness and tenderness of the rolls. The fat coats the flour’s proteins, preventing them from forming too much gluten, resulting in a more tender dough.
5. The Baking Process: Getting the Right Crust
While yeast, kneading, and resting are key factors in achieving soft dinner rolls, the baking process also plays a role in the final texture. Baking the rolls at the right temperature (typically 375°F or 190°C) allows the dough to rise and set properly. It also creates a slightly crisp, golden crust while keeping the inside soft and fluffy.
To ensure the rolls stay soft after baking, you can brush them with butter as soon as they come out of the oven. This adds a delicious richness and prevents the crust from becoming too tough. Let the rolls cool on a wire rack, but don’t leave them uncovered for too long, as this can dry out the crust.
Conclusion: The key to soft dinner rolls lies in the careful balance of yeast, kneading, resting, and baking. By giving the dough the right conditions to rise, kneading it to develop the perfect amount of gluten, and allowing sufficient resting times, you’ll be rewarded with light, fluffy, and soft rolls that everyone will love. Each step plays a vital role in achieving that melt-in-your-mouth texture, so take your time and enjoy the process!
How to Get That Perfect Fluffiness: Dough Rising Techniques and Proper Shaping
Achieving perfect fluffiness in bread and rolls relies on more than just using the right ingredients. The dough’s rise and the way you shape it are crucial steps that directly affect its light, airy texture. From ensuring proper yeast activation to shaping the dough to encourage maximum rise, here’s how to get that perfect fluffiness in your rising recipes.
1. The Importance of the First Rise: Let the Yeast Do Its Job
The first rise, or fermentation, is when the yeast works to create carbon dioxide gas, which causes the dough to expand and become light and airy. The goal of this rise is to give the dough enough time to develop structure and flavor.
To ensure the perfect rise, make sure the dough is placed in a warm, draft-free area. The ideal temperature for yeast activation is between 75°F to 85°F (24°C to 29°C). Too cold, and the yeast will take too long to activate; too hot, and it could kill the yeast.
Allow the dough to rest for about 1-2 hours, or until it has doubled in size. During this time, the gluten in the dough also develops, which strengthens the dough’s ability to trap the air produced by the yeast. This is crucial for creating the light, fluffy texture you’re after.
2. The Punch-Down: Deflating Without Overworking
After the first rise, it’s important to punch the dough down. This might sound counterintuitive, but it’s actually necessary to release excess gas from the dough. Punching the dough gently deflates it, helping to redistribute the yeast, allowing it to continue fermenting, and ensuring an even crumb structure in your final product.
However, it’s important not to overwork the dough. While you want to remove large air bubbles, be careful not to knead it excessively after the first rise. Overworking the dough can lead to a denser texture because you’ll break down the gluten structure too much, causing the dough to lose its ability to trap air.
3. Proper Shaping: Forming Rolls, Loaves, and Other Shapes
Shaping the dough correctly is essential for ensuring an even rise and achieving the perfect fluffy texture. When shaping, make sure not to deflate the dough too much; you want to maintain some of the air bubbles that were created during the first rise.
Here are a few tips for proper shaping:
- For Rolls: After punching down the dough, divide it into even portions. Roll each portion into a smooth ball by folding the dough’s edges underneath and pinching them together. This technique helps create a tight surface, which will encourage the dough to rise evenly and develop a soft, fluffy crumb.
- For Loaves: After the first rise, gently deflate the dough, then shape it into a loaf by rolling it out into a rectangle and rolling it up tightly from one end to the other. Tuck the ends under to form a smooth top. This technique ensures that the dough rises uniformly and creates an airy interior.
- For Other Shapes: If you’re making other shapes, like baguettes or breadsticks, be sure to handle the dough gently. Stretch and roll it rather than pulling or pressing it too hard.
4. The Second Rise: Patience is Key
After shaping the dough, it’s important to give it a second rise. This final rise ensures that the dough achieves its maximum puffiness before baking. Let the dough rest for 30 minutes to 1 hour, depending on the recipe. During this time, the yeast continues to work, creating more gas and expanding the dough.
The second rise is shorter than the first because the dough has already been activated and shaped, but it’s still crucial for fluffiness. The dough should look puffy and almost double in size by the end of this rise. This is your indicator that it’s ready to bake!
Be careful not to overproof the dough during this second rise. If the dough rises too long, the yeast may exhaust its food supply, and the dough can lose its structure, leading to a denser, less fluffy texture. You can check the dough’s readiness by performing the “poke test”: Gently poke the dough with your finger. If the dough springs back slowly but leaves an indentation, it’s ready to bake. If the dough springs back too quickly, give it a bit more time.
5. Baking with Steam: A Secret for Softness
For an extra soft and fluffy texture, some bakers recommend introducing steam into the oven during the first few minutes of baking. This technique helps create a moist environment that prevents the outer crust from hardening too quickly, allowing the dough to expand more freely. As the bread rises in the oven, the moisture ensures the crumb stays soft and light.
To create steam, you can place a shallow pan of water in the oven while it preheats, or spritz the dough with water right before you bake it. This technique is particularly useful when baking bread and rolls in a home oven, as it mimics the steam oven conditions found in professional bakeries.
6. Don’t Skip the Rest After Baking
Once your bread or rolls are finished baking, let them cool completely on a wire rack. This step allows the steam trapped inside the dough to redistribute evenly, ensuring that your rolls or loaf remains soft and airy. If you cut into your rolls or bread while it’s still hot, the steam will escape, and the texture might be denser than desired.
For extra softness, you can brush the tops of your rolls or loaves with butter as soon as they come out of the oven. This adds moisture and helps keep the crust soft.
Conclusion: Achieving perfect fluffiness in your dough is a combination of the right techniques and patience. By allowing the dough to rise properly, shaping it gently, and ensuring a well-timed second rise, you’ll be on your way to creating bread and rolls with a soft, airy texture. With these tips in hand, you can master the art of creating perfectly fluffy dough every time!
Tips for Serving: Suggestions on How to Serve and Store Soft Rolls
Soft rolls are a versatile side dish that can elevate any meal, from a casual family dinner to a holiday feast. Whether you’re serving them fresh out of the oven or saving them for later, knowing the best ways to serve and store them ensures they stay soft, flavorful, and enjoyable. Here are some practical tips for serving and storing your soft rolls.
1. Serve Fresh and Warm
One of the best ways to serve soft rolls is right out of the oven while they’re still warm. The warmth enhances their soft, pillowy texture, making them even more irresistible. To keep the rolls warm during dinner, consider using a bread basket lined with a clean kitchen towel. The towel traps heat and helps maintain the softness of the rolls throughout the meal.
For a special touch, brush the rolls with a little melted butter right before serving. This adds extra flavor and helps create a slightly glossy, golden exterior. If you’re serving the rolls alongside soup, stews, or salads, you can even cut them into smaller pieces for easy dipping.
2. Pairing with Spreads and Toppings
Soft rolls are perfect for pairing with a variety of spreads, toppings, and dips, making them even more enjoyable. Consider these popular pairings:
- Butter: A classic, and for good reason! Softened butter, whether plain or flavored (garlic butter, honey butter, or herb-infused), is the perfect complement to freshly baked rolls. Spread a little on each warm roll to enhance its richness.
- Jam or Jelly: For a sweeter twist, pair the rolls with your favorite fruit jam or jelly. Strawberry, raspberry, or apricot jams offer a bright contrast to the soft, fluffy texture of the rolls.
- Cheese: Soft rolls can also be served with cheeses. Consider offering a spreadable cheese like cream cheese or a tangy goat cheese for a delightful contrast. Alternatively, you can melt a slice of cheese on the rolls for a savory touch.
- Olive Oil and Balsamic Vinegar: If you’re serving the rolls alongside Mediterranean or Italian dishes, drizzle them with a little high-quality olive oil and a splash of balsamic vinegar for a sophisticated, savory option.
3. Serve as a Side or Make a Sandwich
Soft rolls can be used in a variety of ways during mealtime. You can serve them as a side to soups, stews, or pasta dishes, where they can be used to mop up sauces or broths. Their soft texture is perfect for pairing with rich, saucy meals.
Another popular option is to use the soft rolls as sandwich buns. They work wonderfully for making sliders or gourmet sandwiches. You can cut them in half and fill them with roasted meats, cheeses, or grilled vegetables for a simple yet satisfying meal. Their lightness and fluffiness make them perfect for holding all sorts of fillings without overpowering the taste of the sandwich.
4. Storing Leftover Rolls
While soft rolls are best enjoyed fresh, you may have some leftovers that need to be stored for later. Here’s how to store them to maintain their softness:
- Room Temperature: If you plan to eat the rolls within 1-2 days, store them in an airtight container at room temperature. You can also wrap them in plastic wrap or place them in a bread bag. This will help keep them soft without becoming stale. Make sure the rolls are completely cooled before storing them to prevent condensation.
- Freezing: For longer storage, freezing is the best option. To freeze soft rolls, allow them to cool completely, then wrap them tightly in plastic wrap or foil. Place the wrapped rolls in a resealable freezer bag or airtight container to prevent freezer burn. Rolls can be frozen for up to 3 months. When you’re ready to enjoy them, simply thaw them at room temperature or warm them in the oven at 300°F (150°C) for 5-10 minutes.
- Reheating: To revive day-old soft rolls, place them in a preheated oven for 5-10 minutes, or microwave them for 20-30 seconds with a damp paper towel to help maintain moisture. Reheating them gently helps restore their softness and flavor, ensuring they taste nearly as fresh as when they were first baked.
5. Using Leftover Rolls in Creative Ways
Leftover soft rolls can be repurposed into delicious dishes, so don’t throw them out! Here are a few ideas for using them:
- Bread Pudding: Transform leftover rolls into a sweet or savory bread pudding. Tear the rolls into chunks, mix with eggs, milk, sugar or spices, and bake until golden. It’s a great way to use up rolls that might otherwise go stale.
- Croutons: Cube leftover rolls, toss them in olive oil and seasonings, and bake until crispy. These homemade croutons are perfect for adding crunch to soups, salads, or even casseroles.
- Breadcrumbs: If you have rolls that are starting to get a bit hard, pulse them in a food processor to make fresh breadcrumbs. Store the breadcrumbs in an airtight container for future use in recipes like meatballs, stuffing, or as a topping for casseroles.
6. Serving for Special Occasions
Soft rolls are a perfect accompaniment for special occasions, from family dinners to holiday meals. You can get creative with their presentation:
- Roll into Unique Shapes: Instead of traditional round rolls, consider shaping the dough into braids, spirals, or pull-apart rolls for a more festive look.
- Add Toppings or Fillings: You can customize your rolls by adding herbs, garlic, or cheese directly into the dough before baking. This will give them an extra layer of flavor and make them more special for guests.
- Serve in a Decorative Basket: Present the rolls in a pretty bread basket lined with a cloth napkin or in individual small baskets to add an elegant touch to your meal.
Conclusion: Soft rolls are not only a comforting side dish but also a versatile addition to any meal. Whether served warm with butter, turned into sandwiches, or enjoyed with spreads, these rolls are sure to be a hit. By storing and reheating them properly, you can keep them fresh for days, and you can even repurpose any leftovers into creative dishes. With these tips for serving and storing, your soft rolls will always be the star of the table.
4. Flaky, Buttery Croissants: Mastering the Art of Rising
The Role of Layers: Understanding Laminated Dough and How It Differs from Traditional Bread Dough
When it comes to creating beautifully light and flaky pastries, the key lies in the layers. Laminated dough is the star of many beloved baked goods, from buttery croissants to delicate Danish pastries. Unlike traditional bread dough, which is typically kneaded and left to rise, laminated dough undergoes a unique process of folding and layering, which results in its signature flakiness. Here’s a deeper look into the concept of laminated dough and how it differs from traditional bread dough.
1. What is Laminated Dough?
Laminated dough is a type of dough that’s repeatedly folded and rolled to create thin layers of dough and fat. This technique produces a dough that is light, airy, and flaky. The most common types of laminated dough are used for pastries like croissants, puff pastry, and Danish dough. The process of lamination creates hundreds of layers of dough and butter, which expand during baking, resulting in a crisp, flaky texture.
The technique involves encasing a layer of cold butter (or another fat) in dough, then rolling and folding the dough multiple times. With each fold, the dough becomes thinner and more layered, building the structure needed for the perfect pastry. This is why pastries made with laminated dough are so much flakier than those made from traditional bread dough.
2. How Laminated Dough Differs from Traditional Bread Dough
While laminated dough focuses on layering and folding, traditional bread dough follows a different approach to creating texture. Traditional bread dough is typically made by mixing flour, water, yeast, and salt. The dough is then kneaded to develop gluten, which helps the dough rise and form a soft, elastic texture. After rising, the dough is shaped and baked, creating a uniform crumb with a slightly chewy consistency.
In contrast, laminated dough is all about incorporating fat into the dough in a way that creates distinct layers. The fat (usually butter) is essential because it helps the dough develop its characteristic flakiness. The folding process allows the fat to remain in layers within the dough, rather than being fully absorbed. As the dough bakes, the layers of fat and dough create steam, which causes the layers to puff up and separate, resulting in a light, airy texture.
3. The Lamination Process: Folding and Rolling
The process of lamination is key to creating those delicious layers. It begins with making the dough, which typically consists of flour, water, yeast, sugar, and salt. Once the dough is prepared and chilled, a slab of butter (or a butter-like substance) is placed on top of the dough. This butter is then carefully folded into the dough, and the dough is rolled out into a thin rectangle. This rolling and folding process is known as a “turn.”
The dough is folded over the butter in thirds, like folding a letter, and then rolled out again. This process is repeated multiple times (typically 3-6 “turns”), with the dough being chilled in between each turn to keep the butter from melting into the dough. As the dough and butter are rolled and folded, the layers form. With each turn, the dough becomes thinner and more layered.
Each time the dough is rolled and folded, the layers become thinner, and the dough becomes more elastic. The result is a dough that is not only flaky but also light and airy when baked. The butter creates steam during baking, which causes the layers to puff up, while the dough holds its shape and structure.
4. The Key Ingredient: Butter (or Other Fats)
The role of butter in laminated dough cannot be overstated. Butter provides the richness and flakiness that makes laminated dough stand out from traditional bread dough. The fat content in the butter creates pockets of air between the dough layers, which then expand in the oven, giving the pastry its lift and crispness.
Butter also adds a depth of flavor that is characteristic of many laminated pastries, like croissants and Danishes. However, some variations of laminated dough may use other fats, like margarine or shortening, to achieve similar flakiness. These fats can affect the texture and flavor slightly but still provide that signature flakey, airy result.
5. The Science Behind the Layers: Steam and Air Pockets
The magic of laminated dough lies in the way it bakes. As the dough heats up in the oven, the butter begins to melt and releases steam. The steam helps to separate the layers of dough, causing them to rise and expand. The air pockets created by the steam are what give laminated dough its characteristic flakiness.
The layers of dough that are separated by butter create multiple thin sheets, and when baked, these sheets puff up, creating a crisp, flaky texture. The steam pushes against the dough, which causes the layers to separate and rise. This process results in a texture that’s both crisp on the outside and light and airy on the inside—perfect for pastries that melt in your mouth.
6. Laminated Dough and Its Uses
Laminated dough isn’t just for pastries; it’s also used in other baked goods like puff pastry sheets, which can be used for savory items like pot pies or turnovers. The versatility of laminated dough allows it to be used in a wide range of both sweet and savory dishes. Here are some popular examples:
- Croissants: Probably the most famous example of laminated dough, croissants are made by folding butter into dough to create the iconic layers that puff up during baking. They can be filled with chocolate, almond paste, or simply enjoyed plain with a pat of butter.
- Danish Pastries: Similar to croissants, Danish pastries are made with laminated dough but are often filled with fruit, custard, or cream cheese. They can be shaped into various forms, from twists to pinwheels, and are typically topped with icing or sugar.
- Puff Pastry: This dough is used for both sweet and savory treats, including items like palmiers, turnovers, and even savory appetizers like cheese straws or puff pastry tarts. Puff pastry is also used as a base for dishes like beef Wellington.
Conclusion: Laminated dough is a fascinating and intricate process that transforms simple ingredients into light, airy, and flaky pastries. Unlike traditional bread dough, which focuses on kneading and rising to create a chewy texture, laminated dough relies on the folding and layering of fat and dough to create its signature flakiness. By mastering the lamination process, you can create delicious pastries and baked goods that stand apart with their rich, buttery layers and melt-in-your-mouth texture.
Perfect Rise for Flakiness: Tips on Temperature Control and Resting Time for Croissant Dough
Achieving that signature flakiness and perfect rise in croissants isn’t just about the lamination process; the right rising recipes and temperature control play a vital role in ensuring the dough puffs up beautifully in the oven. The key to success lies in mastering rising recipes that balance temperature, proofing, and resting times to create perfectly airy layers. Whether you’re following rising recipes for croissants or other flaky pastry recipes, understanding the dough’s behavior will help you achieve the perfect rise.
Croissant dough relies heavily on a delicate balance of temperature control and ample resting periods. These factors are essential for the dough to rise effectively and create the light, flaky layers you’re aiming for. If you follow the right rising recipes, you’ll learn how to make dough rise at the right times for optimal texture. Adjusting the temperature to ensure it’s neither too warm nor too cold is crucial in perfecting your croissants using these rising recipes.
When you follow rising recipes closely, you’ll understand that it’s not just the lamination process that makes croissants great. The temperature and resting times have an equally significant role in achieving that perfect rise and flakiness. These rising recipes will help you fine-tune every aspect of the croissant-making process, from initial dough preparation to the final rise before baking. With the right approach, you’ll have croissants that puff up beautifully, with layers that are light and airy.
By carefully following these rising recipes and understanding how to make dough rise with precision, you’ll master the art of baking croissants. Patience and practice are key when working with croissant dough, but once you’ve perfected these rising recipes, you’ll consistently achieve croissants that are both delicious and visually stunning.
1. Temperature Control: The Key to Keeping the Butter Firm
The secret to achieving that beautifully flaky texture in croissants lies in how well you manage the temperature of your dough and butter during the lamination process. The butter should remain cold and firm throughout the rolling and folding stages. If the butter melts into the dough, it will prevent the formation of those lovely, crisp layers.
Here’s how to maintain the perfect temperature:
- Cold Ingredients: Start with cold butter and chilled dough. If the dough gets too warm during the lamination process, it becomes sticky, and the butter can begin to melt, making it harder to create clean layers. Chilled ingredients help the butter stay solid and give you the desired separation between dough layers.
- Work in a Cool Environment: It’s essential to work in a cool, controlled environment when making croissant dough. If your kitchen is too warm, the butter will soften too quickly, affecting the dough’s texture. If needed, place the dough and butter in the fridge for 10–15 minutes between folds to prevent any melting. This will ensure the butter remains cold and pliable without fully blending into the dough.
- Use a Marble Surface: Some bakers swear by rolling out dough on a marble countertop. Marble retains cold, which can help keep the dough cool while rolling and folding. If you don’t have a marble countertop, a cold metal surface can also work well.
2. Resting Time Between Turns: Allowing the Dough to Relax
Resting time between the folds, or “turns,” is just as crucial as keeping the dough and butter cold. After each fold and roll, the dough needs time to relax. If you skip this rest period, the dough will be tight and difficult to work with, leading to a less flaky croissant. A rested dough will allow the gluten to relax, making it easier to roll out thin layers, and the layers themselves will form better.
- The First Rest: After mixing the dough and letting it rise for the first time, it’s important to chill it for a minimum of 30 minutes before rolling. This initial resting period helps the dough firm up, making it easier to work with during the lamination process. If the dough feels sticky or soft, you can chill it for a little longer to allow it to firm up further.
- Resting Between Turns: After each turn (folding and rolling the dough), let the dough rest again in the fridge for 20–30 minutes. This rest period allows the gluten to relax and prevents the dough from becoming too elastic, which could hinder the formation of layers. These short resting times are key to giving the dough time to settle, while also ensuring that the butter remains solid.
3. The Second Rise: Proofing the Dough for That Perfect Fluff
After shaping the croissants, the dough needs to go through a final rise, also known as proofing, before baking. Proofing is the stage where the yeast continues to work, allowing the dough to expand and rise before hitting the oven. It’s this rise that gives croissants their characteristic puff and airy interior.
- Ideal Temperature for Proofing: During proofing, the temperature is essential to getting the perfect rise. A temperature of about 75°F (24°C) is ideal for the dough to rise. Too warm, and the dough may overproof, causing it to collapse; too cool, and the dough might not rise enough, leading to a denser texture.
- Proofing Time: The proofing time for croissants typically ranges between 1–2 hours. You’ll know the dough is ready when it has doubled in size and feels slightly puffy to the touch. However, if your kitchen is too warm or too cool, the proofing time can vary, so it’s crucial to monitor the dough closely.
4. The Role of Steam: Creating Flaky Layers in the Oven
Once the croissants have proofed and are ready to bake, the final step in achieving their signature rise and flakiness is the baking process itself. The right temperature and baking conditions are crucial for puffing up the dough and creating those crisp, flaky layers.
- Preheat the Oven Properly: Preheat your oven to a high temperature, typically around 400–425°F (200–220°C), before placing the croissants inside. A high baking temperature ensures that the butter inside the dough melts and turns to steam, helping the layers puff up and separate.
- Steam for Extra Flakiness: Introducing steam into the oven in the first few minutes of baking helps the croissants rise even more. The steam prevents the dough from drying out too quickly and promotes a better rise. You can add steam by placing a pan of hot water in the oven during the preheating stage or spritzing the croissants with water right before placing them in the oven.
5. Don’t Skip the Rest After Baking: Cooling for Perfect Texture
Once the croissants are baked and golden brown, it’s essential to allow them to cool before cutting into them. This rest period allows the layers to set properly and ensures that the steam inside the croissants doesn’t escape too quickly. If you cut into the croissants immediately after baking, you may lose some of that delicious puffiness and flakiness.
Let the croissants rest on a wire rack for at least 10–15 minutes before serving. This will allow the interior to firm up slightly while maintaining its tender, flaky texture.
Conclusion: The perfect rise and flakiness in croissants come from a combination of careful temperature control, adequate resting time, and precise proofing. Keeping the butter cold during the lamination process, allowing the dough to rest after each fold, and managing the proofing temperature all contribute to the delicious texture of your croissants. With these tips, you can create croissants with beautifully flaky layers and a light, airy interior every time.
Troubleshooting Croissants: Solutions for Common Problems Like Uneven Rising or Dense Layers
Croissant-making can be a delicate process, and even seasoned bakers encounter challenges along the way. From uneven rising to dense layers, several issues can arise during the process that affect the final product. Understanding the potential pitfalls and knowing how to troubleshoot these problems can help ensure that your croissants turn out perfect every time. Below are some common issues that bakers face with croissant dough and how to solve them.
1. Problem: Uneven Rising or Croissants Not Puffing Up
One of the most frustrating problems when making croissants is when they don’t rise properly or puff up unevenly. This can result in a flat, underwhelming pastry instead of the airy, flaky croissants you’re hoping for. Here are a few possible reasons for this issue and how to fix them:
Possible Causes and Solutions:
- Over-proofing or Under-proofing: If the dough is over-proofed (left to rise too long), it can lead to a loss of structure, causing the croissants to spread out instead of puffing up. On the other hand, under-proofing means the yeast hasn’t had enough time to fully work, and the dough won’t rise properly.
- Solution: Be mindful of the proofing time. Let the croissants rise until they have nearly doubled in size, but don’t let them overproof. The dough should feel slightly puffy to the touch, but it should not collapse when handled. If you’re unsure, do a “poke test” by gently pressing a finger into the dough — if the indentation springs back slowly, the dough is ready.
- Incorrect Oven Temperature: If the oven isn’t hot enough when you put the croissants in, the layers may not puff properly. The steam created during baking is crucial for separating the dough layers and creating that signature croissant rise. Conversely, if the oven is too hot, the exterior may brown too quickly, and the interior won’t have time to rise.
- Solution: Preheat your oven to the correct temperature (typically around 400°F or 200°C). Use an oven thermometer to ensure your oven is at the right temperature, as some ovens can be inaccurate. A higher initial baking temperature is necessary for the dough to rise quickly and form distinct layers.
2. Problem: Dense Layers or Croissants That Are Too Heavy
Croissants are known for their light, flaky layers. If you encounter dense croissants with heavy layers, the issue is usually with the dough or the lamination process. Here are the potential causes and how to fix them:
Possible Causes and Solutions:
- Butter Too Soft or Warm: The butter used for lamination should remain cold and firm throughout the process. If the butter softens or melts into the dough, it will not create the distinct layers needed for a flaky texture. Instead, you’ll end up with a denser product.
- Solution: Keep your butter cold during the lamination process. If it starts to get too soft while rolling out the dough, return it to the fridge to firm up. Additionally, ensure that the dough and butter are chilled before the lamination process begins. If needed, chill the dough for 10–15 minutes between each fold to keep the butter solid.
- Insufficient Folding and Rolling: Croissant dough requires several folds and rolls to achieve the layers that give it its characteristic flakiness. If you don’t do enough turns (folding and rolling), or if the dough is not rolled out thin enough, the layers will be too thick, leading to dense croissants.
- Solution: Ensure you perform the correct number of turns—usually 3 to 4—while folding and rolling the dough. After each turn, rest the dough in the fridge for 20-30 minutes to relax and maintain its structure. Each turn should result in thinner layers of dough, so aim to roll it out as evenly as possible during each stage.
- Not Enough Resting Time: If the dough is not rested enough during the lamination process, it can become too elastic and resist expansion, leading to denser layers.
- Solution: Rest the dough between turns to allow the gluten to relax. This will make it easier to roll out the dough, and it will help achieve the thin, layered structure necessary for light, flaky croissants.
3. Problem: Croissants Are Too Greasy or Have Butter Leakage
Sometimes, you may notice butter leaking out of the croissants as they bake, leading to greasy pastries that lack the delicate flakiness you expect. This issue typically arises when the butter has melted too much during the rolling or proofing process.
Possible Causes and Solutions:
- Butter Overheated During Rolling: If the butter becomes too soft or melts while you’re rolling out the dough, it may leak out during baking, creating greasy croissants.
- Solution: Keep the butter cold and firm. If the butter softens, chill the dough and butter in the fridge before continuing with the rolling process. It’s crucial to keep the dough and butter at an even, cool temperature to avoid any butter leakage during the process.
- Insufficient Sealing of the Dough Edges: If the edges of the croissants aren’t properly sealed when you shape them, butter can leak out as they bake.
- Solution: Ensure that the edges are tightly sealed after shaping the croissants. Gently press the edges together to ensure they stay closed during the baking process. If needed, you can lightly brush the edges with a little water or egg wash to help them stick together.
4. Problem: Croissants Are Too Dry or Not Buttery Enough
Croissants should have a rich, buttery flavor with a soft, moist interior. If the croissants taste dry or lack that signature buttery richness, the problem could be due to the dough not having enough butter or the butter not being distributed properly throughout the dough.
Possible Causes and Solutions:
- Insufficient Butter Layering: If there isn’t enough butter between the layers of dough, the croissants will be dry and lack the buttery flavor that makes them so irresistible.
- Solution: Ensure that you’re using the proper ratio of butter to dough and that the butter is evenly spread throughout the layers. When folding, be sure that each fold traps a layer of butter between the dough, and don’t skip any turns to ensure even butter distribution.
- Underbaking: Croissants that aren’t baked long enough may come out dry or doughy in the center.
- Solution: Bake the croissants for the full time at the correct temperature. The exterior should be golden brown, and the interior should be fully cooked and airy. If the croissants appear too pale or undercooked, give them an additional few minutes in the oven.
5. Problem: Croissants Lack a Golden, Shiny Finish
Croissants should have a golden, shiny crust. If they look pale or dull after baking, it’s usually due to the absence of an egg wash or improper application.
Possible Causes and Solutions:
- No Egg Wash: An egg wash, which is a mixture of beaten egg and water, is essential for giving croissants their golden, glossy finish.
- Solution: Brush the croissants with an egg wash before baking. Ensure the egg wash is applied evenly across the surface of each croissant. Be careful not to let the egg wash drip into the layers, as this can cause the croissants to become soggy.
- Egg Wash Applied Too Early: If the egg wash is applied too early in the proofing process, it may dry out or not adhere properly.
- Solution: Apply the egg wash right before baking, after the croissants have finished proofing but just before placing them in the oven.
Conclusion:
Troubleshooting croissants involves a careful understanding of the dough, temperature, and proofing process, all crucial elements of rising recipes. By following these solutions for common problems—like uneven rising, dense layers, and butter leakage—you can adjust your dough rising techniques and troubleshoot effectively. Achieving light, flaky, and perfectly golden croissants starts with mastering the right rising recipes.
When working with croissant dough, pay close attention to how you manage the rise. If you’re using soft bread recipes or flaky pastry recipes, you’ll want to ensure that you follow the right dough rising techniques to avoid issues like under-proofing. How to make dough rise properly will help you create perfect layers that hold the butter in place, leading to that irresistible, flaky texture.
With patience and practice, you’ll master the art of perfect rise baking. Whether you’re making croissants or experimenting with other homemade bread recipes, these rising recipes will guide you to the best results. In time, you’ll create croissants that are as beautiful as they are delicious, every time.
5. Simple Sourdough: A Rising Recipe for Artisan Flavor
What is Sourdough?: Defining Sourdough and the Fermentation Process
Sourdough is a type of bread that stands out due to its distinct tangy flavor, chewy texture, and the fermentation process behind it. Unlike traditional breads made with commercial yeast, sourdough uses wild yeast and beneficial bacteria to leaven the dough. This natural process results in a bread that is not only flavorful but also has a rich, complex texture.
1. The Basics of Sourdough
At its core, sourdough bread relies on two main ingredients: flour and water. These ingredients are combined with a starter, a mixture of flour and water that captures wild yeast and bacteria from the environment. The yeast in the starter ferments the flour’s sugars, causing the dough to rise, while the bacteria contribute to the bread’s tangy flavor.
Instead of using commercial yeast, sourdough allows wild yeast and lactic acid bacteria to work together, creating both the rise and the signature flavor. This slow fermentation process takes longer than with regular bread, which gives sourdough its unique characteristics.
2. The Fermentation Process
The fermentation of sourdough happens in two stages: starter fermentation and dough fermentation. Let’s break down each step.
- Starter Fermentation: To begin, you need a sourdough starter. This is a mixture of flour and water that captures wild yeast and bacteria from the air. Over several days, you’ll “feed” the starter by adding more flour and water, allowing the yeast and bacteria to multiply. A healthy starter will be bubbly and tangy, ready to be mixed into the dough.
- Dough Fermentation: Once the starter is ready, it’s mixed with more flour, water, and salt to form the dough. This dough undergoes a long fermentation process. Unlike bread made with commercial yeast, sourdough rises slowly, often over 6–12 hours. During this time, the wild yeast ferments the dough, while the lactic acid bacteria produce acids that give sourdough its signature tang.
As the dough ferments, the wild yeast releases carbon dioxide, causing the dough to rise. Meanwhile, the bacteria break down the sugars, creating the acidic flavors that define sourdough. The longer the dough ferments, the more pronounced the tangy flavor.
3. Wild Yeast and Lactic Acid Bacteria
Wild yeast and lactic acid bacteria are the key players in the fermentation process. Here’s how each contributes to the final bread:
- Wild Yeast: Unlike commercial yeast, wild yeast ferments the sugars in the dough slowly. It produces carbon dioxide, which makes the dough rise. However, wild yeast is slower, which is why sourdough takes longer to ferment. This slower rise helps the dough develop a more complex flavor.
- Lactic Acid Bacteria (LAB): The bacteria in the starter thrive in the dough’s warm, moist environment. As they ferment the sugars, they produce lactic and acetic acids. These acids contribute to the sour flavor that makes sourdough stand apart from other breads. The balance between the wild yeast and the bacteria affects how tangy or mild the sourdough will taste.
4. The Impact of Slow Fermentation
The long fermentation time in sourdough is what makes it special. This extended fermentation gives the dough time to develop rich flavors and improves its texture. Here’s how it affects the bread:
- Flavor: Longer fermentation means more time for the bacteria and yeast to break down the starches and sugars. This results in a more complex, tangy flavor. You can adjust the flavor by controlling how long you let the dough ferment. Shorter fermentation will result in a milder flavor, while a longer one will create a stronger sour taste.
- Texture: The slow fermentation also allows the gluten to develop, giving the bread its chewy texture. As the dough rises, it becomes airy and open, creating the light, satisfying crumb that sourdough is known for. The extended fermentation process also makes the dough more digestible compared to breads that rise quickly.
5. Baking Sourdough
Once the dough has fermented, it’s time to bake! Preheat your oven and prepare your sourdough for the final rise. When baking sourdough, steam is crucial to achieving that perfect rise and a crispy, golden crust. You can bake the dough in a Dutch oven to trap the steam, helping it expand and develop a delicious, crunchy crust.
The high heat and steam work together to create that beautifully puffy bread with an airy crumb. As the bread bakes, the yeast continues to work, and the lactic acid bacteria give it the signature sour taste. The result is a loaf of bread with both a rich flavor and satisfying texture.
Conclusion: Sourdough is a unique bread that stands out for its complex flavor and chewy texture. Unlike other breads, it uses wild yeast and lactic acid bacteria to ferment the dough, resulting in a slow rise and rich flavor. The fermentation process, which includes both starter and dough fermentation, creates a balance of yeast and bacteria that gives sourdough its signature tang. With proper time, patience, and care, you can create a loaf of sourdough bread that’s both delicious and satisfying.
Starter and Rising Tips: How to Maintain a Sourdough Starter and the Best Way to Achieve a Natural Rise
Maintaining a healthy sourdough starter and achieving a natural rise are essential components of rising recipes, especially for perfect sourdough bread. A well-maintained starter is the key to creating that signature tangy flavor and light, airy texture. When following rising recipes, it’s important to nurture your starter and manage the rise effectively. However, many bakers find that taking care of the starter and overseeing the dough rise can be challenging.
Here are some practical baking tips for beginners to help you nurture your starter and ensure a successful natural rise every time. These dough rising techniques will ensure that your sourdough bread turns out with the perfect rise. Whether you’re making soft bread recipes or tackling fluffy pastry recipes, the right starter care is crucial. Even quick rising bread recipes require the proper balance of yeast activity and time.
For those learning how to make dough rise, it’s essential to understand the role of your starter and how it impacts the final product. With the right care, you’ll master rising recipes and achieve the perfect rise baking, making your sourdough bread a success every time.
1. Understanding the Sourdough Starter
Your sourdough starter is the living culture of wild yeast and bacteria that ferment the dough. It’s important to remember that this starter needs to be fed regularly to keep the microorganisms active and healthy. Without a robust starter, your dough won’t rise as effectively, and your bread might turn out dense.
- Feeding Your Starter: A healthy starter needs to be fed with equal parts of flour and water. The most common ratio is 1:1, meaning one cup of flour to one cup of water. However, this ratio may vary depending on your flour type and the environment. If your starter feels too thick, you can increase the water amount slightly, or if it’s too runny, add more flour. Regular feedings, usually once every 12 to 24 hours, will keep the yeast and bacteria active.
- Choosing the Right Flour: For the best results, it’s important to use the right flour for your starter. While many bakers use all-purpose flour, a combination of whole wheat or rye flour can give your starter a boost. Whole grains provide more nutrients, which feed the wild yeast and bacteria more effectively, leading to a stronger, more active starter.
2. How to Store Your Starter
When you’re not actively baking, it’s essential to store your starter properly. How you store it depends on how often you plan to bake.
- Room Temperature: If you bake regularly (every day or every few days), you can keep your starter at room temperature. Just make sure to feed it regularly, around once a day, to keep it active. Leave it in a jar with enough room to grow. As the starter ferments, it will rise and fall, and you’ll need to discard some to maintain the correct ratio of starter to flour and water.
- Refrigeration: If you don’t bake as frequently, you can store your starter in the fridge. This slows down the fermentation process, and you’ll only need to feed it about once a week. When you’re ready to bake, bring the starter back to room temperature and give it a few feedings to reactivate it.
3. How to Know Your Starter Is Ready for Baking
The key to a successful sourdough rise lies in ensuring that your starter is strong and active. When you’re following rising recipes, it’s essential to check the activity of your starter. To do this, perform the “float test.” Simply take a small spoonful of your starter and drop it into a glass of water. If the starter floats, it’s ready to use, indicating that the wild yeast is active and producing enough gas to leaven the dough. This is a crucial step in perfecting your dough rising techniques.
If the starter sinks, it means it may need more feedings and time to become fully active. Properly maintaining your starter is one of the best baking tips for beginners. Whether you’re making soft bread recipes or quick rising bread, a healthy starter is key to achieving the perfect rise baking. Trust the wild yeast to work its magic when following your rising recipes.
For those just starting with homemade bread recipes, checking your starter is the first step in mastering how to make dough rise correctly. Keep in mind that rising recipes vary, but with patience and attention to your starter, you’ll achieve a perfect rise every time.
4. Achieving a Natural Rise: The Role of Temperature and Time
Once your starter is healthy and active, it’s time to focus on getting the best rise for your dough. Sourdough relies on wild yeast and bacteria that work more slowly than commercial yeast, so achieving a natural rise requires patience and careful management of temperature.
- Temperature Control: The temperature of your dough during fermentation is crucial. Wild yeast thrives in a warm, consistent environment. Ideally, your dough should rise at around 75°F to 80°F (24°C to 27°C). If the environment is too cold, the yeast will slow down, and the dough will rise slowly or not at all. On the other hand, if the dough is too hot, it can over-ferment, leading to a sour taste and weaker structure.If you find your kitchen too cold, try placing your dough in a warm spot like an oven with the light on or near a heater. You can also create a DIY proofing box by placing your dough in a container and covering it with a damp cloth to maintain warmth.
- Time and Patience: Sourdough rises slowly, so patience is essential. A typical sourdough bulk fermentation can take anywhere from 4 to 8 hours, depending on the temperature. During this time, the dough will develop its texture and flavor. After the bulk fermentation, shape your dough and allow it to rest for another few hours (called proofing) before baking. The dough should be puffed and slightly airy when it’s ready to bake.If you need to slow down the rise for any reason, you can refrigerate the dough for an overnight proof, which can also help develop a more complex flavor.
5. Shaping and Scoring for the Perfect Rise
Once your dough has risen, it’s time to shape it and prepare it for baking. Proper shaping and scoring are crucial for achieving an even rise during baking.
- Shaping: After the final rise, gently turn your dough onto a floured surface. Stretch it into a round or oval shape, making sure to keep as much of the air inside the dough as possible. Be gentle with it, as overworking the dough can deflate the bubbles that have formed during fermentation.You can use the “preshape” method, where you form the dough into a loose shape first and then let it rest before doing the final shaping. This gives the dough time to relax and makes it easier to shape.
- Scoring: Scoring is the process of making shallow cuts in the top of the dough just before baking. This allows the dough to expand in a controlled way during baking, giving it a beautiful rise and preventing the dough from bursting unpredictably. Use a sharp blade or a razor to make quick, confident slashes in the dough. You can make one long cut down the center or several smaller cuts for a decorative effect.
6. Final Rising Tips: Don’t Rush the Process
Rushing the rise is one of the most common mistakes bakers make when following rising recipes. The slower, longer rise is what helps sourdough develop its signature tangy flavor and light, open crumb. If you’re in a rush, you might be tempted to speed up the process by increasing the temperature, but this can affect the texture and flavor, ruining your rising recipes.
Instead, allow the dough to rise naturally. Pay attention to dough rising techniques, keeping an eye on the texture and bubbles. Trust the process and the wild yeast to do its work. When you give the dough time, you’ll achieve that perfect rise baking every time. Remember, patience is key with rising recipes, especially when it comes to sourdough.
If you’re new to baking, start with simple soft bread recipes or fluffy pastry recipes that guide you through the process of achieving a perfect rise. There are many homemade bread recipes out there to help you perfect your dough rising techniques. Even quick rising bread can benefit from careful attention to how to make dough rise correctly. Following these bread rising tips will ensure that your results are consistently light and airy.
With time, care, and the right rising recipes, you’ll master how to make dough rise to its full potential, creating delicious loaves every time.
Conclusion: Maintaining a sourdough starter and managing the rise are essential skills for successful sourdough baking. By feeding your starter regularly, storing it properly, and ensuring it’s active, you set yourself up for success. Temperature control and patience during fermentation will help you achieve a natural rise that results in delicious, tangy, and airy sourdough bread. With these tips, you’ll have the tools to create consistently great sourdough every time.
Baking with Sourdough: How to Shape and Bake Your Dough to Get That Perfect Texture and Flavor
Shaping and baking your sourdough dough is where the magic happens. Once your dough has fermented properly and your starter is strong, the way you handle and bake the dough will determine the final texture, flavor, and appearance. From shaping the dough to managing the oven conditions, every step plays a crucial role in creating the perfect loaf. Let’s dive into the essential steps to get that flawless sourdough bread.
1. Shaping Your Dough for a Perfect Rise
Shaping the dough correctly is a critical step to getting a beautiful, airy crumb and a nicely risen loaf. When you handle sourdough, be gentle to preserve the bubbles formed during fermentation. Overworking the dough can deflate the gas bubbles and result in a denser loaf. Here’s how to shape it properly:
- Preshape Your Dough: Once the dough has finished its bulk fermentation, gently turn it out onto a floured surface. Begin by gently folding the edges toward the center to create a rough round shape. This process helps strengthen the dough and redistribute the gases that have formed during fermentation. Allow it to rest for about 20 to 30 minutes. This step, called “bench rest,” helps relax the dough, making it easier to shape.
- Final Shaping: After the dough has rested, it’s time to shape it into its final form. You can shape your dough into a round boule (a round loaf) or an oblong bâtard (a longer loaf). To shape, gently stretch the dough and fold it over onto itself, working your way around the edges. The goal is to create surface tension, which will help the dough rise evenly during baking. For a round shape, tuck the edges underneath and roll it over to form a tight ball. For a bâtard, fold the edges inwards and roll the dough into a log shape.
- Resting the Dough Again: After shaping, allow the dough to rest for the final rise. This proofing stage usually lasts anywhere from 1 to 4 hours at room temperature, depending on the dough’s activity level and the room temperature. If you prefer, you can refrigerate the dough for an overnight rise (cold fermentation) to develop a more complex flavor and texture.
2. Scoring the Dough for Controlled Expansion
Once your dough is ready for the oven, scoring is essential. Scoring is the process of making shallow cuts on the surface of the dough right before baking. This allows the bread to expand in a controlled manner, creating a beautiful pattern and preventing it from bursting unpredictably in the oven.
- Why Score? Scoring not only provides visual appeal but also controls the way the dough rises during baking. It directs the expansion, ensuring that the loaf doesn’t tear in unexpected places. Scoring also helps the bread achieve an even rise and can even affect the crumb structure.
- How to Score: Use a sharp razor blade or bread lame to make quick, confident cuts on the dough’s surface. You can score in a single long line down the center for a classic look, or create several smaller cuts in a pattern. Some bakers prefer intricate patterns like a swirl or a lattice design, but keep in mind that the cut should be made quickly to avoid deflating the dough.
3. Preheating the Oven: Creating the Perfect Baking Environment
Preheating your oven is one of the most important steps in baking sourdough. A hot oven ensures the bread will rise properly in the first few minutes of baking and form a crisp, golden crust. Here’s how to set up your oven for optimal results:
- Dutch Oven Method: The best way to create the ideal conditions for sourdough is by baking it in a preheated Dutch oven. The heavy cast-iron pot traps steam, helping the dough expand and form a beautiful crust. Preheat your Dutch oven in the oven for at least 30 minutes before baking.
- Oven Steam: Steam is essential for achieving a crispy, golden crust on your sourdough. In the first few minutes of baking, the steam helps the bread expand without forming a tough crust too quickly. If you’re not using a Dutch oven, you can create steam by placing a pan of hot water at the bottom of the oven or by spraying water onto the oven walls before placing the bread inside.
- Oven Temperature: Sourdough is typically baked at a high temperature, around 450°F (232°C), to encourage a rapid rise and a crispy crust. The high heat helps the dough undergo what’s known as “oven spring,” the final burst of rising when the dough hits the oven’s heat. Once you’ve placed the dough inside, reduce the temperature slightly to around 400°F (200°C) after the first 15-20 minutes of baking.
4. Baking and Timing: Getting That Perfect Crust and Crumb
Baking sourdough takes time, but with patience, you’ll achieve that golden-brown, perfectly textured loaf.
- Bake in Two Phases: The first phase of baking is where the dough will rise the most, so it’s essential to retain steam during this time. After the first 20 minutes in the oven, reduce the temperature to 400°F (200°C) and continue baking for another 25–30 minutes. This second phase allows the crust to set while the inside continues to cook.
- Check for Doneness: To check if your sourdough is done, tap the bottom of the loaf. If it sounds hollow, it’s fully baked. You can also use a thermometer; the internal temperature should be around 200°F (93°C) when the bread is fully cooked. The crust should be a deep golden-brown color, and the bread should have a firm, slightly chewy texture inside.
5. Cooling the Bread: Letting the Sourdough Rest
After removing the bread from the oven, allow it to cool on a wire rack for at least an hour before slicing. When following rising recipes, this cooling period is essential, as it allows the flavors to continue to develop and the crumb texture to firm up. Cutting into hot sourdough can result in a gummy texture, which is why patience is key when working with rising recipes.
By following the right rising recipes, you’ll learn that cooling time plays an important role in perfecting your homemade bread recipes. The longer the dough has to cool, the better the final texture will be. Whether you’re using rising recipes for soft bread or quick rising bread, this simple step ensures that the bread reaches its full flavor and texture potential.
When it comes to perfect rise baking, patience is a key element in the process. Even though you might be eager to slice your loaf, waiting for the bread to cool properly is one of the best bread rising tips. With the right rising recipes, this cooling period allows the dough to stabilize, preventing a gummy or overly dense crumb.
The next time you make bread using rising recipes, be sure to let it cool completely on a wire rack. This will help you achieve that perfect crumb texture and ensure that you get the best results from your dough rising techniques.
Conclusion:
Shaping and baking sourdough requires care and attention, but following the right steps can help you achieve that perfect loaf. From gently shaping the dough and scoring it for controlled expansion to baking in a preheated Dutch oven with steam, each step contributes to a flavorful, airy, and beautifully textured sourdough loaf. With practice and patience, you’ll be able to bake sourdough with the perfect rise, crisp crust, and tender crumb, every time.
Conclusion: Mastering Rising Recipes and Enjoying Delicious Comfort Foods
Mastering rising recipes is an essential skill for any home baker. From fluffy bread to perfectly risen pizza dough, understanding the science behind rising recipes can transform your baking. Whether you’re experimenting with sourdough, dinner rolls, or croissants, these rising recipes will help you achieve the perfect texture and flavor every time.
If you’re not in the mood for baking but still want something tasty, you can always check out the Burger King breakfast menu for quick options. Their breakfast items are perfect for when you’re in a rush and craving something delicious. However, there’s something special about the satisfaction of mastering your own rising recipes at home.
After perfecting your rising recipes, why not enjoy a comforting dish like the Best Bacon Cheeseburger Casserole Recipe? It’s a cheesy, satisfying meal that pairs well with your freshly baked creations. Check out the recipe here to add a savory twist to your meal planning!
In the end, while the Burger King breakfast menu offers convenience, there’s nothing like the homemade goodness you get from crafting the perfect rising recipes. With time and practice, you’ll be able to fill your kitchen with the aroma of fresh, perfectly risen bread, rolls, and more.