
Did you know pancake mix can double as a secret weapon for making cookies? If you’re looking for a quick and delicious dessert, this pancake mix cookie recipe is the perfect solution. It simplifies baking, saves time, and delivers soft, chewy cookies with minimal effort.
This recipe is ideal for busy days or when you’re craving a homemade treat but don’t want to measure out a long list of ingredients. With just a few pantry staples, you can transform pancake mix into irresistible cookies in no time. Plus, it’s versatile—you can easily customize it by adding chocolate chips, sprinkles, or even peanut butter for a unique twist.
In this post, you’ll learn how to make cookies with pancake mix, step-by-step. We’ll also share tips to perfect your baking and ideas for creating fun variations. Let’s get started on this simple yet tasty recipe!
1: Why Use Pancake Mix for Cookies?
Convenience of Pancake Mix: How It Simplifies the Cookie-Making Process
Pancake mix makes baking cookies faster and easier, even for beginners. It offers a simple way to prepare delicious treats without the need for precise measurements or complex techniques. Here’s how pancake mix streamlines the cookie-making process:
1. Pre-Mixed Ingredients for Quick Prep
Pancake mix combines essential ingredients like flour, sugar, and baking powder in one package. This saves time by eliminating the need to measure and mix multiple dry ingredients. You can skip several steps and go straight to combining the mix with wet ingredients, cutting down your preparation time significantly.
2. Fewer Tools, Less Cleanup
When using pancake mix, you reduce the number of bowls, measuring spoons, and utensils needed for baking. With fewer tools to wash, cleanup becomes quick and hassle-free. This makes pancake mix cookies a great choice for busy schedules or impromptu baking sessions.
3. Beginner-Friendly Process
Baking cookies can feel overwhelming for those new to it, but pancake mix simplifies everything. Since the dry ingredient ratios are pre-balanced, you don’t have to worry about over-measuring flour or forgetting a key ingredient. The straightforward instructions make it almost impossible to go wrong.
4. Versatile and Always on Hand
Most people already have pancake mix in their pantry, making this recipe convenient and budget-friendly. You can also adapt the mix to create a variety of flavors by adding ingredients like chocolate chips, nuts, or even a sprinkle of cinnamon. This versatility ensures you’ll never get bored with the same cookies.
5. Perfect for Quick Bakes
If you need a last-minute dessert or snack, pancake mix cookies can be ready in under 30 minutes. There’s no need for extended preparation, making it a lifesaver when time is tight but you still want something homemade and delicious.
With pancake mix, you can enjoy all the fun of baking cookies without the stress. It’s the ultimate shortcut for anyone looking to make sweet treats with minimal effort and maximum satisfaction.
Versatility of Pancake Mix: Perfect for Breakfast and Dessert
Pancake mix isn’t just for pancakes. Its versatile nature makes it a fantastic base for a variety of recipes, from sweet breakfasts to indulgent desserts. Whether you’re starting your morning or ending your day on a sweet note, pancake mix offers endless possibilities. Here’s why it works so well:
1. From Fluffy Pancakes to Chewy Cookies
Pancake mix is traditionally used for light, fluffy pancakes, but it easily transitions into a key ingredient for other recipes like cookies, muffins, or waffles. Its balanced blend of flour, leavening agents, and sugar allows it to adapt seamlessly to both savory and sweet creations. This flexibility is what makes pancake mix a kitchen essential.
2. Sweet Treats for Dessert
Transforming pancake mix into cookies is just one example of its versatility for desserts. By adding ingredients like chocolate chips, peanut butter, or fruit, you can create unique cookie flavors in minutes. You can even use pancake mix as a base for dessert bars, cobblers, or quick cakes. Its ability to pair with a variety of sweet flavors makes it an ideal shortcut for desserts.
3. Easy Breakfast Options Beyond Pancakes
Pancake mix isn’t limited to just pancakes for breakfast. You can use it to make scones, crepes, or even breakfast muffins. By adding ingredients like berries, bananas, or a touch of cinnamon, you can customize your breakfast creations. Pancake mix offers a quick way to prepare hearty, satisfying options that go beyond the usual morning fare.
4. Ideal for Creative Recipes
Pancake mix invites creativity in the kitchen. For instance, you can make savory breakfast options by adding cheese or herbs to the mix. On the flip side, you can go full-on sweet for dessert by incorporating flavors like caramel, marshmallows, or Nutella. Its ability to shift between savory and sweet dishes makes it a truly versatile ingredient.
5. Great for Any Time of Day
The best part about pancake mix is its all-day appeal. You can whip up a batch of cookies in the afternoon for a snack or bake a quick dessert in the evening. On weekends, you can prepare a special breakfast or brunch without spending hours in the kitchen. Its ability to fit seamlessly into any meal plan makes it an incredibly convenient pantry staple.
By keeping pancake mix on hand, you have a go-to ingredient for a wide range of recipes. From breakfast to dessert, it’s the ultimate kitchen multitasker, saving you time while delivering delicious results.
Great for Beginners: Foolproof and Requires Minimal Ingredients
Baking can sometimes feel intimidating, especially if you’re a beginner. However, pancake mix makes the process much easier. It simplifies baking by cutting out unnecessary steps and reducing the chances of mistakes. If you’re new to baking or just looking for a no-fail recipe, pancake mix cookies are a great starting point. Here’s why:
1. No Need for Complex Measurements
One of the biggest challenges for beginners is accurately measuring baking ingredients. Pancake mix eliminates this step because it already combines essential ingredients like flour, sugar, and leavening agents. You only need to add a few wet ingredients—like eggs, butter, and milk—to create the perfect cookie dough. This simplicity ensures that even first-time bakers can achieve success.
2. Minimal Ingredients, Maximum Flavor
With pancake mix, you don’t need to stock your pantry with a long list of ingredients. The mix itself serves as the foundation for your cookies. Add-ins like chocolate chips, nuts, or vanilla extract are optional, but they allow you to experiment with flavors without complicating the recipe. This approach keeps the process easy while delivering delicious results.
3. Clear and Straightforward Instructions
Recipes using pancake mix are typically simple, with step-by-step instructions that anyone can follow. You don’t need advanced baking skills or special equipment. All you need is a mixing bowl, a spoon, and a baking sheet to get started. The straightforward process ensures that your cookies turn out well every time.
4. Hard to Mess Up
Baking can sometimes feel unforgiving, especially when small mistakes ruin the outcome. However, pancake mix cookies are more forgiving than traditional recipes. The mix has the right balance of ingredients, so the dough is less likely to turn out too dry or too wet. Even if you slightly alter the proportions, the recipe will still work.
5. Quick Results Without Stress
For beginners, one of the most rewarding aspects of using pancake mix is how quickly you can enjoy the results. From start to finish, the process takes less than 30 minutes. This short timeframe makes it easier to stay engaged and build confidence in the kitchen. Plus, the delicious aroma of freshly baked cookies is an instant reward for your effort.
6. Encourages Creativity Without Pressure
Once you’re comfortable with the basic recipe, you can experiment by adding your favorite flavors or trying different variations. Since the foundation is foolproof, you can focus on creativity without worrying about ruining the cookies. This flexibility makes pancake mix an excellent choice for beginners looking to develop their baking skills.
For anyone starting their baking journey, pancake mix cookies provide a stress-free introduction. With minimal ingredients, simple instructions, and reliable results, this recipe proves that baking can be easy, enjoyable, and incredibly rewarding.
2: Ingredients Needed for Pancake Mix Cookies
Basic Ingredients: The Essentials for Pancake Mix Cookies
To create delicious pancake mix cookies, you only need a handful of basic ingredients. These pantry staples combine to form a simple yet flavorful cookie dough that’s easy to prepare. Let’s break down each ingredient and its role in the recipe:
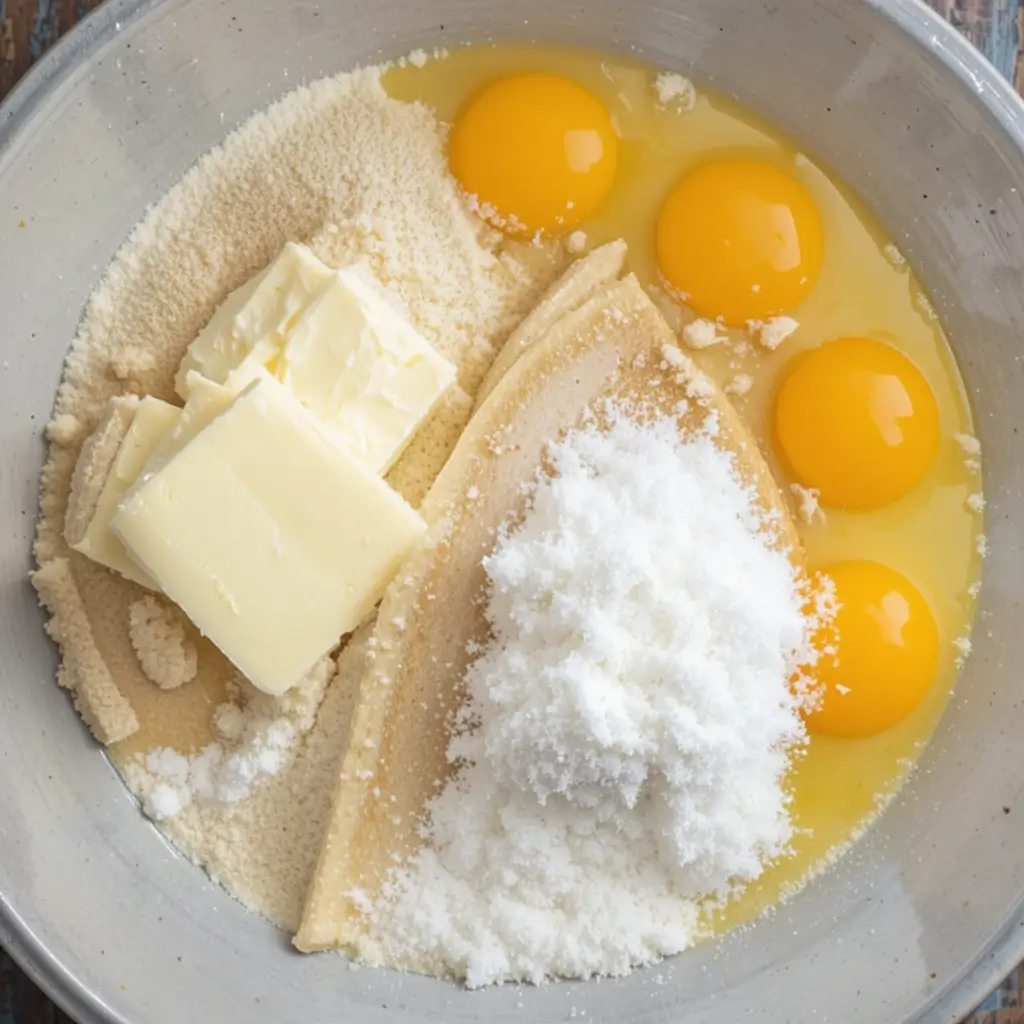
1. Pancake Mix
The star of this recipe, pancake mix, serves as the foundation for your cookies. It combines flour, sugar, baking powder, and sometimes salt in a pre-measured ratio. This eliminates the need to measure multiple dry ingredients, making the process quicker and more convenient. Choose your favorite brand of pancake mix, whether it’s a classic option like Bisquick or a specialty mix like gluten-free or whole-grain varieties.
2. Butter
Butter adds richness, flavor, and moisture to your cookies. When creamed with sugar, it helps create a soft, tender texture. For the best results, use unsalted butter so you can control the salt content in your cookies. Make sure the butter is softened before mixing, as this ensures it blends evenly with the other ingredients.
3. Sugar
Sugar is essential for sweetness and contributes to the cookie’s golden-brown color during baking. Depending on your preference, you can use white granulated sugar for a classic flavor or brown sugar for a richer, caramel-like taste. A combination of both can also enhance the texture and flavor.
4. Eggs
Eggs act as a binding agent, holding the ingredients together while also providing structure. They help the cookies rise slightly during baking, resulting in a soft and chewy texture. For standard recipes, large eggs work perfectly. Make sure the eggs are at room temperature for smoother mixing.
5. Milk
Milk is the liquid ingredient that brings the dough together, making it easier to shape. It also adds a hint of creaminess to the final cookies. Use any milk you prefer—whether it’s whole milk, almond milk, or another alternative. Adjust the quantity slightly if your dough feels too dry or sticky.
Optional Add-Ins for Extra Flavor
While the basic ingredients create a delicious cookie, you can elevate the flavor by including optional add-ins. Consider mixing in chocolate chips, nuts, dried fruits, or sprinkles to customize your cookies. A dash of vanilla extract or a pinch of cinnamon can also enhance the overall taste.
By keeping these basic ingredients on hand, you’re always ready to bake a quick batch of pancake mix cookies. The simplicity of this recipe makes it accessible for anyone, whether you’re a seasoned baker or just starting out.
Optional Add-Ins: Boosting Flavor and Texture
While the basic ingredients create a delicious and simple cookie, adding a variety of mix-ins can take your pancake mix cookies to the next level. These optional add-ins offer a chance to customize your cookies and experiment with different flavors and textures. Here’s a look at some of the most popular add-ins to consider:

1. Chocolate Chips
Chocolate chips are the classic choice for a reason—they bring richness and sweetness to every bite. Whether you opt for milk chocolate, dark chocolate, or even white chocolate chips, this addition makes your cookies irresistibly delicious. You can also mix in mini chocolate chips for a bit of extra crunch or swirl in some chocolate chunks for a more decadent, gooey texture.
2. Nuts
Adding chopped nuts like walnuts, pecans, or almonds gives your cookies a satisfying crunch and a touch of nutty flavor. Nuts also bring healthy fats, adding a richer texture that contrasts nicely with the softness of the cookie dough. If you’re a fan of salted nuts, like salted almonds or cashews, they can create an exciting sweet-and-salty flavor profile.
3. Sprinkles
Sprinkles are a fun way to add color and a touch of whimsy to your cookies. Whether you’re baking for a special occasion or just want to add some cheer to your batch, sprinkles make your cookies look vibrant and festive. You can choose from classic rainbow sprinkles, holiday-themed sprinkles, or even sugar crystals for extra sparkle. They’re especially popular in funfetti-inspired cookies.
4. Dried Fruit
Dried fruits, such as cranberries, raisins, or apricots, bring a natural sweetness and chewy texture to your cookies. These fruits also add a burst of flavor that complements the rich, buttery dough. Dried fruit is an excellent choice for those who prefer a more subtle, less sugary cookie, and it pairs well with nuts like pecans or almonds for extra crunch.
5. Coconut Flakes
Shredded coconut adds a tropical twist to your cookies, bringing both flavor and texture. The slight chewiness of the coconut complements the softness of the cookie, and its subtle sweetness works well with both chocolate chips and dried fruit. Coconut flakes can also enhance the visual appeal of your cookies with their light, snow-like appearance.
6. Candy Pieces
For a more indulgent treat, you can add chopped-up candy bars, like Snickers, M&Ms, or Reese’s cups. This is a great option for anyone with a sweet tooth who wants to create a more decadent cookie. Candy pieces melt into the dough, adding pockets of gooey sweetness throughout the cookie.
7. Spices and Extracts
To deepen the flavor of your cookies, consider adding a dash of ground cinnamon, nutmeg, or even a splash of vanilla or almond extract. These spices and extracts can completely transform the flavor profile, giving your cookies a warm, comforting taste. You can also experiment with a pinch of ginger or pumpkin spice for seasonal varieties.
Customization Tips
The beauty of optional add-ins is that you can mix and match based on your personal taste preferences. Don’t be afraid to get creative and try new combinations. For example, try pairing dried cranberries with white chocolate chips, or mix peanut butter chips with chopped peanuts for a peanut-packed treat.
By experimenting with these add-ins, you can make each batch of pancake mix cookies your own. Whether you prefer chocolatey, nutty, fruity, or spicy flavors, the possibilities are endless.
Recommended Pancake Mix Brands: Popular Options for Pancake Mix Cookies
When it comes to making pancake mix cookies, the choice of pancake mix plays a key role in achieving the best results. While any standard pancake mix can work, certain brands stand out for their flavor, texture, and versatility. Here’s a list of popular pancake mix brands that deliver great results for cookie recipes:
1. Bisquick
As one of the most well-known pancake mix brands, Bisquick is a go-to choice for many bakers. Its consistency and balanced blend of ingredients make it perfect for pancakes, waffles, and, of course, cookies. Bisquick produces soft and chewy cookies with a rich, buttery flavor. Its versatility also means it can be easily adapted for different variations, from chocolate chip cookies to cinnamon sugar treats. Bisquick is a trusted choice for both novice and experienced bakers.
2. Krusteaz
Krusteaz is another favorite pancake mix brand that works wonderfully for cookies. Known for its fluffy pancakes, Krusteaz also creates cookies with a soft and tender texture. The mix is easy to use and consistently delivers good results. For those looking to bake with convenience and minimal effort, Krusteaz is a solid choice. Additionally, Krusteaz offers different varieties, such as buttermilk and protein-packed mixes, so you can select the one that best fits your taste and dietary preferences.
3. Aunt Jemima (Now Pearl Milling Company)
Aunt Jemima, now rebranded as Pearl Milling Company, is a classic pancake mix brand that many home bakers trust. The original formula offers a great balance of flavor and texture, creating soft, fluffy cookies when used in your recipe. The mix is budget-friendly and widely available, making it a go-to option for families and beginner bakers alike. If you’re looking for a reliable and simple pancake mix for your cookies, this is a great option.
4. Hungry Jack
Hungry Jack is a popular pancake mix brand known for its rich, buttery flavor. It’s also a fantastic choice for baking cookies because of its texture and consistency. Hungry Jack pancakes are light and fluffy, and the mix creates cookies that are tender on the inside with a slightly crisp exterior. For anyone who prefers a more traditional pancake mix flavor with their cookies, Hungry Jack is an excellent option.
5. Kodiak Cakes
If you’re looking for a healthier pancake mix option, Kodiak Cakes offers a high-protein, whole-grain alternative. Their pancake mix is perfect for anyone who wants to add a nutritional boost to their cookies without compromising on flavor. Kodiak Cakes’ mixes, such as the Buttermilk & Maple variety, provide a heartier taste and a slightly denser texture that makes for satisfying, flavorful cookies. This is a great choice for anyone looking to create a healthier version of pancake mix cookies.
6. King Arthur Flour
King Arthur Flour is renowned for its high-quality baking products, and its pancake mix is no exception. The brand’s pancake mix is made with premium ingredients, which results in cookies with a light and delicate texture. King Arthur’s mix is perfect for bakers who want to elevate their cookies with a professional-grade product. It also offers options like gluten-free pancake mix, making it an excellent choice for those with dietary restrictions.
7. Birch Benders
Birch Benders offers a range of pancake mixes that are perfect for people looking for a cleaner, more natural option. Their mixes are made with simple ingredients and contain no artificial flavors or preservatives. Birch Benders’ pancake mix can create cookies that are both delicious and wholesome, with an added focus on quality. If you prefer a mix made with non-GMO ingredients, Birch Benders is an excellent choice for baking your next batch of cookies.
Choosing the Right Pancake Mix
The best pancake mix for cookies ultimately depends on your flavor preference and dietary needs. For classic, soft cookies, go with popular options like Bisquick, Krusteaz, or Aunt Jemima. If you’re aiming for a healthier treat, Kodiak Cakes or Birch Benders can add extra nutritional benefits. Whatever brand you choose, you can count on pancake mix to deliver quick, easy, and tasty results for your cookies.
3: Step-by-Step Pancake Mix Cookie Recipe
Step 1: Prepping Your Ingredients – Getting Everything Ready for Pancake Mix Cookies
Before you dive into the fun of baking pancake mix cookies, it’s essential to prepare your ingredients properly. A little prep work can make the whole process smoother and ensure the best results. Here’s how to measure and prepare everything for your pancake mix cookie recipe:
1. Gather All Your Ingredients
First, make sure you have all the ingredients you need. You’ll need pancake mix, butter, sugar, eggs, and milk as your base ingredients. If you’re adding optional mix-ins like chocolate chips, nuts, or dried fruit, set those aside as well. Having everything on hand prevents scrambling mid-recipe and ensures you don’t miss anything.
2. Measure the Ingredients Correctly
Accurate measurement is key to the perfect cookie dough. For pancake mix cookies, the measurements are typically straightforward, but it’s still important to follow the recipe. Use dry measuring cups for ingredients like pancake mix and sugar, and level off the ingredients with a flat edge to ensure accuracy. For butter, measure it using a stick marked with measurements, or use a kitchen scale for precision. Eggs should be large and at room temperature to ensure they incorporate smoothly into the dough. If you’re adding milk, use a liquid measuring cup and check at eye level to avoid over-pouring.
3. Softening the Butter
Butter is a crucial ingredient in cookie recipes because it adds richness and helps with texture. To make sure it blends well into your dough, soften the butter before use. Set it out at room temperature for about 30 minutes before you begin baking. Softened butter is easier to mix with sugar, creating a smoother, creamier dough. If you’re in a hurry, you can soften butter quickly by cutting it into small chunks and microwaving it in short bursts (5-10 seconds). Avoid melting the butter entirely, as this can result in a greasy dough.
4. Preheat Your Oven
While prepping your ingredients, preheat your oven to the temperature specified in your recipe, typically 350°F (175°C). Preheating ensures that your cookies bake evenly and at the right temperature. It’s best to preheat the oven while you mix your ingredients so that the oven is ready when the dough is ready to go on the baking sheet.
5. Line Your Baking Sheet
To prevent your cookies from sticking to the baking sheet, line it with parchment paper or a silicone baking mat. This also makes cleanup easier. If you don’t have either, you can lightly grease the baking sheet with cooking spray or butter. Make sure the surface is evenly coated to ensure your cookies bake evenly and don’t stick when you try to remove them.
6. Preparing Mix-Ins (Optional)
If you’re using mix-ins like chocolate chips, nuts, or dried fruit, now is the time to prep them. If you’re adding nuts, chop them into small pieces to ensure they distribute evenly in the dough. For dried fruit, chop it into bite-sized pieces. If using chocolate chips, measure them out and set them aside. Preparing your add-ins in advance keeps everything organized and ready to fold into the dough quickly.
7. Set Up Your Mixing Area
Before you start combining the ingredients, clear your counter or workspace so you have plenty of room to mix the dough. Having a clean, clutter-free area will help you focus on the task at hand. Get a mixing bowl large enough to accommodate the ingredients and a spoon or electric mixer to mix the dough. This simple preparation ensures that everything is in place for efficient mixing and cookie-making.
By taking a few extra steps to prep your ingredients, you set yourself up for a smoother, more enjoyable baking experience. Properly measuring, softening your butter, and organizing your ingredients ensures that your pancake mix cookies come out perfectly every time. This prep work is the first step toward making delicious, homemade treats with minimal effort.
Step 2: Mixing the Dough – Combining the Pancake Mix with Other Ingredients
Once you’ve prepped your ingredients, it’s time to mix the dough. This step is crucial because it determines the texture and consistency of your pancake mix cookies. It’s important to incorporate everything evenly and not overwork the dough. Here’s how to do it:
1. Cream the Butter and Sugar
Start by creaming the softened butter and sugar together in a large mixing bowl. Use an electric mixer or a hand whisk to beat the two ingredients together until the mixture becomes light and fluffy. This process helps incorporate air into the dough, resulting in cookies that are soft and tender. If you’re using a stand mixer, start on low speed to avoid splattering sugar, and gradually increase the speed as the butter and sugar blend together.
The sugar not only sweetens the cookies but also helps to create that golden-brown color during baking. You can use either white granulated sugar for a clean, classic sweetness or brown sugar for a richer, more caramel-like flavor. Some bakers prefer a combination of both for a more complex taste.
2. Add the Eggs
Once the butter and sugar are well mixed, add in the eggs, one at a time, beating well after each addition. This step helps bind the dough together and gives structure to your cookies. Make sure the eggs are fully incorporated before adding the next ingredient. If your eggs are at room temperature, they will mix in more evenly and prevent the dough from curdling.
3. Mix in the Milk
Next, add the milk to the mixture, continuing to beat until it is fully combined. The milk helps create the right consistency for the dough, giving it moisture and making it easier to work with. If you prefer a thicker dough, you can reduce the amount of milk slightly. On the other hand, if the dough seems too thick or dry, you can add a little extra milk to achieve the desired consistency. Be careful not to add too much, as this can make the dough too runny.
4. Gradually Add the Pancake Mix
Now comes the key ingredient—pancake mix. Gradually add the pancake mix to the wet ingredients, stirring gently with a spoon or spatula. If you’re using an electric mixer, be sure to start at a slow speed to avoid the pancake mix from flying out of the bowl. Mix until the dough comes together and no dry spots remain.
The pancake mix is the backbone of the cookie dough. Its combination of flour, sugar, and baking powder provides the necessary structure and rise for the cookies. If you prefer a more cake-like texture, you can add a little more pancake mix. For chewier cookies, slightly reduce the pancake mix amount or add a touch more butter.
5. Add Optional Mix-Ins
Once the pancake mix is fully incorporated, it’s time to add any optional mix-ins, such as chocolate chips, nuts, or dried fruit. Use a spatula to fold them into the dough gently. Be careful not to overmix at this stage, as doing so can cause the dough to become too dense. The goal is to evenly distribute the mix-ins without crushing them or altering the dough’s texture too much.
If you’re using add-ins that are heavier, like nuts or dried fruit, make sure to fold them in gently to avoid clumping. For lighter ingredients like chocolate chips, you can stir them in more vigorously, as they won’t weigh the dough down as much.
6. Check the Dough Consistency
Before you finish, check the dough’s consistency. It should be soft and slightly sticky but not too wet. If the dough feels too runny, you can add a little more pancake mix to firm it up. If it feels too dry, a splash of milk can help bring it to the right consistency. You want the dough to hold together without spreading too much when baked.
Tips for Mixing Success
- Don’t Overmix: Overmixing the dough can result in dense, tough cookies. Mix just until everything is incorporated.
- Room Temperature Ingredients: Ensure your butter and eggs are at room temperature to avoid clumps and uneven mixing.
- Be Gentle with Add-ins: Fold in any optional mix-ins carefully to keep the dough from getting overworked and to maintain a light, airy texture.
Once your dough is well-mixed and the consistency is just right, you’re ready to move on to the next step—shaping the dough and preparing to bake those delicious pancake mix cookies.
Step 3: Baking the Cookies – Perfecting the Temperature and Timing
Now that your cookie dough is ready, it’s time to bake! The baking process is where your pancake mix cookies come to life. You’ll want to pay close attention to the oven temperature, baking time, and how your cookies look as they bake to achieve the perfect texture. Here’s a step-by-step guide to baking your pancake mix cookies:
1. Preheat the Oven
Before you begin shaping your cookies, preheat your oven to 350°F (175°C). Preheating the oven ensures that your cookies start baking as soon as they go in, leading to even cooking and the best texture. If your oven tends to have hot spots or doesn’t always maintain consistent heat, it’s a good idea to rotate your baking sheet halfway through the baking time to ensure uniform results.
2. Prepare the Baking Sheet
While the oven is preheating, line your baking sheet with parchment paper or a silicone baking mat. This prevents the cookies from sticking to the sheet and makes cleanup easier. If you don’t have parchment paper, you can lightly grease the baking sheet with butter or non-stick cooking spray. You want to make sure the surface is fully covered to help the cookies bake evenly without sticking.
3. Scoop and Shape the Dough
Using a spoon, cookie scoop, or your hands, scoop out portions of dough and place them onto the prepared baking sheet. Space the dough balls about 2 inches apart, as the cookies will spread slightly while baking. If you want larger cookies, you can use a bit more dough, but be sure to adjust the baking time accordingly. For smaller, bite-sized cookies, use a smaller scoop and reduce the baking time by a minute or two.
To create uniform cookies, you can roll the dough balls between your palms to smooth them out. If you prefer a more rustic look, simply scoop and drop the dough without shaping. This method can give your cookies a more homemade, textured appearance.
4. Baking Time
Place the baking sheet in the preheated oven and bake the cookies for 8-10 minutes. The exact time may vary depending on your oven and the size of your cookies, so it’s a good idea to start checking around 8 minutes. Look for the following signs to know when they’re done:
- Edges: The edges should look slightly golden and firm.
- Top: The top of the cookies should look set but still soft. They will continue to firm up as they cool.
- Slight Cracks: If you see small cracks or wrinkles on the surface of the cookies, they’re usually a sign that they are perfectly baked.
Remember, cookies often continue to cook on the baking sheet after you take them out of the oven. So, err on the side of underbaking slightly for chewier, softer cookies, and let them rest on the sheet for a couple of minutes before transferring them to a cooling rack.
5. Check for Doneness
If you’re not sure whether your cookies are fully baked, do a quick visual check: The cookies should be lightly golden on the edges, and the center should not look raw. You can also gently press a cookie with a finger; if it springs back, it’s done. If it leaves an indentation, the cookie might need a little more time in the oven.
If you’re baking multiple trays of cookies, rotate them halfway through the baking time to ensure even cooking. Als if your oven tends to bake unevenly, it may help to switch the trays around, moving the bottom tray to the top and vice versa.
6. Cooling the Cookies
Once the cookies are baked to perfection, take the baking sheet out of the oven and let them sit for 2-3 minutes. This resting time allows the cookies to firm up and makes them easier to transfer. After a short wait, carefully move the cookies onto a wire rack using a spatula. Placing them on a wire rack helps cool them quickly and prevents the bottoms from becoming soggy.
For crispier cookies, let them cool on the sheet for a bit longer before transferring. For soft, chewy cookies, move them sooner to avoid overbaking.
7. Don’t Forget the Next Batch
If you have more cookie dough left to bake, repeat the process with a new batch of dough. Just be sure to let the baking sheet cool slightly before adding the new dough to avoid spreading issues.
Baking Tips for the Perfect Pancake Mix Cookies
- Oven Thermometer: Ovens can sometimes be inaccurate. Consider using an oven thermometer to ensure your oven is truly at 350°F.
- Watch for Overbaking: To keep your cookies soft and chewy, avoid overbaking. Slightly underbake them for a soft, gooey center that firms up as they cool.
- Cooling Racks: If you don’t have a cooling rack, you can also place your cookies on a clean countertop lined with parchment paper to cool.
By following these baking steps, you’ll create perfect pancake mix cookies every time. Whether you prefer your cookies soft and chewy or crisp and golden, adjusting the baking time will help you achieve your desired results.
Step 4: Cooling and Serving – Tips for Perfect Texture and Serving Suggestions
Cooling your cookies properly is just as important as the baking process. How you cool the cookies affects their texture, flavor, and overall appearance. Here’s how to cool your pancake mix cookies to ensure they come out with the best possible texture, followed by some serving suggestions for maximum enjoyment:
1. Let the Cookies Rest on the Baking Sheet
Once your cookies are done baking, remove them from the oven and let them rest on the baking sheet for about 2 to 3 minutes. During this time, the cookies will continue to firm up, making them easier to transfer to a cooling rack. If you try to move them too quickly, they might break or lose their shape. The brief resting time also allows the residual heat to finish cooking the center of the cookie without overbaking.
2. Use a Cooling Rack
After the initial resting period, gently transfer the cookies to a wire cooling rack. This step is crucial for achieving the perfect texture. A cooling rack helps air circulate around the cookies, preventing them from becoming soggy on the bottom. If you don’t have a wire rack, you can place the cookies on a clean counter or table lined with parchment paper, but a cooling rack is ideal for keeping them crisp.
For soft cookies, avoid leaving them on the baking sheet for too long, as this may cause them to become too firm. For a firmer texture, let them cool for a little longer before moving them.
3. Cooling Time for Different Textures
- Chewy Cookies: For a soft and chewy texture, remove the cookies from the oven when the edges are lightly golden but the centers still look a bit soft. Let them rest on the baking sheet for a couple of minutes before transferring them to the wire rack. The cookies will continue to set as they cool but remain moist and tender.
- Crispy Cookies: If you prefer a crispier cookie, let them bake for a minute or two longer, then let them cool on the baking sheet for a few minutes before transferring them to the wire rack. This extra cooling time helps the cookies harden to a crisp, crunchy texture.
4. Don’t Stack the Cookies Too Soon
While it may be tempting to stack your freshly baked cookies, avoid doing so until they’ve completely cooled. Stacking cookies while they’re still warm can cause them to become soggy due to trapped moisture. Allow the cookies to cool fully on the rack before arranging them in stacks or serving containers.
5. Storage Tips for Freshness
Once your cookies have cooled completely, it’s time to store them. For maximum freshness and to maintain their texture, place the cookies in an airtight container. For soft, chewy cookies, store them at room temperature for up to 3-4 days. If you want to keep your cookies for longer, you can freeze them. Simply place the cookies in a freezer-safe container or bag, separating layers with parchment paper, and freeze them for up to 3 months. When you’re ready to enjoy, just thaw them at room temperature for a few hours or heat them up in the microwave for a few seconds.
6. Serve and Enjoy
Once your cookies are cooled and stored, it’s time to serve them! Here are some fun ideas to make your pancake mix cookies even more enjoyable:
- With a Glass of Milk: There’s nothing quite like the classic combination of cookies and milk. The soft, chewy texture of pancake mix cookies pairs perfectly with a cold glass of milk.
- Cookie Ice Cream Sandwiches: For a special treat, use your pancake mix cookies to make ice cream sandwiches. Just sandwich a scoop of your favorite ice cream between two cookies and freeze for an indulgent dessert.
- Add a Dusting of Powdered Sugar: If you want to give your cookies a festive touch, lightly dust them with powdered sugar just before serving. This is especially great for holiday cookie plates or when you want to add a little extra flair.
- Serve with Coffee or Tea: Pair your cookies with a hot cup of coffee or tea for a comforting dessert experience. The richness of the cookies complements the warmth of the drink.
7. Reheating for a Fresh-from-the-oven Taste
If your cookies have cooled but you want to enjoy them as if they just came out of the oven, reheat them in the oven at 300°F (150°C) for 5-7 minutes. This will revive their softness and make them taste fresh, especially if you’ve stored them for a few days. Alternatively, microwave the cookies for about 10-15 seconds to warm them up quickly.
By cooling and storing your pancake mix cookies properly, you ensure they maintain their delicious texture and stay fresh for longer. These tips will help you enjoy the perfect cookie every time, whether you’re sharing them with friends, packing them for lunch, or savoring them with a cozy drink.
4: Delicious Variations to Try
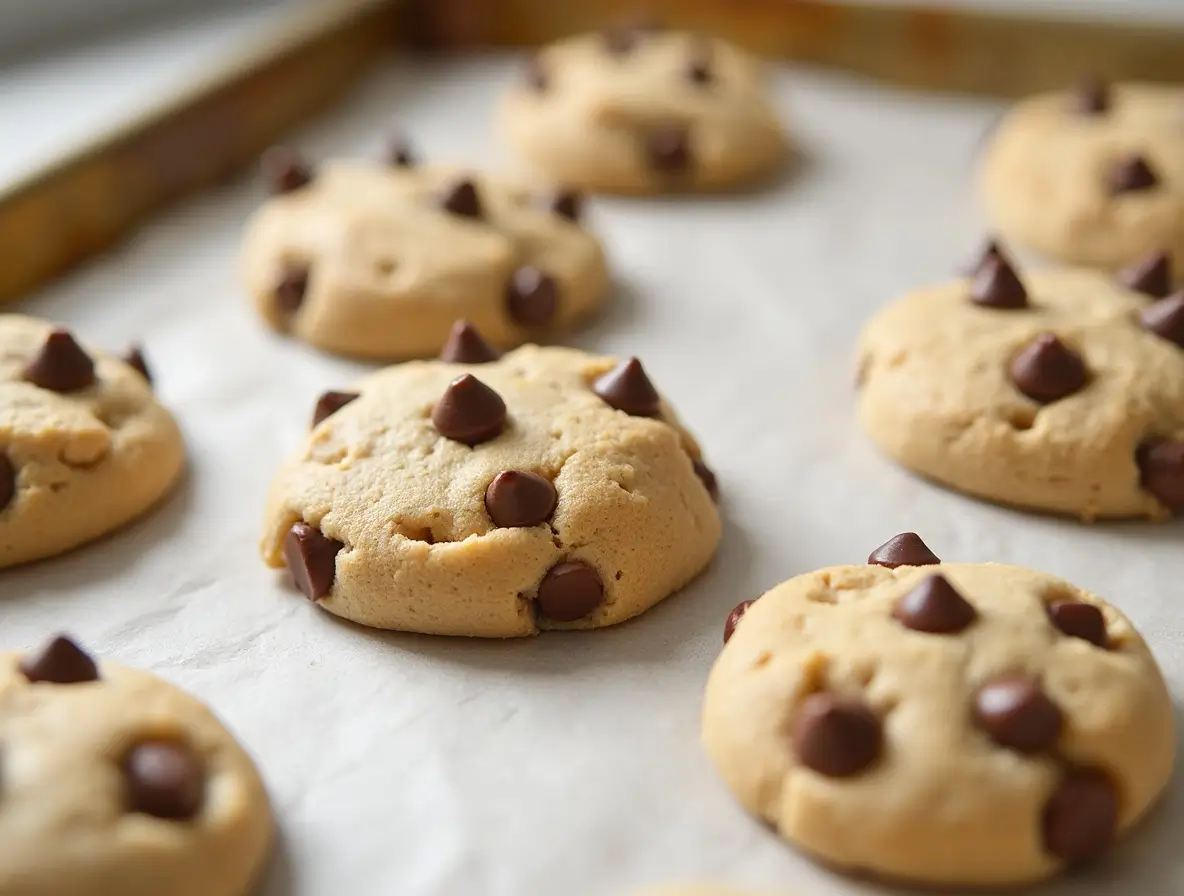
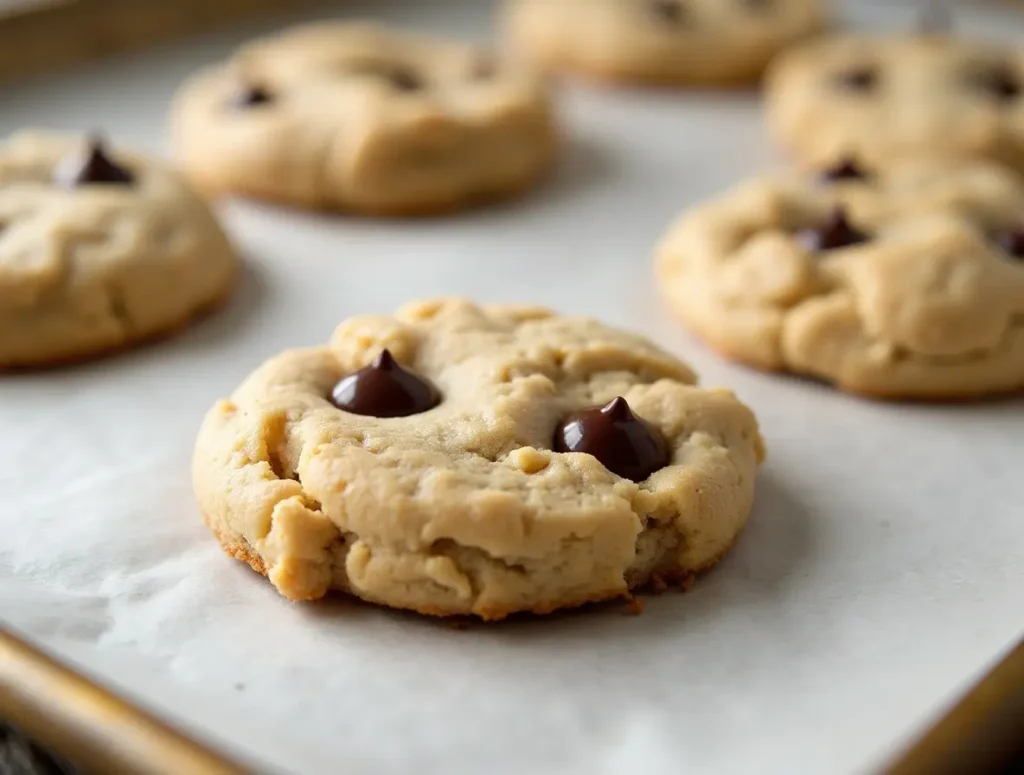
Chocolate Chip Pancake Mix Cookies – A Classic Twist on a Timeless Favorite
One of the most beloved cookie variations is the chocolate chip cookie, and when combined with pancake mix, you get a new, exciting twist on this classic treat. Chocolate chips bring an irresistible sweetness and rich flavor to the soft, fluffy texture of pancake mix cookies. Adding them is a simple way to elevate the taste, and the result is a cookie that’s both familiar and unique. Here’s how to make Chocolate Chip Pancake Mix Cookies:
1. Why Add Chocolate Chips to Pancake Mix Cookies?
The addition of chocolate chips to pancake mix cookies creates the perfect balance of sweetness and texture. Pancake mix already provides a soft, fluffy base, and the chocolate chips add gooey, melt-in-your-mouth pockets of chocolate that make each bite even more indulgent. Plus, chocolate chips are incredibly versatile and work well with other mix-ins, making it easy to customize your cookies. Whether you prefer semi-sweet, milk, or dark chocolate chips, they all complement the pancake mix dough beautifully.
Chocolate chips also create delightful pockets of melty chocolate that contrast with the tender cookie dough, adding to the overall satisfaction of each bite. If you’re someone who loves chocolate and cookies, this is an unbeatable combination.
2. Choosing the Right Chocolate Chips
There are several options when it comes to chocolate chips, and each brings a slightly different flavor to the table. Here’s a rundown of some popular choices:
- Semi-Sweet Chocolate Chips: These are the most common choice for chocolate chip cookies and offer a good balance of sweetness and rich chocolate flavor.
- Milk Chocolate Chips: If you prefer a sweeter, creamier taste, milk chocolate chips are a great option. They melt beautifully into the dough and create a sweeter cookie overall.
- Dark Chocolate Chips: For those who enjoy a slightly bitter contrast to the sweetness of the cookie, dark chocolate chips can create a more refined, grown-up flavor.
- Mini Chocolate Chips: These smaller chips distribute evenly throughout the dough, ensuring that every bite has chocolate in it. They’re perfect if you want to maintain a consistent texture in your cookie without having large chunks of chocolate.
You can even mix and match different types of chocolate chips for a fun, multi-dimensional flavor. A combination of milk and dark chocolate chips creates a perfect balance for chocolate lovers!
3. Adding the Chocolate Chips to the Dough
When it comes to incorporating the chocolate chips into your pancake mix cookie dough, the key is to fold them in gently so you don’t overmix the dough. Overmixing can cause the dough to become dense, which can impact the texture of your cookies.
After mixing the basic dough (pancake mix, butter, eggs, milk, and sugar), it’s time to add the chocolate chips. Add about 1 to 1 ½ cups of chocolate chips to the dough (you can adjust this based on your personal preference for chocolate-to-cookie ratio). Stir the dough gently with a spatula or spoon until the chocolate chips are evenly distributed. Be sure not to stir too vigorously, as you want to keep the dough light and fluffy.
4. Baking the Chocolate Chip Pancake Mix Cookies
Once the dough is ready and the chocolate chips are incorporated, follow the same baking instructions as with the classic pancake mix cookies. Preheat your oven to 350°F (175°C), scoop out the dough, and space the cookie balls about 2 inches apart on the baking sheet. Bake for 8-10 minutes, or until the edges are golden brown and the centers look slightly soft. You’ll notice the chocolate chips melting and oozing out as they bake, creating a beautifully gooey texture.
Remember, the baking time can vary depending on the size of your cookies, so start checking at 8 minutes and continue baking until you reach your desired texture. For a softer, chewier cookie, err on the side of underbaking slightly.
5. Let the Cookies Cool
Once your chocolate chip pancake mix cookies are done baking, let them cool on the baking sheet for 2-3 minutes before transferring them to a cooling rack. This brief rest will help them set and maintain their shape. As they cool, the chocolate chips will firm up a little, making each cookie even more delicious.
6. Serving Suggestions for Chocolate Chip Pancake Mix Cookies
Chocolate chip pancake mix cookies are perfect on their own, but there are plenty of ways to serve them for an extra-special touch:
- Serve with Ice Cream: Make a cookie sandwich by placing a scoop of vanilla, chocolate, or your favorite ice cream between two cookies. This creates a delicious contrast between the warm, gooey cookies and the cold, creamy ice cream.
- Drizzle with Caramel or Chocolate Sauce: For an indulgent treat, drizzle warm caramel or extra melted chocolate over the cookies. The sauce will enhance the chocolatey flavor and make the cookies even more decadent.
- Pair with a Drink: Chocolate chip cookies go perfectly with a cup of coffee, tea, or milk. The warmth of the drink complements the softness of the cookies, creating a cozy snack experience.
7. Customizing Your Chocolate Chip Pancake Mix Cookies
While chocolate chips are a classic addition to pancake mix cookies, there are endless ways to customize your creation:
- Add Nuts: Chop up some walnuts, almonds, or pecans to add a crunchy texture that complements the smooth chocolate.
- Mix in Dried Fruit: For a twist on the classic, try adding dried cranberries, raisins, or even dried cherries for a sweet and tart contrast.
- Sprinkles or Shredded Coconut: Add some fun by folding in colorful sprinkles or shredded coconut for extra flavor and texture.
With chocolate chips as the star ingredient, these pancakes mix cookies take on a deliciously rich flavor that will have everyone asking for more.
Peanut Butter Pancake Mix Cookies – A Rich, Nutty Flavor Twist
If you’re a fan of peanut butter, this peanut butter pancake mix cookie recipe will quickly become your go-to treat. The creamy, nutty goodness of peanut butter enhances the soft and fluffy texture of pancake mix cookies, creating a deliciously indulgent flavor in every bite. Whether you’re craving a quick snack or need a crowd-pleasing dessert, this peanut butter pancake mix cookie recipe delivers both ease and taste.
The beauty of this peanut butter pancake mix cookie recipe is in its simplicity. Using pancake mix as the base makes the preparation quick and hassle-free, while the addition of peanut butter brings a rich and satisfying layer of flavor to the cookies. The combination of pancake mix and peanut butter gives you the perfect balance of soft texture and bold taste, making this pancake mix cookie recipe a must-try for any peanut butter lover.
Next time you’re looking for a quick and easy dessert, don’t hesitate to whip up these peanut butter pancake mix cookies. The ease of the pancake mix cookie recipe and the delicious peanut butter twist make it the perfect snack to satisfy your sweet cravings. Enjoy the rich, nutty flavor of this peanut butter pancake mix cookie recipe with every bite! It’s a simple and delicious twist that elevates the classic pancake mix cookie to a whole new level. Here’s how to make these irresistible peanut butter-infused cookies:
1. Why Add Peanut Butter to Pancake Mix Cookies?
Peanut butter is a rich, flavorful ingredient that pairs wonderfully with the light, fluffy texture of pancake mix cookies. When added to the dough, it provides a soft, melt-in-your-mouth center with a nutty depth that’s hard to resist. The natural oils in peanut butter create a slightly denser texture, giving the cookies a satisfying chew, while the flavor balances the sweetness of the dough.
Peanut butter also adds a layer of complexity to your cookies, turning them into a savory-sweet treat that stands out. Whether you love creamy or crunchy peanut butter, both variations can be incorporated into your cookie dough, giving you a custom cookie experience.
2. Choosing the Right Peanut Butter
When selecting peanut butter for your cookies, it’s important to choose a quality product. Here are some considerations:
- Creamy Peanut Butter: This is the most common option for cookies. It blends seamlessly into the dough and gives the cookies a smooth texture. It’s ideal if you want a uniform, soft cookie without the crunch of peanuts.
- Crunchy Peanut Butter: If you enjoy a bit of texture in your cookies, go for crunchy peanut butter. It adds small chunks of peanuts that provide a nice contrast to the soft dough. It’s a great choice if you like a bit of crunch and extra nutty flavor in your cookies.
- Natural Peanut Butter: For a healthier option, you can opt for natural peanut butter. It’s typically made with just peanuts and salt, without added sugars or oils. Keep in mind that natural peanut butter may have a slightly different consistency, so you may need to adjust the recipe by adding a little more flour or pancake mix to compensate for any extra moisture.
Regardless of which type you choose, ensure the peanut butter is well-stirred and not too oily before adding it to the dough. This ensures an even distribution of flavor throughout the cookies.
3. Adding Peanut Butter to the Dough
Incorporating peanut butter into your pancake mix cookie dough is easy. After mixing the base ingredients (pancake mix, butter, sugar, eggs, and milk), add about ½ cup of peanut butter to the dough. Stir it in gently to avoid overmixing.
Here’s a tip: If your peanut butter is too thick and difficult to incorporate, microwave it for 15-20 seconds to loosen it up before adding it to the dough. This will help it mix in more easily, ensuring that the peanut butter flavor is evenly distributed throughout the dough.
If you’re using crunchy peanut butter, you can opt to add a few extra spoonfuls to intensify the flavor and texture. However, make sure not to overload the dough, as too much peanut butter can affect the cookie’s final texture and cause them to spread too much while baking.
4. Baking the Peanut Butter Pancake Mix Cookies
Once the dough is ready and the peanut butter is incorporated, it’s time to bake! Preheat your oven to 350°F (175°C). Scoop out the dough with a spoon or cookie scoop, spacing the balls about 2 inches apart on the baking sheet. If you like large, chewy cookies, use more dough per cookie; for smaller, bite-sized cookies, reduce the dough portion.
Bake the cookies for 8-10 minutes, or until the edges are lightly golden brown and the centers are set but still soft. Keep an eye on them in the final minutes of baking, as the addition of peanut butter can sometimes make the cookies appear a little darker than usual.
Since peanut butter can cause cookies to spread more, you may want to chill the dough for about 15-20 minutes before baking. This will help control the spread and result in thicker, chewier cookies.
5. Cooling and Serving Peanut Butter Pancake Mix Cookies
Once baked, let the peanut butter pancakes cookies cool for 2-3 minutes on the baking sheet before transferring them to a cooling rack. As they cool, the cookies will firm up and develop their chewy, rich texture. The peanut butter will remain soft, creating a melt-in-your-mouth experience.
Here are a few tips for serving your peanut butter cookies:
- Pair with a Glass of Milk: Like chocolate chip cookies, peanut butter cookies go exceptionally well with a cold glass of milk. The creaminess of the milk complements the richness of the peanut butter.
- Add a Pinch of Sea Salt: For an extra twist, sprinkle a little flaky sea salt on top of the cookies just after they come out of the oven. The salty contrast will enhance the peanut butter flavor and provide a sophisticated touch.
- Serve with Jam: For a peanut butter and jelly-inspired snack, serve your cookies with a dollop of your favorite jam or jelly. The sweetness of the jam complements the savory peanut butter, creating a perfect balance of flavors.
6. Storing and Freezing Peanut Butter Pancake Mix Cookies
To keep your peanut butter pancakes cookies fresh, store them in an airtight container at room temperature for up to 4-5 days. If you prefer a firmer texture, you can refrigerate them for a slightly chilled cookie. For longer storage, freeze the cookies. Simply place them in a freezer-safe container or bag, separated by parchment paper, and freeze for up to 3 months. When ready to eat, let them thaw at room temperature or reheat in the microwave for a warm, fresh-from-the-oven treat.
7. Variations of Peanut Butter Pancake Mix Cookies
For even more variety, consider adding these optional ingredients:
- Chocolate Chips: A classic combo—chocolate chips and peanut butter create a delicious and indulgent cookie that’s hard to resist.
- Chopped Nuts: Add chopped peanuts, almonds, or cashews for an extra nutty crunch.
- Banana: For a truly indulgent treat, mix in mashed banana to complement the peanut butter flavor and add moisture to the cookies.
Funfetti Pancake Mix Cookies – Colorful, Party-Ready Treats
Funfetti pancakes mix cookies are the ultimate way to brighten up any occasion. The addition of colorful sprinkles not only adds visual appeal but also gives your cookies a playful, festive vibe. These vibrant cookies are perfect for birthdays, celebrations, or simply to bring a smile to someone’s face. With pancake mix as the base, these cookies are quick to make and absolutely delicious. Let’s dive into how you can make these joyful treats and how the sprinkles elevate the overall experience.
1. Why Add Sprinkles to Pancake Mix Cookies?
Sprinkles are the star ingredient in Funfetti pancakes mix cookies. Their bright colors and cheerful appearance instantly transform a simple batch of cookies into a fun, eye-catching treat. But sprinkles aren’t just for looks—they add a slight crunch and sweetness that enhances the cookie’s texture. As the cookies bake, the sprinkles melt slightly, leaving behind a beautiful burst of color throughout the dough.
Funfetti cookies are perfect for any event, from children’s parties to casual gatherings. The sprinkles make them feel like a celebration in every bite, making them ideal for birthdays, holiday get-togethers, or even as a surprise treat to brighten someone’s day.
2. Choosing the Right Sprinkles for Funfetti Cookies
When making Funfetti pancakes mix cookies, the type of sprinkles you use can make a big difference in both the flavor and appearance of the cookies. Here’s a breakdown of some popular sprinkle options and what they bring to the table:
- Jimmies (Traditional Sprinkles): These are the classic long, cylindrical sprinkles commonly used in cakes and cookies. They come in a variety of bright colors and blend beautifully into the dough without overpowering the cookie.
- Nonpareils: These tiny, round sprinkles are small but mighty. They add a delicate crunch and look like little dots of color scattered throughout your cookies. Nonpareils work particularly well if you want to add a bit of elegance to your Funfetti cookies.
- Sugar Crystals or Coarse Sugar: If you want to add a bit of sparkle, sugar crystals or coarse sugar sprinkles are a great option. They provide a slight crunch and a shimmering effect, making your cookies extra special.
- Confetti Sprinkles: Larger, flat confetti sprinkles offer an even bolder burst of color. They don’t melt as much as smaller sprinkles and can make your cookies look like a mini celebration in every bite.
Pick sprinkles that fit your style or color theme. If you’re making these cookies for a specific event, you can match the sprinkle colors to the occasion—rainbow sprinkles for a birthday, red and green sprinkles for Christmas, or pastels for spring celebrations.
3. Adding Sprinkles to Pancake Mix Cookie Dough
Incorporating sprinkles into pancake mix cookie dough is easy, but there are a couple of important steps to follow to ensure the sprinkles stay intact and don’t dissolve during baking.
- Add Sprinkles at the Right Time: After mixing the basic dough (pancake mix, butter, sugar, eggs, and milk), gently fold in ½ to 1 cup of sprinkles (depending on how colorful you want your cookies). It’s important to fold the sprinkles in gently to avoid breaking them up too much. If you stir too vigorously, the sprinkles can bleed into the dough, making the cookies appear less vibrant.
- Reserve Some Sprinkles for Topping: For an extra burst of color, you can reserve a handful of sprinkles and press them gently on top of the cookie dough balls before baking. This ensures the sprinkles stay bright and bold after baking.
If you prefer, you can mix in the sprinkles and save some for after the cookies have baked. Once the cookies have cooled, you can press a few more sprinkles on top for an added pop of color.
4. Baking Funfetti Pancake Mix Cookies
Once your dough is ready, it’s time to bake! Preheat your oven to 350°F (175°C) and line your baking sheet with parchment paper to prevent the cookies from sticking. Scoop the dough into balls, placing them about 2 inches apart on the sheet to allow for spreading. The size of your dough balls will determine how thick or thin the cookies turn out, so feel free to adjust based on your preferences.
Bake the cookies for 8-10 minutes, or until the edges are lightly golden and the center is set. These cookies bake up soft and fluffy, with just the right balance of chewiness and a light crunch from the sprinkles. Keep a close eye on the cookies towards the end of the baking time to prevent overbaking—Funfetti cookies should have a soft, melt-in-your-mouth texture.
5. Cooling and Serving Funfetti Pancake Mix Cookies
After baking, let the cookies cool on the sheet for a few minutes to set. Then, transfer them to a cooling rack to prevent them from getting soggy on the bottom. As the cookies cool, the sprinkles will harden slightly, giving them a satisfying crunch.
Here are some fun serving ideas to make your Funfetti cookies even more exciting:
- Serve with Ice Cream: Pair these colorful cookies with a scoop of ice cream for a festive ice cream sandwich. Vanilla or birthday cake ice cream works especially well with the Funfetti flavor.
- Serve on a Cookie Platter: Display the cookies on a platter with additional sprinkles or edible glitter for a visually striking treat. This is perfect for birthdays, holidays, or any party.
- Cookie Decorating: If you’re hosting a party or get-together, let the kids (or adults!) decorate the Funfetti cookies with additional sprinkles, icing, or candy toppings. This turns the cookies into an interactive activity and makes the treat even more fun.
6. Storing and Freezing Funfetti Pancake Mix Cookies
Funfetti cookies can be stored in an airtight container at room temperature for 3-4 days. If you want to keep them longer, consider freezing them. To freeze, place the cookies in a single layer on a baking sheet and freeze them for about 1 hour. Once they are frozen, transfer them to a freezer-safe bag or container. These cookies can stay frozen for up to 3 months. When you’re ready to enjoy them, simply thaw at room temperature or heat them up in the microwave for a few seconds for a fresh-from-the-oven experience.
7. Variations of Funfetti Pancake Mix Cookies
- Add White Chocolate Chips: White chocolate pairs perfectly with sprinkles, creating a creamy, sweet cookie that complements the vibrant colors of the sprinkles.
- Incorporate Other Candy Pieces: For even more fun, consider adding crushed-up candy pieces, like M&Ms or mini marshmallows, into your Funfetti dough.
- Use Flavored Sprinkles: Mix things up by using flavored sprinkles, such as fruit-flavored or citrus sprinkles, to add an extra layer of taste and fun to your cookies.
A funfetti pancake mix cookie recipe is the perfect treat to bring a burst of color and excitement to any occasion. Whether you’re celebrating a birthday, a special event, or just want to brighten up your day, this pancake mix cookie recipe will add joy to the moment. The bright and cheerful appearance of funfetti pancake mix cookies makes them a favorite for both kids and adults alike.
Making these cookies is easy with a simple pancake mix cookie recipe, and the addition of colorful sprinkles ensures that every bite is as fun as it is delicious. The pancake mix cookie recipe gives you the convenience of preparing delightful treats quickly, without needing complex ingredients. Whether you’re new to baking or an experienced cook, the funfetti pancake mix cookie recipe is beginner-friendly and perfect for anyone who wants to try a colorful twist on the classic cookie.
This funfetti pancake mix cookie recipe is guaranteed to be a hit at birthdays, family gatherings, or any event where you want to serve something fun and festive. The sweet flavor and simple preparation of this pancake mix cookie recipe will surely make it a staple in your cookie collection. So, the next time you’re craving a fun and delicious treat, turn to this easy and colorful funfetti pancake mix cookie recipe!
Healthier Options – Whole-Grain and Gluten-Free Pancake Mix for Better Cookies
If you’re looking for a healthier twist on the classic pancake mix cookie recipe, using whole-grain or gluten-free pancake mix is an excellent choice. These alternatives not only cater to specific dietary needs but also offer nutritional benefits, making your pancake mix cookie recipe a little more wholesome without compromising on flavor or texture. With a few simple adjustments, you can create a healthier version of your favorite pancake mix cookie recipe that everyone can enjoy.
Whole-grain pancake mix adds more fiber and nutrients to your pancake mix cookie recipe, providing a richer, heartier texture while maintaining the soft and chewy consistency of traditional cookies. If you’re following a gluten-free diet, simply swap in gluten-free pancake mix to make your pancake mix cookie recipe suitable for those with gluten sensitivities. Both whole-grain and gluten-free pancake mix options ensure that you can still enjoy a delicious treat while making a healthier choice.
By using these healthier alternatives in your pancake mix cookie recipe, you’ll be able to enjoy all the benefits of a more nutritious snack. These versions of the pancake mix cookie recipe still deliver the delightful flavor and texture you love, without sacrificing the health-conscious elements. So, whether you’re baking for dietary needs or simply seeking a more wholesome treat, this healthier pancake mix cookie recipe will become a favorite in your kitchen.
1. Whole-Grain Pancake Mix for More Fiber and Nutrients
Whole-grain pancake mix is an excellent choice if you’re looking to add more fiber and essential nutrients to your cookies. Unlike regular pancake mix, which is made from refined white flour, whole-grain pancake mix retains the bran, germ, and endosperm of the grain. This means it provides a higher concentration of fiber, B vitamins, and minerals like iron and magnesium.
When used in cookie recipes, whole-grain pancake mix adds a slightly nuttier flavor and denser texture, which works wonderfully in cookie dough. The added fiber also helps with satiety, meaning you’ll feel fuller for longer after enjoying these cookies. The extra nutrients make these cookies a better option for a quick snack, especially if you want a more balanced indulgence.
2. How to Use Whole-Grain Pancake Mix in Cookies
To substitute whole-grain pancake mix in your cookie dough, simply replace regular pancake mix with the same amount of whole-grain version. Since whole-grain flour is heavier than refined flour, your dough might appear a bit thicker, and the cookies may bake slightly thicker as well. However, the taste and texture will remain deliciously soft, with a subtle, wholesome flavor that pairs perfectly with add-ins like chocolate chips or nuts.
If you’re worried about the texture being too dense, you can balance it by adding a little extra baking powder or soda to help the cookies rise. This will give the cookies a slightly lighter texture while maintaining the nutritional benefits of the whole grain.
3. Gluten-Free Pancake Mix for Celiac and Gluten Sensitivities
For those with gluten sensitivities or celiac disease, gluten-free pancake mix offers a great alternative without compromising on taste. Gluten-free pancake mixes are made from a combination of gluten-free flours such as rice flour, almond flour, or oat flour, and they are often enriched with additional ingredients like starches to mimic the texture and structure of wheat-based flour.
Gluten-free pancake mix allows you to enjoy cookies without any gluten-related concerns. These cookies are just as delicious and soft as traditional ones, with a slight difference in texture—gluten-free cookies tend to be a bit more crumbly, but still delightfully chewy and satisfying. The great part is that you can still use your favorite mix-ins, like chocolate chips or sprinkles, and your cookies will still turn out amazing!
4. How to Use Gluten-Free Pancake Mix in Cookies
Substituting gluten-free pancake mix in your cookie recipe is simple. Just swap the regular pancake mix for an equal amount of gluten-free pancake mix. You might need to adjust the other ingredients slightly. For example, you can add a bit more liquid (such as milk or butter) to achieve the right consistency in your cookie dough, as gluten-free mixes tend to absorb more liquid than traditional mixes.
You may also want to experiment with adding a tablespoon of cornstarch or a binding agent like xanthan gum to help stabilize the dough and give it more structure. These ingredients help ensure that the cookies hold together without falling apart or being too crumbly. Once you’ve made these adjustments, you’ll have perfectly soft, chewy, and gluten-free cookies in no time!
5. Additional Tips for Healthier Cookie Variations
Beyond just choosing whole-grain or gluten-free pancake mix, here are some other ways to make your cookie recipe healthier:
- Use a Natural Sweetener: Instead of refined white sugar, opt for a natural sweetener like honey, maple syrup, or coconut sugar. These alternatives add a unique flavor while also providing more nutrients.
- Add Nuts and Seeds: Incorporating nuts (like almonds, walnuts, or pecans) or seeds (such as chia, flax, or sunflower seeds) into your cookie dough can add protein, healthy fats, and extra fiber. This is a great way to make your cookies more filling and nutritious.
- Substitute Butter with Coconut Oil or Applesauce: If you’re looking to reduce saturated fat or add a bit of flavor, consider swapping out butter for healthier alternatives like coconut oil or unsweetened applesauce. These swaps provide different health benefits while keeping the texture of your cookies intact.
- Increase the Protein Content: Add protein powder or Greek yogurt to your dough to increase the protein content of your cookies. This will help make the cookies more satisfying and support your fitness goals.
6. Baking Considerations for Healthier Pancake Mix Cookies
When baking with whole-grain or gluten-free pancake mix, there are a few things to keep in mind to achieve the best results:
- Monitor Bake Time: Because whole-grain and gluten-free ingredients can behave differently, it’s important to keep a close eye on the cookies as they bake. They may require a slightly shorter or longer baking time than traditional cookies, so check them frequently.
- Don’t Overmix the Dough: Whole-grain and gluten-free doughs can become too dense or tough if overworked, so be gentle when mixing the ingredients. Stir until just combined for the best texture.
- Cooling: Let your cookies cool completely on the baking sheet before transferring them to a wire rack. This allows the cookies to set and become firmer, especially if using gluten-free flour, which may be a bit more fragile.
7. Enjoy Healthier, Wholesome Cookies
By using whole-grain or gluten-free pancake mix, you can make delicious, healthier cookies without sacrificing flavor. These alternatives not only improve the nutritional value of your pancake mix cookie recipe but also cater to dietary restrictions, offering more energy-boosting ingredients. Whether you’re aiming for a high-fiber snack or need a gluten-free option, these healthier pancake mix cookies are a perfect choice for satisfying your sweet tooth while keeping things lighter and more nutritious.
Whole-grain pancake mix adds fiber and essential nutrients to your pancake mix cookie recipe, making it a great option for anyone looking to boost their daily intake of whole grains. At the same time, gluten-free pancake mix allows those with gluten sensitivities to indulge in these tasty treats without worry. With both options, you can enjoy the same delightful flavor and chewy texture that make pancake mix cookies so popular, but with the added benefit of healthier ingredients.
So, whether you’re making a pancake mix cookie recipe for a health-conscious snack or simply seeking a gluten-free alternative, these healthier versions will keep your cookie game strong while meeting your dietary needs. Embrace the versatility of whole-grain or gluten-free pancake mix, and indulge in a delicious yet healthier pancake mix cookie recipe!
5: Pro Tips for Perfect Pancake Mix Cookies
Adjusting Consistency – Ensuring Your Dough Isn’t Too Dry or Sticky
Achieving the perfect cookie dough consistency can be one of the trickiest parts of making cookies, especially when using pancake mix. If the dough is too dry, your cookies will turn out crumbly and tough, while overly sticky dough can be hard to shape and may spread too much during baking. Understanding how to adjust the dough’s consistency will ensure your cookies have the ideal texture—soft, chewy, and easy to work with. Here are some practical tips for adjusting the consistency of your pancake mix cookie dough.
1. Recognize the Ideal Cookie Dough Consistency
The ideal pancake mix cookie dough should be soft and slightly sticky but not too wet. It should hold its shape when scooped onto the baking sheet but still spread a little as it bakes. When mixed properly, the dough will feel smooth and slightly tacky to the touch but won’t stick excessively to your hands. If your dough seems too wet or dry, making a few adjustments will help balance the texture for the perfect cookie dough.
2. If the Dough is Too Dry
If your dough is too dry, it might not come together properly or could produce tough cookies. This can happen if there isn’t enough moisture in the mix or if you’ve used too much pancake mix. Fortunately, there are simple ways to fix dry dough.
- Add More Liquid: The most common reason for dry dough is a lack of moisture. If the dough feels crumbly and doesn’t hold together, add a tablespoon of liquid at a time, such as milk, water, or melted butter. You’ll want to mix it in gradually until the dough comes together and is smooth and pliable. Start with a little liquid to avoid making the dough too runny.
- Add More Butter or Oil: Another option is to increase the fat content in your dough. Butter, oil, or even coconut oil can help hydrate the dough and make it more malleable. Just add small amounts and mix until you reach the desired consistency. The butter also imparts a richer flavor to the cookies.
- Consider Adding an Egg: If you’ve reduced the amount of egg or omitted it for dietary reasons, try adding one more egg to the dough. The egg helps bind the ingredients together, adds moisture, and gives structure to the cookies. If you’re using a vegan alternative, a flax egg or chia egg can work similarly.
3. If the Dough is Too Sticky
Sticky dough can be just as problematic as dry dough. While it’s important to have some tackiness, overly sticky dough can be difficult to work with, especially when you try to scoop it into cookie shapes. If your dough is too sticky, follow these steps to adjust it.
- Add More Pancake Mix: If the dough is sticking to your hands and is too wet, adding more pancake mix can help absorb the excess moisture. Start by adding a small amount (1-2 tablespoons) at a time, and gently mix it into the dough. Be careful not to add too much, as this can make the dough too dense or dry.
- Use Flour for Dusting: If you’re struggling to work with sticky dough, dust your hands, spoon, and work surface with a light coating of flour. This helps prevent the dough from sticking to everything it touches. Alternatively, you can lightly dust the dough itself with flour and fold it in to make it more manageable.
- Chill the Dough: Sometimes, dough can become too sticky if it’s too warm. Refrigerating the dough for 30 minutes to an hour can help firm it up and make it less sticky. Chilled dough is also easier to handle when shaping into balls or pressing down to form cookies. If you don’t have time for a long chill, even a short 10-15 minute rest in the fridge can make a noticeable difference.
4. Testing Consistency Before Baking
Before you begin baking your cookies, it’s a good idea to test the consistency of your dough. Here’s a simple test you can do:
- Scoop a small amount of dough with a spoon or cookie scoop and roll it into a ball with your hands.
- Place it on the baking sheet and gently press it down with your fingers or the back of the spoon.
- Observe how it holds its shape. If the dough holds together well and doesn’t spread too much, you’re good to go! If the dough is too dry and cracks apart, add more liquid or butter. If it spreads too much, add a little more pancake mix or refrigerate the dough to firm it up.
5. The Right Balance Between Dry and Wet
Achieving the right balance between dry and wet ingredients is key to successful pancake mix cookies. If the dough feels too stiff, add a little more liquid to loosen it up. If it feels too loose, increase the dry ingredients slightly. Keep in mind that as the dough sits, it may absorb moisture, so always check the consistency just before you bake.
Additionally, consider how your mix-ins (chocolate chips, nuts, etc.) can affect the dough’s consistency. These add-ins may absorb some moisture and make the dough firmer, so it’s important to test and adjust accordingly after adding them.
6. Using Your Hands to Adjust the Dough
Sometimes, the best tool for adjusting cookie dough is your hands. After mixing the dough, use your hands to feel the texture. You can gently knead or fold the dough to incorporate any additional ingredients, liquid, or dry ingredients you’ve added. This gives you more control over the consistency and helps you judge whether the dough is ready for shaping and baking.
7. Conclusion
Adjusting the consistency of your pancake mix cookie dough is all about balance. With the right tweaks—whether you need to add more liquid, flour, or refrigerate the dough—you can ensure your cookies bake to perfection every time. A little patience and practice will help you find the ideal texture, making your cookies soft, chewy, and easy to handle.
With these tips, you’ll be able to confidently adjust your dough and create the perfect batch of pancake mix cookies—whether you prefer them thicker, thinner, chewier, or crunchier!
Baking Time and Temperature – Achieving a Soft, Chewy Texture
Getting the perfect soft and chewy texture in your pancake mix cookies depends heavily on the baking time and temperature. This is a crucial step in your pancake mix cookie recipe, as overbaking or underbaking can lead to cookies that are either too dry and hard or undercooked in the middle. By following the right baking techniques, you can ensure that your pancake mix cookies bake to perfection every time—soft, chewy, and golden brown.
For the best results in your pancake mix cookie recipe, it’s important to preheat your oven to the correct temperature, typically around 350°F (175°C). The oven temperature plays a key role in achieving the desired texture, ensuring that the cookies cook evenly and don’t burn on the outside while remaining raw in the center. When baking your pancake mix cookies, be sure to keep a close eye on them during the final few minutes of baking.
To get that perfect soft and chewy texture, remove your pancake mix cookies from the oven as soon as they turn golden brown at the edges but still appear slightly soft in the middle. They will continue to cook and firm up as they cool, giving you the ideal texture without being too hard. By following these baking time and temperature guidelines, your pancake mix cookie recipe will result in perfectly soft, chewy cookies every time. So, enjoy your baking journey and create delicious pancake mix cookies with a texture that’s simply irresistible!
1. Ideal Oven Temperature
The oven temperature plays a crucial role in determining how your cookies will turn out. Baking at the correct temperature ensures the cookies bake evenly and develop that soft, chewy texture you’re aiming for.
- Bake at 350°F (175°C): This is the sweet spot for most cookie recipes, including pancake mix cookies. Baking at 350°F allows the cookies to cook through at a moderate pace, giving them time to rise and spread evenly without overcooking. At this temperature, your cookies will firm up on the outside while remaining soft and chewy on the inside.
- Avoid Higher Temperatures: Baking at too high of a temperature (above 375°F) may cause the cookies to cook too quickly, leading to overbaked edges and a dry center. While it’s tempting to speed up the process, baking at lower temperatures provides more control over the final texture.
2. Oven Placement
Where you place your baking sheet in the oven can also influence the final texture of your cookies.
- Middle Rack: For the most even heat distribution, position your baking sheet on the middle rack of the oven. This ensures that both the top and bottom of the cookies bake evenly, giving you that ideal chewy texture without any burnt edges.
- Top or Bottom Rack: Avoid placing your cookies too close to the top or bottom of the oven, as this can cause the cookies to bake unevenly. Placing them too close to the top may lead to overly crisp tops, while the bottom rack can cause the cookies to brown too quickly, leaving the centers undercooked.
3. Bake Until Just Set
One of the keys to achieving soft, chewy cookies is knowing when to remove them from the oven. The trick is to bake the cookies until they’re just set—not fully golden brown or crisp all over.
- Check for Slightly Golden Edges: Your cookies should be golden brown around the edges but still soft and slightly underdone in the center. This is the perfect point to pull them out of the oven.
- Don’t Wait for Full Browning: If you wait until the cookies are fully browned, they will likely be too firm and crisp. Soft cookies will continue to set as they cool, so don’t wait for them to reach their final texture in the oven.
- Bake Time: Generally, pancake mix cookies take around 8-12 minutes to bake, depending on the size and thickness of the dough. Start checking around the 8-minute mark and continue to monitor closely until they’re just set.
4. Cooling Time and Cookies’ Texture
After baking, the cooling process is just as important in achieving a soft, chewy texture. Letting your cookies cool the right way ensures that they finish setting and maintain their softness.
- Let Cookies Cool on the Sheet: After removing the cookies from the oven, allow them to cool on the baking sheet for 5 minutes. This helps them firm up slightly, making them easier to transfer without breaking.
- Transfer to a Cooling Rack: Once the cookies have cooled slightly, transfer them to a cooling rack to allow air to circulate around them. This helps prevent the bottoms from becoming soggy while they finish cooling.
- Avoid Overcooling: If you leave your cookies on the cooling rack for too long, they may lose their soft, chewy texture and become too hard. Be sure to enjoy them while they’re still fresh and soft!
5. Adjusting for Cookie Size and Thickness
The size and thickness of your cookies will also impact the baking time. If you’re making larger or thicker cookies, they will take longer to bake. Here’s what you can do to adjust the baking time for different sizes of cookies:
- Smaller Cookies: If you’re using a small cookie scoop or making mini cookies, they will bake faster, usually around 8-10 minutes. Keep a close eye on them to avoid overbaking.
- Larger Cookies: Larger cookies may need 12-15 minutes of baking time. If you’re making thick, chunky cookies, they will need more time in the oven to ensure the centers cook properly without overbaking the edges.
- Flattening Dough: If you prefer a thinner, chewier cookie, you can gently flatten the dough balls before baking. This can help the cookies spread out more evenly and bake faster, ensuring the perfect chewy texture.
6. Experiment with Cookie Texture
While soft and chewy is the goal, everyone has their own ideal texture. Some people prefer slightly crispier edges, while others like a more gooey center. To experiment with texture:
- Adjust Baking Time for Softer Cookies: If you like your cookies extra soft and gooey, bake them for a shorter time—just until the edges start to set and the centers are still a little soft.
- For a Slightly Crispier Edge: Increase the baking time by a minute or two, but still pull the cookies out before they become fully golden. This slight increase will give you a nice contrast between the chewy middle and slightly firmer edges.
7. Oven Differences and Adjustments
Ovens can vary in terms of heat distribution, so it’s important to keep an eye on your cookies during baking. If you find that your cookies are baking unevenly, you may want to rotate the baking sheet halfway through the baking time to ensure even browning.
Additionally, if you notice that your cookies are consistently overbaking or underbaking, you may want to calibrate your oven’s temperature. An oven thermometer is a great tool to check whether your oven’s actual temperature matches the set temperature.
8. Conclusion
Baking pancake mix cookies to achieve that ideal soft, chewy texture is all about controlling the temperature, baking time, and how you handle the dough. In your pancake mix cookie recipe, baking at 350°F is the key to achieving that perfect balance between a golden, crispy edge and a soft, chewy center. It’s important to remove your cookies from the oven as soon as the edges turn golden, but while the centers are still soft. This ensures that your pancake mix cookies retain their chewy texture and don’t become too dry.
Allowing your pancake mix cookies to cool properly also contributes to the final texture. Let them sit on the baking sheet for a few minutes before transferring them to a wire rack, so they firm up while cooling without losing their softness. This technique is essential for your pancake mix cookie recipe, as it ensures the texture stays just right.
Experiment with these tips to find your perfect pancake mix cookie texture. Whether you prefer your cookies to be extra soft with a melt-in-your-mouth feel or with a hint of crispiness around the edges, this pancake mix cookie recipe gives you the flexibility to adjust the outcome. Happy baking, and enjoy creating delicious pancake mix cookies with that perfect chewy texture every time!
Storage Tips – How to Keep Cookies Fresh for Longer
Storing your pancake mix cookies properly can make a huge difference in how long they stay fresh and maintain their perfect texture. Whether you’ve baked a large batch or simply want to save some for later, knowing the best storage techniques will help preserve their delicious flavor and soft, chewy texture. Here’s everything you need to know about storing your cookies to keep them fresh for as long as possible.
1. Let Cookies Cool Completely
Before you store your cookies, it’s important to let them cool completely. If you place warm cookies in an airtight container, the moisture from the cookies can cause them to become soggy, and the condensation can affect their texture. Allowing your cookies to cool on a wire rack ensures they reach room temperature and helps maintain their crispness on the outside while keeping them soft and chewy inside.
2. Use an Airtight Container
Once your cookies are completely cool, the best way to store them is in an airtight container. This will lock in moisture and prevent them from drying out. There are several storage options to consider:
- Plastic or Glass Containers: A plastic or glass container with a tight-fitting lid is a great option for storing your cookies. It keeps air out and helps preserve their freshness. Make sure the container isn’t too large—excess air can cause your cookies to lose moisture.
- Cookie Tins: Cookie tins are another good choice for storing your cookies. They provide an airtight seal and protect your cookies from being crushed or damaged. If you’re storing a variety of cookies, a tin with dividers can help keep each type separated.
3. Layering with Parchment Paper
If you’ve baked a large batch and need to stack your cookies in the container, be sure to separate the layers with parchment or wax paper. This prevents the cookies from sticking to each other and helps maintain their shape.
- Avoid Direct Contact: When stacking, avoid placing the cookies directly on top of each other, especially if they’re still slightly soft. Parchment paper allows air to circulate around each cookie and reduces the risk of the cookies sticking together.
- Use a Paper Towel: If you want to absorb any excess moisture and keep your cookies fresh, you can place a paper towel at the bottom of the container and one on top of the cookies. This will help wick away moisture and prevent them from becoming soggy.
4. Storing Cookies at Room Temperature
For cookies you plan to eat within a few days, storing them at room temperature works best.
- Keep in a Cool, Dry Place: Store your airtight container in a cool, dry place, away from direct sunlight or heat. Heat and humidity can cause cookies to soften or lose their texture more quickly.
- How Long Will They Last?: If stored correctly, your pancake mix cookies will stay fresh for about 5-7 days at room temperature. Keep an eye on the cookies to ensure they remain soft and chewy.
5. Freezing Cookies for Long-Term Storage
If you want to keep your cookies fresh for a longer period, freezing is the best option. Freezing allows you to preserve your cookies’ taste and texture for up to 3 months. Here’s how to freeze your pancake mix cookies properly:
- Flash Freeze First: If you want to store individual cookies, place them on a baking sheet in a single layer, ensuring they don’t touch. Put the baking sheet in the freezer for 1-2 hours or until the cookies are solid. This prevents the cookies from sticking together when frozen.
- Transfer to Freezer Bags: After flash freezing, transfer the cookies to a freezer-safe bag or airtight container. Be sure to remove as much air as possible before sealing to prevent freezer burn.
- Label the Bags: When freezing cookies, it’s always a good idea to label the bags with the date they were baked. This will help you keep track of how long they’ve been stored and ensure you enjoy them before they lose their quality.
6. Thawing Frozen Cookies
When you’re ready to enjoy your frozen cookies, thawing them properly ensures they stay fresh. Here’s how to do it:
- Thaw at Room Temperature: To thaw, simply remove the cookies from the freezer and let them sit at room temperature for about 20-30 minutes. This allows the cookies to regain their soft, chewy texture.
- Microwave for Quick Thawing: If you’re in a hurry, you can microwave individual cookies for 10-15 seconds. Just be sure not to overheat them, as this can cause them to dry out.
- Oven Option: Alternatively, you can place the cookies on a baking sheet and warm them in a preheated oven at 300°F (150°C) for 5-8 minutes. This method helps restore the texture and flavor, just like when they were freshly baked.
7. Avoid Storing Cookies in the Fridge
Although the refrigerator might seem like a good place to store cookies, it’s best to avoid it. The cold temperature can cause cookies to dry out and lose their soft texture. Instead, keep your cookies at room temperature or freeze them for long-term storage.
8. Storing Cookie Dough
If you have leftover cookie dough or want to prepare the dough in advance, you can store it in the fridge or freezer as well.
- In the Fridge: Store cookie dough in an airtight container or wrap it tightly in plastic wrap. Refrigerated dough can last for up to 3-5 days. This is a great option if you want to bake fresh cookies later in the week.
- In the Freezer: For longer storage, you can freeze cookie dough. Shape the dough into balls, then freeze them on a baking sheet. Once frozen, transfer the dough balls to a freezer-safe bag. Frozen cookie dough can last up to 3 months. Simply bake the dough balls directly from the freezer—just add an extra minute or two to the baking time.
9. Tips for Keeping Texture Intact
To keep your cookies fresh and maintain that soft, chewy texture, here are a few extra tips:
- Add a Slice of Bread: This may sound unusual, but placing a slice of bread in the container with your cookies helps keep them soft. The bread absorbs moisture, preventing the cookies from becoming too dry. Just replace the bread slice when it starts to get hard.
- Check for Freshness Regularly: While you can store your cookies for several days, it’s always a good idea to check their texture regularly. If they begin to dry out, you can restore some moisture by microwaving them for a few seconds or adding a piece of apple or a damp paper towel to the storage container (remove the towel after a day).
10. Conclusion
Storing your pancake mix cookies correctly ensures that they stay fresh and delicious for as long as possible. Whether you’re storing them at room temperature for a few days, freezing them for months of enjoyment, or preserving your cookie dough for later use, following these storage tips will help maintain their soft, chewy texture. With proper storage techniques, you can enjoy your homemade cookies for days or even weeks after baking!
Frequently Asked Questions – Addressing Common Cookie-Baking Concerns
When making pancakes mix cookies, there are always questions that come up, especially for first-time bakers or those new to using pancake mix as a base. From ingredient substitutions to freezing dough, we’ve compiled answers to some of the most frequently asked questions to help you bake the best cookies possible.
1. Can I Substitute Other Ingredients for the Butter or Milk?
If you’re out of butter or prefer to use alternatives, there are several options you can try without compromising the taste or texture of your pancake mix cookies.
- Butter Substitutes:
- Margarine: You can use margarine as a one-to-one replacement for butter in most recipes. It will provide a similar texture and moisture.
- Vegetable Oil: For a softer cookie, vegetable oil can be used, but it may slightly alter the texture. You’ll need about 3/4 of the amount of oil compared to butter (for example, 3/4 cup of oil for 1 cup of butter).
- Applesauce: If you’re looking for a healthier option, unsweetened applesauce can replace butter, especially for a more cake-like, moist texture. Use a 1:1 ratio when substituting.
- Coconut Oil: Another good alternative for those seeking a dairy-free option is coconut oil. Use it in a 1:1 ratio, but be mindful of its slight coconut flavor.
- Milk Substitutes:
- Almond Milk: For a dairy-free option, almond milk works well in cookies. You can use it as a 1:1 substitute for regular milk.
- Oat Milk or Soy Milk: Both oat milk and soy milk are great alternatives and offer a creamy consistency, similar to regular milk.
- Water: In a pinch, you can use water to replace milk, although the cookies may be a little less rich in flavor and texture.
Substituting ingredients can work well in most cases, but keep in mind that the final cookie texture might differ slightly depending on the replacement you choose.
2. Can I Freeze Pancake Mix Cookie Dough?
Yes! Freezing cookie dough is a great way to prepare ahead of time and ensure you have fresh cookies whenever you want them. Here’s how to freeze pancake mix cookie dough properly:
- Flash Freeze Dough Balls: Scoop your cookie dough into balls and place them on a baking sheet. Put the baking sheet in the freezer for 1-2 hours or until the dough balls are firm. Once frozen, transfer the dough balls to a freezer-safe bag or container. Be sure to label the bag with the date so you know when it was frozen.
- Freezing in Logs: If you prefer, you can roll the cookie dough into a log, wrap it tightly in plastic wrap or wax paper, and freeze it. When ready to bake, just slice the dough into rounds and bake.
- How Long Can I Freeze Dough?
Frozen dough can last up to 3 months in the freezer. When you’re ready to bake, there’s no need to thaw the dough beforehand. You can bake the frozen dough directly, just adding 1-2 extra minutes to the baking time to ensure they bake through.
3. How Do I Adjust the Recipe for Smaller or Larger Batches?
If you’re looking to bake a smaller batch or more cookies, you can easily adjust the ingredients in the recipe. Here are some tips:
- Scaling Down: If you only need a small batch, you can simply divide the recipe in half. Use half of the pancake mix, butter, sugar, eggs, and other ingredients. It’s easy to scale down, but be mindful of your mixing technique to ensure everything blends well.
- Scaling Up: For larger batches, double or triple the recipe as needed. If you’re doubling the recipe, stick to the same measurements and mixing process. However, you may need to bake in batches depending on the size of your baking sheet or the amount of space in your oven.
4. Can I Add More Sugar or Less Sugar?
Adjusting the sugar amount in your pancake mix cookies is possible, depending on your taste preferences. Here’s what to keep in mind when making adjustments:
- Adding More Sugar: Increasing the sugar in the recipe will make your cookies sweeter and may make them slightly crispier. If you like extra sweetness, you can add up to 1/4 cup more sugar than the recipe calls for, but be cautious as it can change the texture.
- Reducing Sugar: If you prefer less sweetness or are trying to cut back on sugar, you can reduce the sugar amount by up to 1/4 cup. Keep in mind that this might make your cookies softer and less golden in color. You can also try using natural sweeteners like honey or maple syrup for a healthier alternative.
5. Can I Use Gluten-Free Pancake Mix for This Recipe?
Yes, you can use a gluten-free pancake mix to make gluten-free cookies! Many gluten-free pancake mixes are available, and they work well as a base for cookies. The texture might vary slightly from traditional cookies, but they should still turn out soft and delicious. Here are some tips for using gluten-free pancake mix:
- Check for Xanthan Gum: Some gluten-free pancake mixes already contain xanthan gum, which helps bind the dough. If not, consider adding a small amount (about 1/4 teaspoon per cup of flour) to improve the texture and prevent the cookies from crumbling.
- Use Eggs or Egg Substitute: If you need an egg-free version, you can substitute eggs with flax eggs (1 tablespoon of ground flaxseed mixed with 2.5 tablespoons of water for each egg) or other egg replacements. This can help maintain the right texture in gluten-free cookies.
6. How Do I Prevent My Cookies from Spreading Too Much?
If you’re having trouble with cookies spreading too thin, there are a few things you can try to prevent them from spreading too much while baking:
- Chill the Dough: If your dough is too warm, the cookies may spread too much during baking. After mixing the dough, let it chill in the refrigerator for at least 30 minutes. Chilling helps solidify the fat and prevents the dough from spreading too quickly in the oven.
- Add More Flour: If the dough feels too soft or sticky, adding a little more flour can help. Start by adding 1 tablespoon at a time until the dough is thick enough to hold its shape on the baking sheet.
- Use Parchment Paper or Silicone Mats: Using parchment paper or silicone baking mats can help keep the cookies from spreading too much and sticking to the baking sheet. They also provide a non-stick surface for even baking.
7. Can I Use Pancake Mix for Other Types of Cookies?
Absolutely! Pancake mix is incredibly versatile and can be used as a base for various other cookie types. Some popular options include:
- Oatmeal Pancake Mix Cookies: Add oats to the pancake mix dough to create chewy oatmeal cookies.
- Snickerdoodle Pancake Mix Cookies: Roll the dough balls in a mixture of cinnamon and sugar before baking for a classic snickerdoodle flavor.
- Lemon or Orange Cookies: Add zest from fresh citrus fruits to the dough for a light, refreshing flavor.
Using pancake mix as a base opens up endless possibilities for creating fun and delicious variations of cookies!
8. How Do I Know When the Cookies Are Done Baking?
Knowing when your cookies are done is key to getting that perfect texture. As a general rule:
- Golden Brown Edges: Check for golden brown edges, which indicate that the cookies are fully cooked. The centers should still look a little soft, but they’ll firm up as they cool.
- Touch Test: Gently press a finger on the top of the cookie. If it bounces back, the cookies are likely done. If it leaves an indentation, they may need a minute or two more in the oven.
9. Can I Add Fillings Like Caramel or Marshmallows?
Yes, you can definitely get creative by adding fillings like caramel bits, marshmallows, or even caramel sauce. Just make sure the fillings are evenly distributed throughout the dough to prevent them from melting and burning during baking. You can fold them in gently after mixing the dough to avoid disrupting the cookie texture.
10. Conclusion
These frequently asked questions cover some of the most common concerns when making pancake mix cookies. Whether you’re substituting ingredients, freezing dough, or trying different variations, the answers provided should help guide you in the right direction. Enjoy baking your perfect batch of pancake mix cookies and get creative with your ingredients!
Conclusion
In this guide, we’ve covered everything you need to know about creating the perfect pancake mix cookie recipe. From ingredient substitutions to tips for freezing dough, making adjustments, and even answering your frequently asked questions, we hope this pancake mix cookie recipe has inspired you to get baking! Whether you’re looking for a quick and easy treat or experimenting with creative variations, this pancake mix cookie recipe is versatile and beginner-friendly. The best part is that you can customize your pancake mix cookie recipe with various add-ins and flavors, allowing you to make them your own. For more baking tips and inspiration, check out this trusted resource on The Kitchn for expert advice on all things baking.
Remember, the pancake mix cookie recipe is perfect for both experienced bakers and beginners, and with the simple ingredients, you can enjoy delicious cookies in no time. Whether you’re making a classic version or trying out one of the fun variations, this pancake mix cookie recipe will surely become a favorite. Looking for more inspiration for your cooking adventures? Check out this blog post on 5 Irresistible Beef Recipes: Chili with Enchilada Sauce, Cheese Balls, and More here.
Embrace the ease and versatility of the pancake mix cookie recipe, and keep experimenting to find your perfect batch!