
Are you looking for a quick and easy way to make soft, fluffy dinner rolls without the hassle of using yeast? This homemade dinner rolls recipe is the perfect solution! These delicious rolls are light, buttery, and ready in no time, making them an ideal choice for beginners or anyone in a hurry.
Unlike traditional bread recipes, this no-yeast dinner rolls recipe skips the proofing process, saving you valuable time without compromising on flavor or texture. Whether you need a last-minute addition to your meal or a simple way to enjoy fresh bread at home, this recipe is perfect for every occasion.
Made with common pantry staples like flour, baking powder, milk, butter, and sugar, these yeast-free bread rolls are quick to prepare and incredibly satisfying. Let’s dive into the easiest way to bake soft and fluffy dinner rolls that are sure to impress your family and guests!
Why Choose a No-Yeast Dinner Roll Recipe?
The Convenience of No Yeast
One of the biggest advantages of this recipe is that it completely eliminates the need for yeast, which means no proofing or waiting for the dough to rise. Traditional bread recipes often require hours of preparation due to the fermentation process, where yeast works to leaven the dough. While yeast-based recipes have their charm, sometimes you need a quick and reliable option without the extra time or effort.
No Proofing Required: Save Time Instantly
With this no-yeast dinner rolls recipe, the waiting game is eliminated. Instead of relying on yeast, the recipe uses leavening agents like baking powder or baking soda, which work instantly. These agents create air bubbles in the dough during mixing and baking, ensuring soft and fluffy rolls in a fraction of the time.
Why No-Yeast Rolls Are a Game-Changer
This approach is especially convenient for:
- Last-Minute Baking: Whether you’ve run out of yeast or need fresh bread quickly, this recipe saves the day.
- Beginners in Baking: Working with yeast can feel intimidating. This method is simple, foolproof, and beginner-friendly.
- Busy Schedules: On hectic days, these fast dinner rolls allow you to enjoy homemade bread without planning hours in advance.
Consistent Results Every Time
Yeast-based recipes can sometimes be unpredictable—if the yeast isn’t fresh, or the dough doesn’t rise, it can lead to frustration. With this yeast-free recipe, you avoid such issues altogether. The ingredients work reliably, ensuring perfect rolls every single time.
By eliminating the proofing and rise time, this recipe makes bread-making accessible, easy, and stress-free. It’s perfect for anyone craving delicious, buttery dinner rolls on demand, without the need to plan ahead or deal with complicated processes.
Quick and Easy Preparation
One of the best things about this no-yeast dinner rolls recipe is how quickly it comes together. Unlike traditional bread recipes that require hours of preparation for proofing and rising, this recipe is designed for speed and efficiency, making it ideal for busy days or last-minute baking.
Minimal Prep Time
The preparation process is straightforward and takes only 10-15 minutes from start to finish. With just a few basic ingredients—like flour, baking powder, milk, and butter—you can mix the dough in no time. There’s no waiting for the dough to rise or double in size, which makes this recipe incredibly time-saving.
Fast Bake Time
Once the dough is shaped into rolls, they bake in just 15-20 minutes, depending on your oven. This means you can have freshly baked, soft, and fluffy dinner rolls ready in under 30 minutes total! It’s perfect for when you’re in a hurry to put bread on the table alongside dinner or to satisfy a sudden craving for homemade bread.
Why It’s Perfect for Busy Days
- No Waiting Periods: Skipping the proofing process means no downtime—just mix, shape, and bake.
- Beginner-Friendly: The simple steps and quick process make this recipe ideal for bakers of all skill levels.
- Last-Minute Solution: Whether it’s a sudden gathering or a meal that needs a side of bread, this recipe is your go-to.
By combining speed and simplicity, this recipe allows you to enjoy the satisfaction of freshly baked dinner rolls without spending hours in the kitchen. It’s a quick, easy, and reliable option for anyone looking to make homemade bread in a fraction of the time!
Perfect for Last-Minute Baking
Sometimes, life throws unexpected gatherings or sudden cravings your way, and you need a recipe that’s both fast and foolproof. This no-yeast dinner rolls recipe is your ultimate solution! It’s designed to save you time while still delivering soft, fluffy, and delicious rolls that feel like they took hours to prepare.
Quick and Reliable for Any Occasion
This recipe is a lifesaver when you need fresh bread in a hurry. Whether it’s a last-minute dinner party, an impromptu family meal, or a simple craving for something warm and homemade, these dinner rolls come together in less than 30 minutes.
Why It Works for Last-Minute Needs
- No Special Ingredients Required: Since this recipe uses basic pantry staples like flour, milk, butter, and baking powder, you likely already have everything you need at home.
- No Rise Time: Traditional bread recipes require yeast and time to proof, but this recipe skips all that, giving you fresh rolls faster than delivery.
- Easy for Everyone: Even if you’re new to baking or short on time, the steps are simple and straightforward.
Scenarios Where This Recipe Shines
- Unexpected Guests: Impress your visitors with warm, homemade rolls that look like you planned them all along.
- Busy Weeknights: When you’re juggling dinner prep and time is tight, these rolls are a quick and satisfying addition.
- Cravings for Fresh Bread: Sometimes, nothing beats the comfort of fresh bread—and with this recipe, you can enjoy it anytime, hassle-free.
With this recipe, you don’t have to compromise on flavor or quality, even when you’re in a rush. It’s a game-changer for anyone who loves homemade bread but doesn’t have hours to spare.
Ingredients for Soft and Fluffy Homemade Dinner Rolls
Essential Ingredients
To make these no-yeast dinner rolls, you only need a handful of core ingredients that you probably already have in your kitchen. Each one plays a vital role in creating soft, fluffy, and delicious rolls in no time. Here’s a breakdown of the essential ingredients and their function in the recipe:
1. All-Purpose Flour
All-purpose flour is the foundation of this dough. It provides the structure and texture needed to create the perfect soft roll. This versatile flour works well in many bread recipes, including this one, to give your rolls a light, tender crumb. If you prefer a different texture, you can experiment with bread flour for more chew, though all-purpose flour is typically the best choice for light, fluffy dinner rolls.
2. Baking Powder
Instead of yeast, this recipe uses baking powder as the leavening agent. Baking powder causes the dough to rise during baking, creating the air pockets that result in fluffy rolls. It’s a quick-acting leavening agent that doesn’t require any waiting time, making it perfect for a fast, no-yeast bread recipe.
3. Milk
Milk helps create a moist dough that’s soft and tender. It also adds a mild richness and a bit of sweetness to the rolls. You can use whole milk for a richer flavor, but plant-based milk like almond or oat milk works just as well for a dairy-free alternative. Milk is also responsible for providing some liquid to activate the baking powder and hydrate the flour.
4. Butter
Butter adds that irresistible flaky texture and buttery flavor that makes these rolls so delightful. It contributes to the dough’s richness and helps keep the rolls moist. You can melt the butter for easier incorporation into the dough, or you can use cold butter for a more layered, flaky texture. For a dairy-free version, substitute with margarine or plant-based butter.
5. Sugar
A small amount of sugar balances the savory elements and enhances the overall flavor. Sugar helps the rolls brown nicely during baking, creating that golden, crispy exterior while maintaining a soft and airy interior. If you prefer a less sweet roll, you can reduce the sugar amount slightly, but it’s an essential part of achieving the right texture and color.
6. Salt
Salt enhances the flavors of the other ingredients and helps control the rise of the dough. It’s also important for balancing the sweetness of the sugar. Too much salt can make the rolls overly savory, so be sure to stick to the recommended amount for the best flavor.
These ingredients come together in the most simple and delicious way, resulting in dinner rolls that are perfect for any occasion. They’re easy to find, quick to use, and work harmoniously to create soft, fluffy rolls without the need for yeast or long preparation times.
Optional Add-Ins
While this no-yeast dinner rolls recipe is delicious on its own, there are plenty of ways to customize it with optional add-ins for extra flavor and variety. These ingredients are easy to incorporate and can make your rolls even more exciting. Here are a few ideas to elevate the flavor of your rolls:
1. Garlic
Garlic is a classic addition that can take your dinner rolls to the next level. You can either mix in minced garlic directly into the dough or brush the finished rolls with garlic butter after baking for a rich, savory flavor. If you prefer a milder garlic taste, try using garlic powder or garlic salt instead.
2. Cheese
Cheese adds a deliciously rich, savory element to your rolls. Shredded cheddar, Parmesan, or mozzarella are great options, but feel free to experiment with any cheese you love. Stir the cheese into the dough before baking or sprinkle it on top of the rolls for a melty, cheesy finish. Cheese not only enhances the flavor but also adds an extra layer of moisture to the rolls.
3. Fresh Herbs
Adding fresh herbs like rosemary, thyme, or parsley can infuse your rolls with a fragrant, earthy flavor. You can finely chop the herbs and knead them into the dough, or sprinkle them on top before baking for an aromatic crust. If you prefer a more subtle flavor, try using dried herbs like oregano or basil.
4. Sweet Additions
If you’d like to turn your rolls into a slightly sweeter treat, consider adding honey, cinnamon, or raisins. A bit of honey in the dough will give your rolls a subtle sweetness and a soft, golden finish when baked. For a more dessert-like roll, sprinkle cinnamon sugar on top before baking, or fold in some raisins or dried cranberries for a fruity twist.
5. Jalapeños or Spices
For a spicy kick, add finely chopped jalapeños, or season the dough with spices like cayenne pepper or paprika. These additions can make your dinner rolls perfect for pairing with chili, BBQ, or other spicy dishes.
6. Parmesan or Herb Topping
After shaping the dough into rolls, top them with a generous sprinkle of grated Parmesan cheese or a herb mixture (such as parsley, garlic powder, and a bit of olive oil). This will create a flavorful crust that contrasts beautifully with the soft interior of the roll.
These optional add-ins are a fun way to personalize your no-yeast dinner rolls and make them even more special. Whether you want a savory, cheesy roll or a sweet, fragrant one, the possibilities are endless!
Tips on Ingredient Substitutions
This no-yeast dinner rolls recipe is highly adaptable, making it easy to customize based on your dietary preferences or ingredient availability. Whether you’re following a vegan, dairy-free, or gluten-free diet, or if you simply run out of a key ingredient, there are plenty of substitutions you can make without sacrificing flavor or texture. Here are some helpful tips on ingredient substitutions:
1. Plant-Based Milk
For a dairy-free or vegan option, you can easily swap regular milk with any plant-based milk. Popular alternatives include:
- Almond milk
- Oat milk
- Soy milk
- Coconut milk (for a hint of coconut flavor)
Make sure to choose unsweetened varieties to avoid altering the flavor of the rolls. Any of these options will work perfectly, and the texture of the rolls will remain soft and tender.
2. Vegan Butter or Margarine
If you’re making these rolls dairy-free or vegan, replace regular butter with vegan butter or margarine. Both options will give your rolls the rich, buttery flavor without any animal products. Be sure to use a plant-based butter that melts well for the best texture.
3. Gluten-Free Flour
For a gluten-free version, you can substitute all-purpose flour with a gluten-free flour blend. Look for a blend that is designed for baking, as it typically includes a mix of flours like rice flour, potato starch, and tapioca flour, which help provide structure to the rolls.
- Important Tip: When using gluten-free flour, you may need to adjust the amount of liquid in the recipe slightly, as gluten-free flour blends can absorb more liquid. Start with the recommended amount of liquid, then add a little more if the dough feels too dry. You may also want to add xanthan gum (usually about 1/2 teaspoon) to help with the texture and rise.
4. Sugar Alternatives
If you’re looking to reduce sugar or use a different sweetener, you can replace regular sugar with:
- Honey or maple syrup (for a slightly different flavor and natural sweetness)
- Stevia or erythritol (for a low-sugar or diabetic-friendly version)
Keep in mind that liquid sweeteners like honey and maple syrup may require slightly less liquid in the recipe, so adjust accordingly.
5. Dairy-Free or Vegan Cheese
For a cheesy twist, if you’re making these rolls vegan, simply swap regular cheese with dairy-free cheese. Options like vegan mozzarella or vegan cheddar melt beautifully and provide that rich, savory taste you love in dinner rolls.
6. Egg Substitutes
If you want to make these rolls egg-free, you can use an egg replacer or natural alternatives such as:
- Flaxseed meal (1 tablespoon mixed with 3 tablespoons water)
- Applesauce (1/4 cup for 1 egg)
- Mashed bananas (1/4 cup for 1 egg)
These substitutes work well in binding the dough and helping it rise while keeping the rolls soft and delicious.
By making these ingredient substitutions, you can easily tailor this recipe to meet your dietary needs while still enjoying warm, homemade dinner rolls that are soft, fluffy, and satisfying.
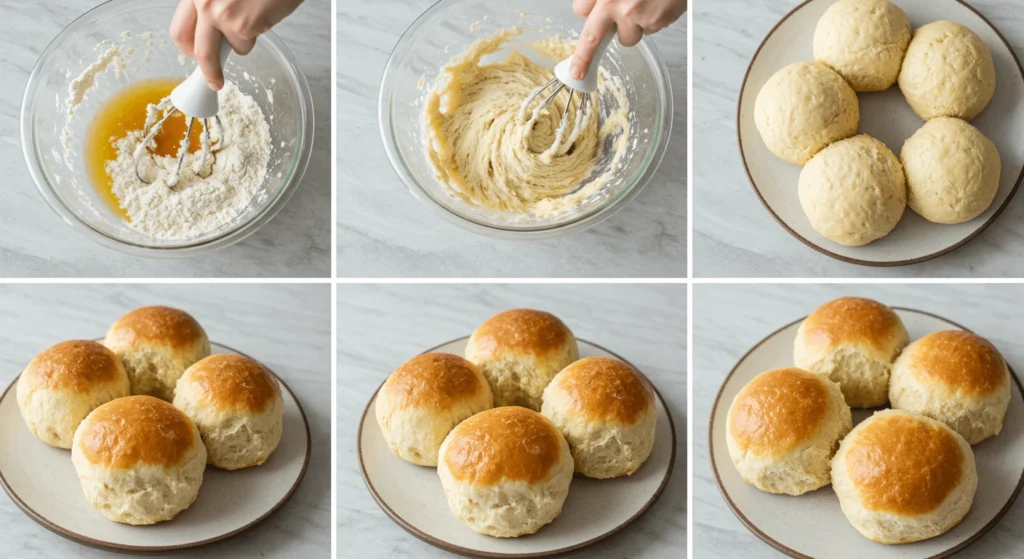
Step-by-Step Guide to Make Homemade Dinner Rolls Without Yeast
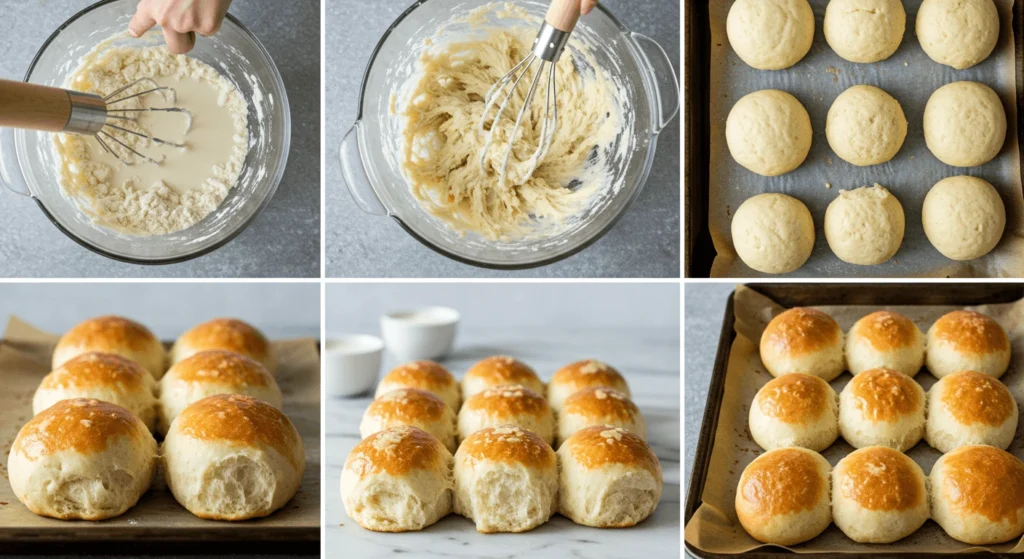
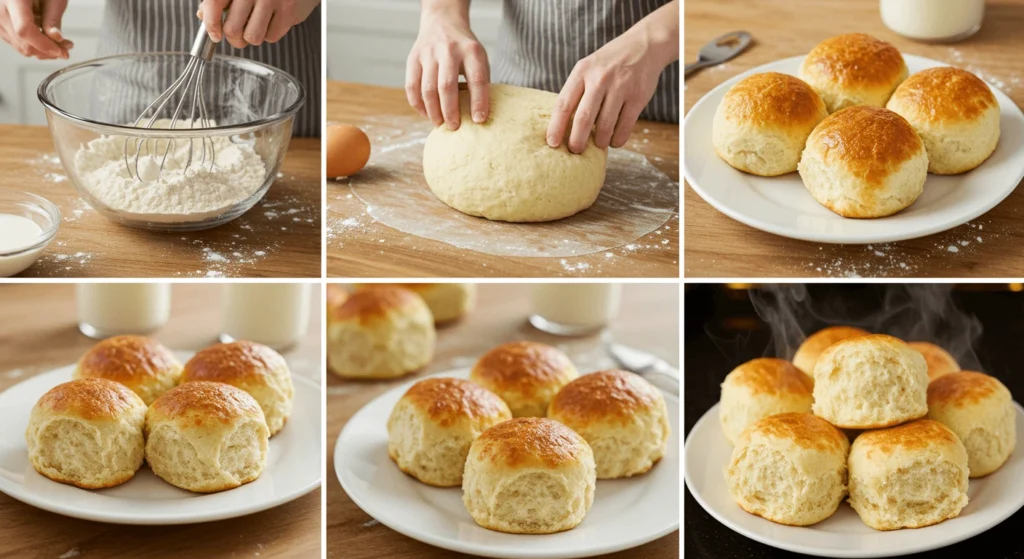
Mixing the Dough
Now that you have all your ingredients ready, it’s time to mix the dough! The process is quick and easy, ensuring you don’t spend too much time preparing. Follow these simple steps to combine the ingredients and create a smooth, soft dough for your no-yeast dinner rolls.
1. Preheat Your Oven
Start by preheating your oven to 375°F (190°C). This will allow the rolls to bake evenly and give them a golden-brown finish.
2. Combine Dry Ingredients
In a large mixing bowl, whisk together the all-purpose flour, baking powder, sugar, and salt. This ensures that the baking powder is evenly distributed throughout the flour, allowing the rolls to rise uniformly as they bake.
3. Add Wet Ingredients
Create a well in the center of your dry ingredients and add the milk and melted butter (or plant-based alternatives). If you’re using any optional add-ins like garlic, herbs, or cheese, you can also mix them in at this stage.
4. Mix Until Combined
Using a spoon or your hands, gently stir the wet and dry ingredients together until they form a dough. Don’t overmix—this could lead to tough rolls. If the dough is too dry and doesn’t come together, add a tablespoon of milk at a time until it forms a soft, slightly sticky dough. On the other hand, if it’s too wet, add a bit more flour until the dough holds its shape.
5. Knead the Dough
Turn the dough out onto a lightly floured surface and gently knead it for about 1-2 minutes. The goal is to make the dough smooth and cohesive, not overworked. Don’t worry about developing gluten like you would with traditional bread—this dough doesn’t require as much kneading, and you want to maintain its light, fluffy texture.
6. Shape the Rolls
Once your dough is smooth, divide it into 12 equal portions (or more if you want smaller rolls). Roll each portion into a ball, or you can shape the dough into a round or oval shape, depending on your preference. Place the dough balls onto a baking sheet lined with parchment paper, making sure they are close together but not touching.
7. Optional Topping
If you want an extra touch, brush the tops of the rolls with melted butter or olive oil for a glossy, golden finish. You can also sprinkle on some extra cheese, herbs, or garlic for added flavor.
Now that your dough is ready, it’s time to bake!
Shaping the Rolls
Shaping your dinner rolls can be a fun part of the process, and ensuring they are evenly sized helps them bake uniformly. Follow these simple tips to shape your rolls perfectly:
1. Divide the Dough Evenly
First, it’s important to divide the dough evenly to ensure that all the rolls bake at the same rate. The easiest way to do this is to:
- Roll the dough into a log (a long, cylindrical shape).
- Cut the dough log into 12 equal pieces (or more for smaller rolls).
- Use a knife or bench scraper for even cuts.
Alternatively, you can weigh the dough using a kitchen scale to ensure each portion is the same size, aiming for approximately 1.5 oz (45g) per roll. This method guarantees even baking and consistent size.
2. Shape into Balls
Once you’ve divided the dough into pieces, it’s time to shape each one into a smooth ball. Here’s how to do it:
- Take each piece of dough and roll it between your palms to form a smooth ball.
- For a more polished look, tuck the edges of the dough underneath as you roll it. This helps create a nice, tight ball that holds its shape well.
- Avoid overworking the dough—gentle handling will keep it light and airy.
3. Arrange the Rolls on the Baking Sheet
Once shaped, place the dough balls on a baking sheet lined with parchment paper or a silicone baking mat. Arrange them close together, but not touching, so they have space to expand while baking. If you want soft rolls with a soft, pull-apart texture, place them closer together, so they rise upward instead of spreading out.
4. Use a Muffin Tin for Perfect Shape
If you want rolls with a more uniform and round shape, you can use a muffin tin to bake them. Place each dough ball into a muffin cup, ensuring each one is packed tightly. This method guarantees that the rolls will rise up rather than spread out, giving you perfectly round dinner rolls.
5. Optional: Add a Decorative Touch
For extra flair, you can use a sharp knife to make a small X-shaped incision on top of each roll before baking. This adds a decorative touch and gives the rolls a rustic look. You can also sprinkle the tops with extra herbs, cheese, or seeds before baking for added texture and flavor.
6. Let the Rolls Rest (Optional)
If you have time, you can let the shaped rolls rest for 5-10 minutes before baking. This will give the dough a chance to relax, and the rolls may puff up slightly more during baking, resulting in an even fluffier texture.
Shaping your rolls properly will help them bake evenly and look as good as they taste. Plus, the process is quick and easy, so you don’t need to worry about complicated techniques.
Baking and Final Touches
Once your dinner rolls are shaped and ready, it’s time to bake them to perfection! The baking process is simple, and with the right oven temperature and a few finishing touches, you’ll have soft, fluffy rolls in no time. Here’s how to bake and finish your rolls:
1. Preheat the Oven
Before you start baking, make sure your oven is preheated to 375°F (190°C). Preheating ensures that the rolls will bake evenly from the moment they go into the oven, creating that beautiful golden-brown crust.
2. Bake the Rolls
Once the oven is preheated, place your shaped rolls onto the middle rack of the oven. Bake for approximately 15-20 minutes, but keep an eye on them toward the end. The rolls should be golden brown on top, and you can check for doneness by gently tapping on the top of a roll—if it sounds hollow, it’s done!
The baking time may vary slightly depending on the size of the rolls or your oven, so check them at the 15-minute mark to avoid over-baking.
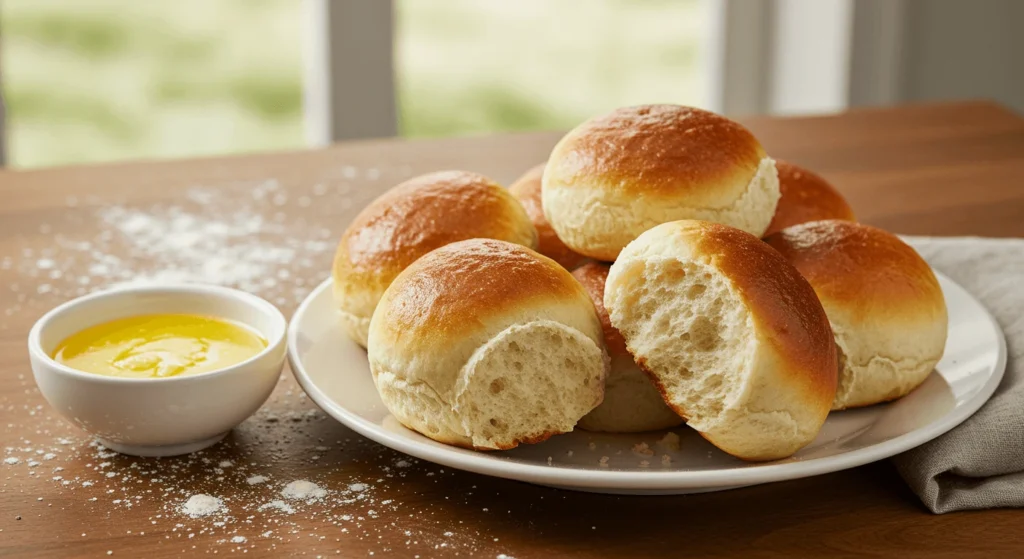
3. Optional: Brush with Butter
As soon as the rolls come out of the oven, you can take them to the next level by brushing them with melted butter. This step adds a glossy finish and a rich, buttery flavor that will make your rolls irresistible. Use a pastry brush to gently coat the tops of the rolls while they’re still warm.
For an extra special touch, you can infuse the butter with garlic or herbs before brushing it onto the rolls. Simply melt the butter and stir in minced garlic, rosemary, or any herbs you like for an aromatic finish. This will give your rolls a flavorful, savory boost.
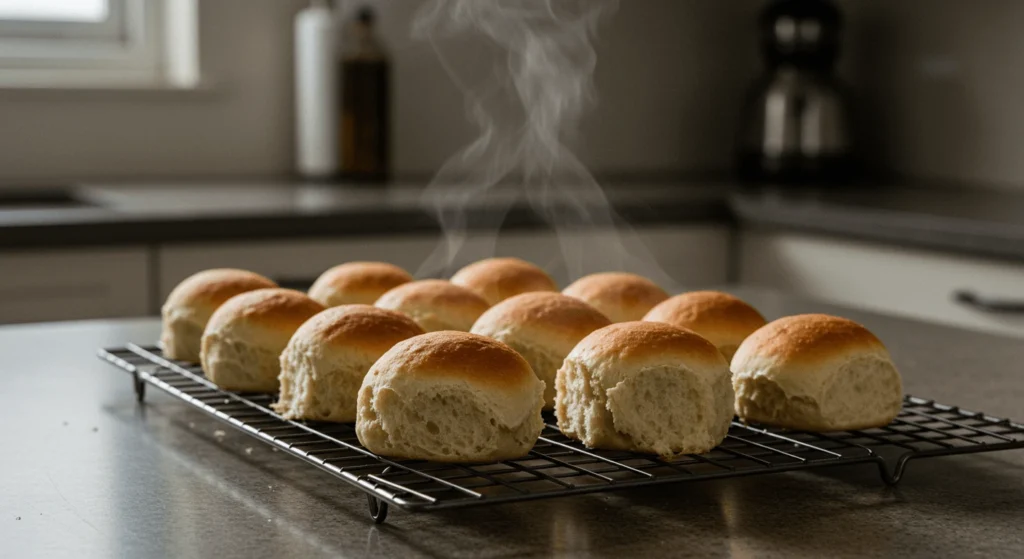
4. Let the Rolls Cool Slightly
Once you’ve brushed the rolls with butter, let them cool for 5 minutes on the baking sheet before serving. This gives the rolls a chance to firm up slightly, making them easier to handle and less likely to fall apart when you pick them up.
5. Serve and Enjoy
Your no-yeast dinner rolls are now ready to be enjoyed! These rolls are best served warm, so they’re perfect alongside any meal, from pasta to soups or roasted dishes. The soft, fluffy texture and delicious buttery flavor will be a hit with everyone at the table.
By following these simple steps, you’ll achieve perfectly baked dinner rolls every time. The final touches, such as brushing with butter, will elevate the rolls and make them even more delightful.
Tips for Perfect No-Yeast Dinner Rolls Every Time
Avoid Overmixing
One of the key factors in making soft, fluffy dinner rolls is ensuring you don’t overmix the dough. While it might seem like the more you mix, the better the dough will come together, overmixing can actually have a negative impact on the final texture of your rolls. Here’s why and how to avoid it:
1. Why Overmixing is a Problem
Overmixing the dough develops the gluten in the flour more than necessary. Gluten is a protein that gives bread dough its structure, but when overworked, it can result in dense, tough, and chewy rolls. Instead of the soft and airy texture you want, overmixing leads to rolls that lack the lightness and fluffiness that make homemade rolls so special.
2. How to Mix Without Overdoing It
To prevent overmixing, here are some tips:
- Mix Just Until Combined: When adding the wet ingredients to the dry ingredients, stir until the dough comes together. It should form a rough dough, and the ingredients should be just combined—you don’t need to keep stirring after that.
- Handle the Dough Gently: Once the dough is formed, gently knead it on a floured surface for just 1-2 minutes. You want to make the dough smooth, but don’t knead it too much. If the dough feels too sticky, lightly flour your hands or the surface, but avoid using too much flour as it can affect the texture.
- No Need to “Develop” Gluten: Unlike traditional yeast bread, this no-yeast recipe doesn’t require the dough to be kneaded for long periods. The purpose of kneading is simply to bring the dough together, not to develop strong gluten strands.
3. What to Look Out For
When mixing, if the dough feels stiff, tough, or you notice a rubbery texture, that’s a sign you’ve overmixed. At this point, it’s important to stop and let the dough rest. The rest time will allow the dough to relax, and it will help the rolls stay soft when baked.
4. The Right Texture
The ideal dough for these no-yeast dinner rolls should be soft and slightly sticky, but not so sticky that it sticks to your hands. When you gently touch the dough, it should spring back slightly. If you overmix, the dough will become too tight and lose its elasticity, resulting in dense rolls after baking.
By avoiding overmixing, you’ll ensure that your dinner rolls come out light, fluffy, and full of air pockets that make them perfect for any meal. Keep the mixing and kneading minimal, and you’ll achieve that desirable soft texture without the heaviness.
Using Fresh Ingredients
When baking no-yeast dinner rolls, the freshness of your ingredients plays a crucial role in achieving the perfect fluffy texture. While the absence of yeast eliminates the need for proofing, the baking powder is the key ingredient that helps these rolls rise and stay light. Here’s why it’s important to use fresh baking powder and how it affects the final product:
1. The Role of Baking Powder
Baking powder is a leavening agent that helps the dough rise without the need for yeast. It contains both an acid and a base (usually cream of tartar and baking soda) that react when mixed with liquid and heat, producing carbon dioxide gas. This gas forms tiny bubbles in the dough, which causes the rolls to rise and become fluffy.
2. Why Fresh Baking Powder Matters
Over time, baking powder loses its potency. Once opened, it begins to react with the moisture in the air and becomes less effective at helping the dough rise. If you use old or expired baking powder, your rolls may turn out dense or fail to rise properly, leaving you with heavy, flat rolls.
To ensure the best results:
- Check the expiration date on your baking powder before using it.
- Test the freshness of your baking powder by adding 1/2 teaspoon to 1/4 cup of warm water. If it bubbles vigorously, it’s still good to use. If not, it’s time to replace it.
3. Fresh Ingredients Lead to Fluffier Rolls
Using fresh baking powder ensures that your rolls will rise properly and be light and airy. The chemical reaction between the baking powder, liquid, and heat will create tiny air pockets in the dough, making the rolls soft and fluffy. Without fresh baking powder, the dough won’t rise as expected, and you’ll end up with dense, heavy rolls.
4. Other Ingredients to Keep Fresh
In addition to using fresh baking powder, the quality of the other ingredients also affects the final result. Here’s how fresh ingredients contribute to fluffiness:
- Fresh flour ensures that the dough has the right texture, without being too dry or overly coarse.
- Fresh butter or plant-based fat adds moisture and a rich flavor, making the rolls soft and tender.
- Fresh milk helps hydrate the dough and keep the rolls from being too dry.
By focusing on using fresh ingredients, especially baking powder, you’ll guarantee that your rolls rise beautifully and turn out perfectly fluffy every time.
Storing and Reheating
Once you’ve baked your delicious no-yeast dinner rolls, you’ll want to keep them fresh and enjoy them at their best. Here are some storage tips to keep your rolls fresh and soft, along with reheating instructions to bring them back to life when you’re ready to enjoy them again:
1. Storing Freshly Baked Rolls
To preserve the softness and fluffiness of your rolls, follow these storage tips:
- Room Temperature Storage: If you plan to eat the rolls within 1-2 days, you can store them at room temperature. Simply place the rolls in an airtight container or resealable plastic bag. If you have a lot of rolls, you can also wrap them in a clean kitchen towel before placing them in a container. This will help them retain moisture and keep the rolls soft.
- Avoid Refrigeration: Refrigeration can dry out rolls, making them less soft and fluffy. It’s best to avoid storing your rolls in the fridge unless you’re planning to store them for longer.
- Freezing Rolls for Long-Term Storage: If you want to keep your rolls for longer, freezing them is a great option. Here’s how to do it:
- Let the rolls cool completely before freezing to prevent condensation.
- Wrap each roll individually in plastic wrap or aluminum foil, or place them in a freezer-safe bag.
- Store them in the freezer for up to 3 months. When you’re ready to eat them, you can thaw them overnight in the fridge or on the countertop.
2. Reheating Rolls
Whether you’re reheating leftover rolls for a meal or a snack, you’ll want to make sure they stay soft and warm. Here’s how to reheat them perfectly:
- Reheating in the Oven (Best Method):
- Preheat your oven to 350°F (175°C).
- Place the rolls on a baking sheet, and cover them with aluminum foil to prevent them from drying out.
- Bake for about 5-10 minutes, or until the rolls are heated through. If you want a slightly crispier top, remove the foil for the last few minutes of baking.
- Optionally, you can brush them with melted butter after reheating for extra flavor.
- Reheating in the Microwave (Quick Method):
- Place a damp paper towel over the rolls to keep them from drying out.
- Microwave for about 20-30 seconds for one or two rolls, or 1 minute for a larger batch.
- Be cautious not to overheat them in the microwave, as this can make them rubbery.
- Reheating in a Toaster Oven (Alternative Method):
- Set your toaster oven to 350°F (175°C).
- Place the rolls directly on the rack or a baking sheet, and heat for 5-7 minutes, or until warm. This method helps retain a crispy outer texture while keeping the inside soft.
3. Tips for Keeping Rolls Soft
- Add Moisture: When reheating, always use a damp towel or cover the rolls with foil. This helps retain moisture, keeping the rolls from drying out.
- Serve Immediately: Once your rolls are reheated, enjoy them immediately for the best texture and flavor.
By following these storage and reheating tips, you’ll be able to enjoy your freshly baked no-yeast dinner rolls for several days or even weeks after baking. Whether they’re served fresh out of the oven or reheated to perfection, these rolls will remain soft, fluffy, and delicious.
Frequently Asked Questions (FAQs)

Can I Make These Rolls Ahead of Time?
Yes! One of the best things about this no-yeast dinner rolls recipe is its flexibility when it comes to preparation. You can easily make the dough or baked rolls ahead of time and store them for later use. Here’s how you can prep and store them, ensuring that they’re fresh and ready whenever you need them:
1. Making the Dough Ahead of Time
If you want to save time on the day you plan to bake the rolls, you can prepare the dough in advance and store it in the fridge. This allows you to enjoy freshly baked rolls with minimal effort. Here’s how to do it:
- Prepare the Dough: Follow the recipe through to the point where you have mixed and kneaded the dough.
- Cover and Refrigerate: Once the dough is ready, cover it with plastic wrap or place it in an airtight container. Store it in the fridge for up to 24 hours. The cold temperature will slow down the process, but the dough should still rise slightly, resulting in fluffy rolls.
- Shaping and Baking: When you’re ready to bake the rolls, take the dough out of the fridge and let it sit at room temperature for 15-20 minutes before shaping. Shape the rolls as usual, let them rest briefly, and bake according to the recipe instructions.
2. Freezing the Dough for Later
You can also freeze the dough to bake the rolls at a later date. This method is perfect for busy days or preparing for gatherings ahead of time. Here’s how:
- Shape the Rolls: After preparing and mixing the dough, divide it into the desired number of rolls and shape each portion into a ball.
- Freeze Individually: Place the shaped rolls onto a baking sheet lined with parchment paper, making sure they are not touching each other. Freeze them for 2-3 hours or until solid.
- Store in Freezer Bags: Once the rolls are frozen, transfer them into a freezer-safe bag or airtight container. They can be stored in the freezer for up to 3 months.
- Bake from Frozen: When you’re ready to bake, remove the rolls from the freezer and place them on a greased baking sheet. Allow them to thaw for about 30 minutes at room temperature. Preheat your oven to 375°F (190°C) and bake as directed. You may need to add an extra 5 minutes to the baking time since the dough is frozen.
3. Storing Baked Rolls
If you’ve already baked your rolls and want to store them for later, you can follow these steps to ensure they remain fresh:
- Room Temperature Storage: For 1-2 days, store the rolls at room temperature in an airtight container or resealable plastic bag. You can also wrap them in a clean kitchen towel before storing them. This helps retain moisture and keeps the rolls soft.
- Freezing Baked Rolls: If you want to store baked rolls for a longer period, freezing them is a great option. Here’s how to do it:
- Let the rolls cool completely before freezing to prevent condensation.
- Wrap each roll individually in plastic wrap or aluminum foil and place them in a freezer-safe bag.
- Store them in the freezer for up to 3 months. When you’re ready to enjoy them, thaw the rolls in the refrigerator or on the counter, and reheat them in the oven at 350°F (175°C) for about 5-10 minutes to restore their softness.
4. Tips for Storing and Reheating
- For best results, when storing baked rolls, keep them in an airtight container to prevent them from drying out.
- Reheat in the oven or microwave for a few minutes to enjoy fresh, warm rolls. Consider brushing the tops with melted butter when reheating for added flavor and moisture.
Making the dough or rolls ahead of time can save you effort on busy days and ensure you always have fresh, soft and fluffy rolls ready to enjoy. Whether you’re prepping for a special occasion or simply looking to make your week more efficient, these storage methods give you flexibility without compromising on taste or texture.
What Can I Serve with These Dinner Rolls?
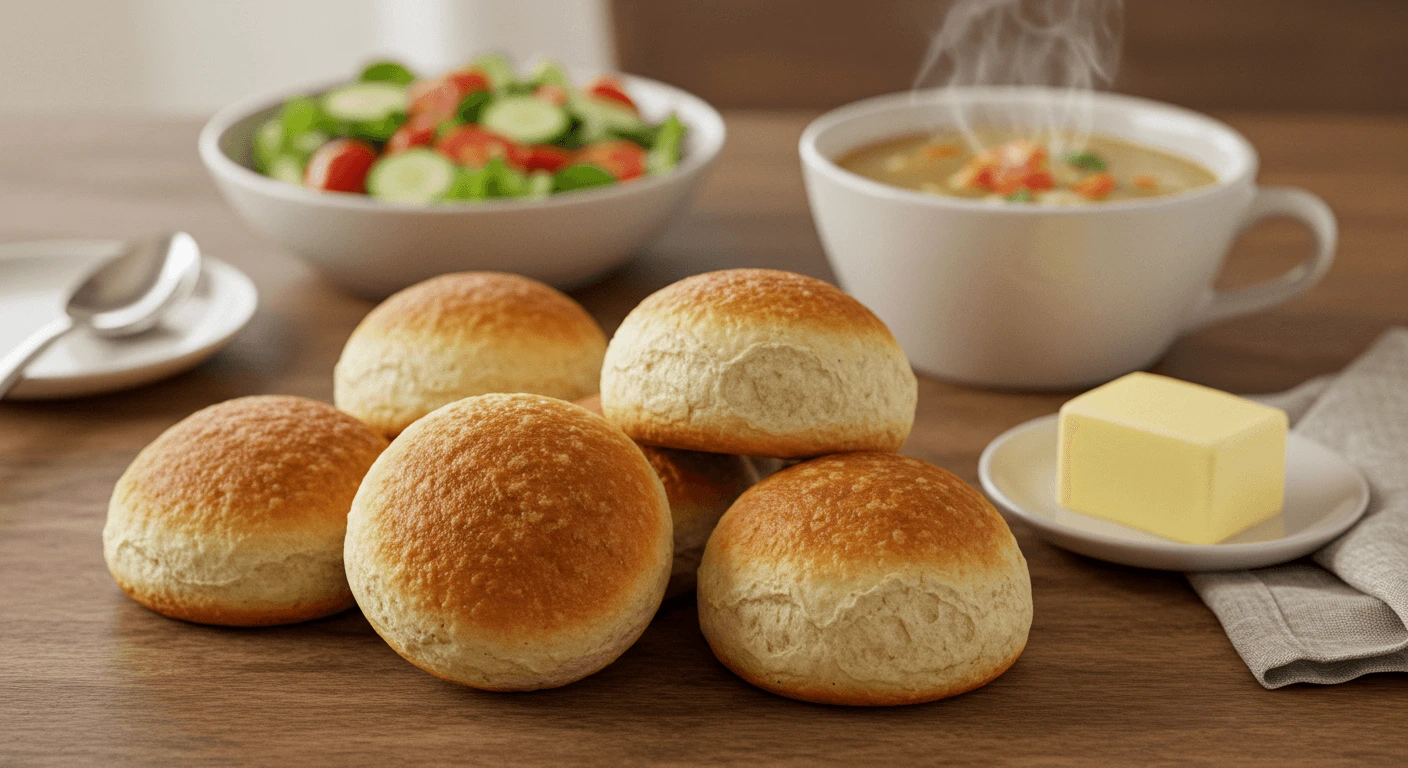
These no-yeast dinner rolls are incredibly versatile and can be paired with a wide range of dishes, making them perfect for any meal or occasion. Whether you’re serving them as a side, an appetizer, or even for a snack, here are some fantastic pairing ideas to complement the soft, fluffy rolls:
1. Soups and Stews
Dinner rolls are a perfect accompaniment to soups and stews—their soft, pillowy texture makes them great for dipping into broth or sauce. Here are some soups that pair wonderfully with your rolls:
- Creamy Tomato Soup: The rich, smooth texture of tomato soup complements the lightness of the rolls. Use the rolls to scoop up the creamy soup for a cozy, satisfying meal.
- Chicken Noodle Soup: A classic pairing, the tender rolls are great for mopping up any leftover broth or sauce from the soup.
- Hearty Beef Stew: The rich, savory flavors of a beef stew will be balanced by the light, fluffy texture of the rolls, making each bite even more comforting.
- Lentil Soup: For a lighter option, pair your rolls with a nutritious and flavorful lentil soup. The rolls will add a nice contrast to the hearty texture of the lentils.
2. Salads
For a lighter meal or side dish, dinner rolls pair perfectly with fresh salads. The fluffy rolls can complement the crisp, refreshing flavors of a salad while adding substance to the meal. Here are a few options:
- Caesar Salad: The creamy dressing and crunchy croutons in a Caesar salad blend well with soft, warm dinner rolls.
- Greek Salad: The tangy feta, olives, and fresh vegetables in a Greek salad are enhanced by the buttery, mild flavor of the rolls.
- Roasted Vegetable Salad: The sweetness of roasted vegetables like carrots, sweet potatoes, and beets is a great match with the simple yet satisfying texture of dinner rolls.
- Spinach and Strawberry Salad: For a slightly sweet and savory combination, pair the rolls with a fresh spinach salad topped with sweet strawberries, nuts, and balsamic dressing.
3. Spreads and Dips
If you’re serving these rolls as an appetizer or snack, consider pairing them with delicious spreads and dips that will elevate the flavor of your rolls:
- Garlic Butter: One of the simplest and most delicious ways to enjoy dinner rolls is with a generous smear of garlic butter. The savory garlic flavor enhances the richness of the rolls, creating a savory treat.
- Hummus: A smooth, creamy hummus can be used as a flavorful dip for your rolls. Try classic chickpea hummus or variations like roasted red pepper or garlic hummus.
- Cream Cheese Spread: For a more indulgent option, a cream cheese spread with herbs or even smoked salmon works wonderfully with the soft rolls.
- Herb Butter: Make a compound herb butter by mixing softened butter with fresh herbs like parsley, rosemary, and thyme. This will add aromatic flavor to each roll.
- Spinach Artichoke Dip: Serve warm spinach artichoke dip alongside the rolls for a rich, cheesy pairing that’s perfect for dipping.
4. Main Dishes
If you’re serving the dinner rolls as part of a main course, there are plenty of hearty options that pair beautifully with them:
- Roast Chicken or Turkey: The lightness of the rolls pairs well with savory roasted meats like chicken or turkey. Use the rolls to scoop up gravy or sauces.
- BBQ Ribs: The sweetness and smokiness of BBQ ribs are balanced perfectly by the soft, neutral flavor of dinner rolls.
- Grilled Steaks or Fish: For a more sophisticated pairing, serve your rolls with grilled meats like steak or fish. The rolls add texture and can be used to soak up any delicious juices or sauces.
- Vegetable Stir-Fry: If you prefer a vegetarian option, a flavorful vegetable stir-fry served with rice is complemented by these soft rolls. The rolls can help balance the spiciness or richness of the stir-fry.
5. Breakfast or Brunch
Dinner rolls can even make an appearance at breakfast or brunch, especially when served with a variety of toppings or sides:
- Eggs and Bacon: Pair your rolls with scrambled eggs, sunny-side-up eggs, or crispy bacon for a satisfying breakfast spread.
- Jam or Jelly: Spread your favorite fruit jam or jelly over the rolls for a sweet breakfast treat.
- Avocado Toast: For a more modern twist, use your rolls to make avocado toast, adding a sprinkle of salt, pepper, and perhaps a dash of chili flakes.
- Cheese and Cold Cuts: For a savory brunch, serve your rolls alongside cheese, charcuterie, and fresh fruit.
6. Holiday Meals
Dinner rolls are often a staple at holiday gatherings and can pair wonderfully with your festive meals. Here are a few options:
- Thanksgiving Dinner: These rolls are perfect alongside roast turkey, mashed potatoes, and gravy.
- Christmas Feast: Serve your rolls with roast ham, vegetable casseroles, or stuffing for a traditional holiday meal.
- Easter Dinner: Pair these soft rolls with glazed ham or lamb for a delicious holiday spread.
With so many pairing options, these no-yeast dinner rolls are a versatile and delicious addition to almost any meal. Whether served with soups, salads, main dishes, or spreads, they’re sure to be a hit at your table!
Can I Make the Recipe Vegan or Gluten-Free?
Absolutely! This no-yeast dinner rolls recipe is versatile and can be easily adapted to suit vegan and gluten-free diets without compromising on the fluffiness and taste of the rolls. Here are some simple substitutions for both dietary preferences:
Vegan Substitutions
Making these dinner rolls vegan-friendly is simple by swapping out animal-based ingredients for plant-based alternatives. Here’s how to modify the recipe:
1. Replace Dairy Milk
- Substitute: Use any plant-based milk like almond milk, soy milk, oat milk, or coconut milk in place of cow’s milk. These options work well and will maintain the soft texture of the rolls.
- Tip: Choose an unsweetened variety to avoid altering the taste of your rolls.
2. Replace Butter
- Substitute: Use vegan butter or margarine instead of regular butter. These work just as well for both the dough and brushing on top after baking.
- Other Options: You can also use coconut oil or olive oil for a slightly different flavor, although coconut oil will give a subtle coconut taste to the rolls.
3. Egg Replacement
- Substitute: In place of eggs (if the recipe calls for them), you can use flax eggs (mix 1 tablespoon of ground flaxseeds with 3 tablespoons of water and let it sit for 5 minutes), chia eggs (similar method), or a store-bought egg replacer. These will help bind the dough and maintain its fluffiness.
4. Optional Add-Ins
If the recipe includes dairy-based cheese, simply replace it with vegan cheese or omit it altogether for a dairy-free version. You can also use nutritional yeast to add a cheesy flavor if desired.
By swapping these ingredients, you’ll have a delicious vegan version of the dinner rolls without sacrificing any of the soft, fluffy goodness.
Gluten-Free Substitutions
Making the recipe gluten-free requires a few adjustments to the flour and binding agents. Here’s how to adapt the recipe for a gluten-free version:
1. Replace All-Purpose Flour
- Substitute: Use a gluten-free all-purpose flour blend that is designed for baking. These blends typically contain a mix of rice flour, potato starch, tapioca flour, and sometimes xanthan gum or guar gum to help bind the ingredients and provide structure to the dough.
- Tip: Make sure the blend contains xanthan gum or guar gum as these help mimic the elasticity and chewiness that gluten normally provides. If your blend doesn’t contain it, add about 1/2 teaspoon of xanthan gum per cup of gluten-free flour.
2. Use a Gluten-Free Baking Powder
- Substitute: Make sure you are using gluten-free baking powder. Most baking powders are naturally gluten-free, but it’s important to check the label to ensure no added wheat starch.
3. Adding Moisture
- Substitute: Gluten-free flour can sometimes lead to drier dough, so you may need to add extra moisture. If the dough feels too dry, add a bit more plant-based milk or water, 1 tablespoon at a time, until you achieve a soft, sticky dough.
- Tip: You can also add a small amount of apple cider vinegar (about 1 teaspoon) to the dough. This can help with the rise and improve the texture.
4. Egg Replacement
- Substitute: Use flax eggs or chia eggs (1 tablespoon ground flax or chia seeds mixed with 3 tablespoons water) in place of eggs for binding. This works great in gluten-free baking and adds moisture to the rolls.
5. Optional Add-Ins
- If your recipe calls for dairy-based ingredients like cheese, you can use dairy-free cheese or skip it altogether. For savory rolls, herbs or garlic powder are a great way to add flavor without dairy.
Tips for Both Vegan and Gluten-Free Rolls
- Don’t Overwork the Dough: Whether vegan or gluten-free, it’s important not to overmix the dough. Overworking the dough can result in dense rolls, especially with gluten-free flour. Mix the ingredients until they are just combined, then stop.
- Allow for Extra Resting Time: Gluten-free doughs often benefit from a longer resting period to allow the flour to fully hydrate. Let the dough rest for about 15-20 minutes before shaping to ensure the flour absorbs the liquid properly.
- Moisture is Key: Both vegan and gluten-free rolls can benefit from a little extra moisture, so be sure to check the texture of the dough. It should be soft and slightly sticky but not too wet.
- Use High-Quality Ingredients: As with any baking project, using high-quality ingredients—whether vegan or gluten-free—can make a big difference in the final result. Opt for certified gluten-free flour blends and organic plant-based milks for the best taste and texture.
By making these simple substitutions, you can enjoy delicious, fluffy dinner rolls that are both vegan and gluten-free—perfect for anyone with dietary restrictions or preferences.
Conclusion
In conclusion, these no-yeast dinner rolls offer a quick, easy, and delicious way to enjoy homemade bread rolls without the wait. With minimal ingredients and no proofing required, you can create soft and fluffy dinner rolls in no time—perfect for those last-minute cravings or unexpected gatherings. Whether you’re a beginner baker or just in a hurry, this fast bread recipe will help you achieve bakery-quality rolls without the hassle of yeast or rising time.
We encourage you to give this easy dinner rolls without yeast recipe a try and experience the joy of homemade bread rolls that are both flavorful and simple. We’d love to hear your thoughts, so be sure to share your feedback or any variations you’ve tried.
For more quick dinner rolls recipes and other delicious homemade baked goods, be sure to check out similar recipes on our blog. Don’t forget to subscribe for regular updates on new, tasty recipes that you can easily prepare at home. Happy baking!
Need more inspiration for your next meal? Visit Hearty Recipes to discover tasty, wholesome recipes that fit all kinds of dietary needs!
1 thought on “Homemade Dinner Rolls Recipe Without Yeast: Soft, Fluffy, and Ready in Minutes”