

What Makes Asian Desserts Special?
Asian desserts stand out because they balance sweetness with subtle savory flavors. They often feature ingredients like matcha, red bean paste, coconut milk, and black sesame. These unique flavors give each dessert its own distinctive taste and texture. For example, mochi is chewy, while sesame balls are crispy and golden. These desserts are simple to make at home. With just a few key ingredients, you can easily recreate your favorite Asian desserts in your own kitchen. Whether you crave mango sticky rice or want to try Taiyaki, you don’t need advanced skills to make these treats.
Making Asian desserts at home is easier than you think. Let’s explore the top 5 easy Asian desserts you can prepare today!
1. Mochi: A Sweet and Chewy Japanese Treat
What is Mochi?
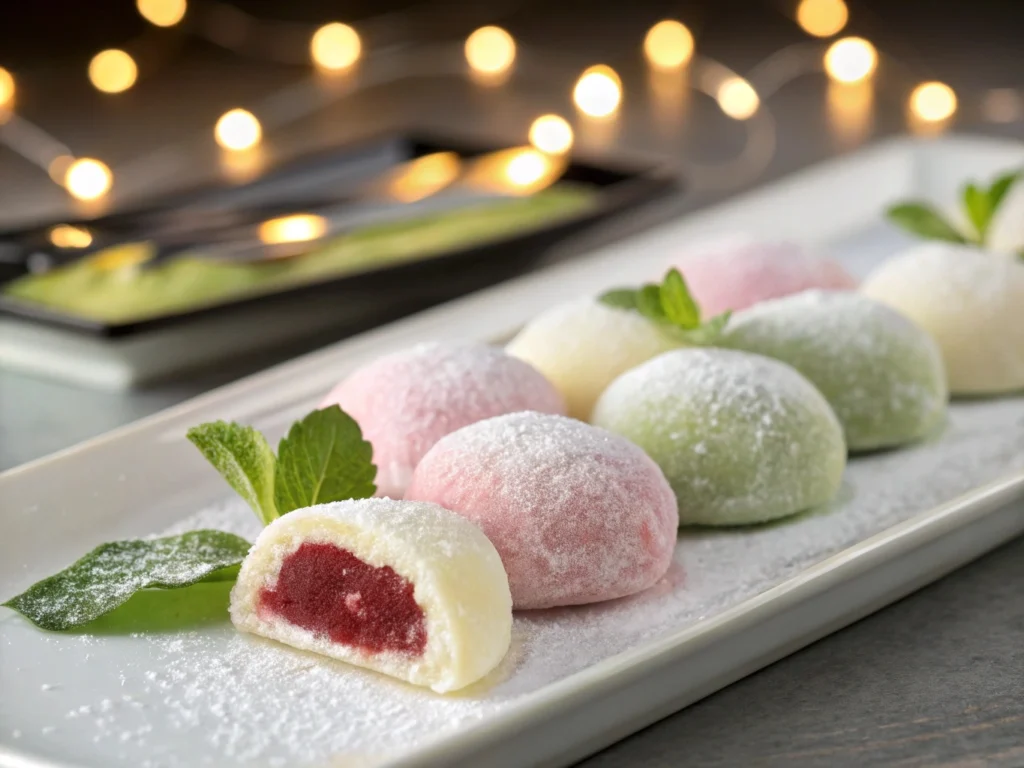
Mochi is a traditional Japanese dessert made from glutinous rice, known for its chewy and sticky texture. It’s crafted by steaming and pounding glutinous rice until it becomes a smooth, elastic dough. Mochi has been enjoyed in Japan for centuries and is often served during special occasions, festivals, and holidays. It can be enjoyed on its own or used as a base for a variety of Japanese sweets.
The popularity of mochi in Japanese cuisine stems from its versatility. While it’s commonly enjoyed as a plain treat, mochi can be filled with sweet ingredients like red bean paste or matcha. In recent years, mochi ice cream has become a global sensation, combining the chewy outer layer with a cold, creamy filling.
Many people love mochi not only for its unique texture but also for its simple yet satisfying taste. It’s a dessert that can be made in numerous variations, from classic flavors to more inventive, modern twists. Whether filled with fruit, ice cream, or even savory fillings, mochi continues to be a beloved treat in Japanese and Asian dessert culture.
Ingredients Needed for Homemade Mochi
Making homemade mochi requires only a few simple ingredients. Here’s what you’ll need:
- Glutinous rice flour (also known as sweet rice flour): This is the main ingredient that gives mochi its chewy texture.
- Sugar: Used to sweeten the dough and balance the flavors. You can adjust the amount based on your sweetness preference.
- Water: Helps form the dough and creates the desired consistency.
- Cornstarch (or potato starch): Used to dust the mochi to prevent it from sticking together while you shape it.
- Filling (optional): Common fillings include red bean paste, matcha powder, or chocolate. You can also get creative and add fruits like mango or strawberries.
These basic ingredients allow you to create a simple, delicious homemade mochi. With a bit of creativity, you can also experiment with different flavors and fillings to make your own unique variations of this Japanese dessert!
How to Make Mochi at Home
Making mochi at home is easier than you might think. Follow these simple steps to enjoy this chewy, traditional Japanese dessert in no time:
- Prepare the Ingredients
Gather all the ingredients: glutinous rice flour, sugar, water, and cornstarch for dusting. If you’re adding a filling, like red bean paste or matcha, have it ready. - Mix the Dough
In a bowl, combine 1 cup of glutinous rice flour and ¼ cup of sugar. Slowly add 1 cup of water, stirring continuously to avoid lumps. The mixture should form a smooth batter. - Steam the Mixture
Pour the batter into a heatproof dish or a bowl that fits into your steamer. Cover it with a cloth or foil. Steam the mixture for about 30-40 minutes, stirring every 10 minutes until it becomes thick and sticky. - Cool and Shape the Mochi
Once the dough is ready, allow it to cool for a few minutes. Dust a clean surface with cornstarch to prevent sticking. Turn the mochi dough onto the surface and cut it into small pieces. Roll each piece into a ball or flatten it into discs. - Fill (Optional)
If you want to add a filling, flatten each piece of mochi and place a spoonful of red bean paste, matcha, or another filling in the center. Pinch the edges together to seal. - Serve and Enjoy
Dust each finished mochi with a little cornstarch to prevent sticking. You can serve them immediately or store them in an airtight container for later.
With these simple steps, you can make delicious mochi at home, and enjoy this chewy, sweet treat any time!
Variations of Mochi
Mochi is incredibly versatile, and there are countless variations to suit different tastes. Here are some of the traditional and creative twists you can try:
- Traditional Flavors
- Matcha: Matcha-flavored mochi is a classic favorite, known for its rich, slightly bitter taste that pairs perfectly with the sweetness of the dough.
- Red Bean Paste: Anko, or red bean paste, is another traditional filling for mochi. Its sweet and earthy flavor balances the chewy texture of the dough.
- Creative Twists
- Mochi Ice Cream: This modern take on mochi combines the chewy dough with a creamy ice cream filling. You can find flavors like vanilla, chocolate, mango, and even green tea.
- Fruit Mochi: Add a refreshing twist by wrapping mochi around fresh fruits like strawberries, mango, or kiwi.
- Chocolate Mochi: For chocolate lovers, fill mochi with chocolate ganache or mix cocoa into the dough for a rich, indulgent treat.
With these variations, mochi becomes a fun and customizable dessert that’s perfect for any occasion.
2. Mango Sticky Rice: A Classic Thai Delight
Why Mango Sticky Rice is a Fan Favorite
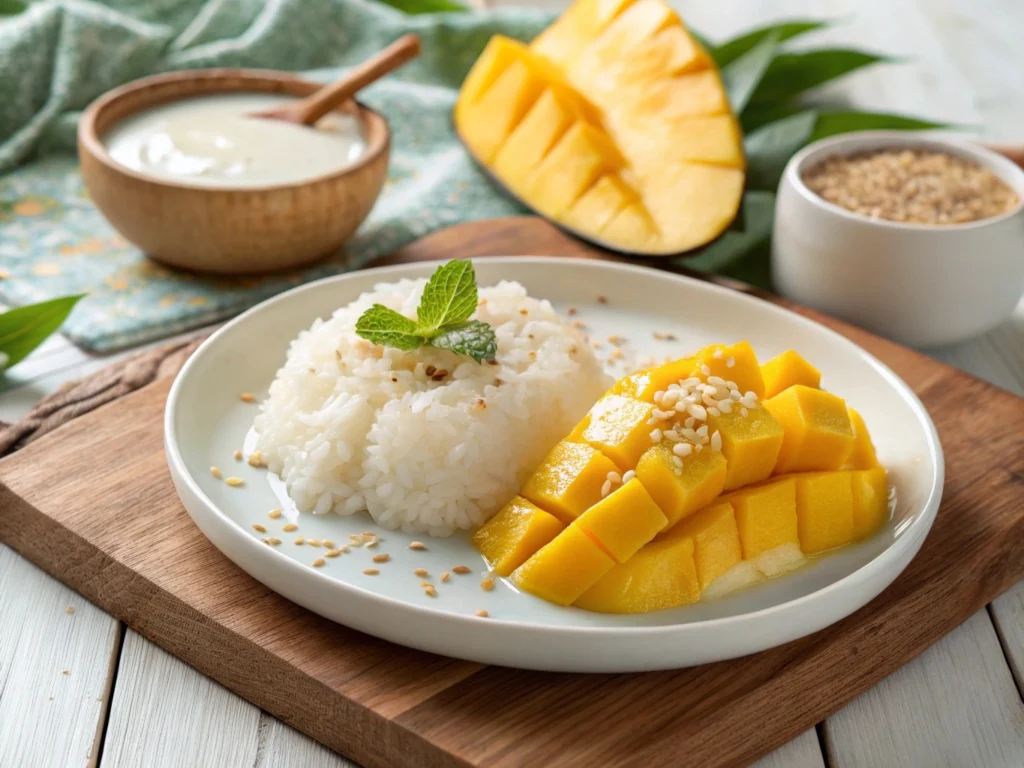
Mango Sticky Rice is a beloved Asian dessert that combines two irresistible ingredients: ripe mangoes and coconut milk. This simple yet flavorful combination has made it a fan favorite, especially in Thailand and throughout Southeast Asia.
- Sweet Mangoes: The mango is the star of the dish. Its natural sweetness and juicy texture provide a refreshing contrast to the rich, creamy coconut sauce. The soft, ripe mangoes create a perfect balance of freshness and sweetness in every bite.
- Coconut Milk: The coconut milk adds a rich, smooth flavor that complements the sweetness of the mango. Its creamy texture brings everything together, turning the dish into a comforting, indulgent treat. The coconut’s subtle saltiness enhances the overall taste, making Mango Sticky Rice uniquely satisfying.
Together, these two ingredients create a dessert that’s not only delicious but also visually stunning. The smooth, sticky rice acts as the base, while the vibrant, golden mango slices top the dish. It’s no wonder that Mango Sticky Rice is a fan favorite, offering the perfect balance of flavors in every bite!
Key Ingredients for Mango Sticky Rice
To make Mango Sticky Rice, you only need a few essential ingredients. Here’s what you’ll need:
- Sticky Rice: The base of this dessert, sticky rice (also known as glutinous rice) is key to achieving the dish’s signature texture. It becomes soft and sticky when cooked, making it perfect for absorbing the coconut milk.
- Fresh Mango: Choose ripe mangoes for the best flavor. Their sweetness and juiciness are what make this dessert so irresistible.
- Coconut Milk: Coconut milk provides the rich, creamy texture and flavor that elevates the dish. It’s the key to making Mango Sticky Rice indulgent yet refreshing.
- Sugar: A small amount of sugar is added to sweeten the coconut milk, balancing the flavors and enhancing the overall sweetness of the dessert.
- Salt: A pinch of salt is essential to enhance the flavors, creating a perfect balance between sweet and savory in the coconut sauce.
With these simple ingredients, Mango Sticky Rice becomes a rich, comforting, and refreshing dessert that’s easy to prepare and enjoy!
Step-by-Step Instructions for Making Mango Sticky Rice
Making Mango Sticky Rice at home is simple and rewarding. Follow these easy steps to create this delicious Asian dessert:
- Prepare the Sticky Rice
- Rinse 1 cup of sticky rice under cold water until the water runs clear. This removes excess starch.
- Soak the rice in water for 1-2 hours to ensure it cooks evenly.
- Steam the rice for 30-40 minutes in a bamboo steamer or a heatproof dish. Once cooked, fluff the rice gently.
- Make the Coconut Sauce
- In a saucepan, combine 1 cup of coconut milk, ¼ cup of sugar, and a pinch of salt.
- Stir the mixture over medium heat until the sugar dissolves completely and the sauce becomes smooth. Do not let it boil. Remove from heat once combined.
- Combine Rice and Coconut Sauce
- Pour the coconut sauce over the warm, steamed sticky rice. Stir gently to coat the rice evenly with the sauce. Let the rice sit for 10-15 minutes so it absorbs the coconut milk.
- Prepare the Mango
- While the rice is resting, peel and slice 2-3 ripe mangoes. Cut the mango into thin, long slices for an elegant presentation.
- Assemble the Dessert
- Place a scoop of sticky rice on a plate and top it with the fresh mango slices.
- Optionally, drizzle extra coconut milk over the top for added richness, or garnish with sesame seeds or mung beans for crunch.
- Serve and Enjoy
- Serve the Mango Sticky Rice immediately, either warm or at room temperature. It’s the perfect dessert for a sweet treat after a meal or for a special occasion.
With these simple steps, you can enjoy this iconic Asian dessert any time!
Variations to Try
While Mango Sticky Rice is traditionally made with mango, there are several exciting variations you can try for a unique twist on this classic dessert:
- Black Sesame Sticky Rice: Instead of mango, use black sesame paste or black sesame seeds as a filling. The rich, nutty flavor of black sesame pairs beautifully with the creamy coconut milk, giving the dish a deep, slightly earthy taste.
- Lychee Sticky Rice: For a refreshing twist, substitute mango with lychee. This tropical fruit adds a sweet and fragrant touch to the dessert, complementing the coconut and sticky rice perfectly.
- Sesame Seeds for Extra Flavor: Sprinkle toasted sesame seeds on top of your Mango Sticky Rice or its variations to add a delightful crunch and extra nutty flavor. The seeds also enhance the dish’s appearance, giving it a touch of elegance.
These variations allow you to explore different flavors while keeping the core elements of this beloved dessert. Whether you’re in the mood for something nutty, fruity, or crunchy, these ideas will elevate your Mango Sticky Rice experience!
3. Sesame Balls: A Crispy Chinese Dessert

What are Sesame Balls?
Sesame balls, or Jian Dui, are a popular Chinese dessert that offer a delightful combination of textures and flavors. These deep-fried treats are made with glutinous rice flour, which gives them a chewy interior, and are coated with sesame seeds, adding a crunchy exterior. The perfect balance of crunch and chew makes them a favorite in Chinese cuisine and at festivals or celebrations.
Traditionally, sesame balls are filled with sweet red bean paste or lotus seed paste, giving them a sweet, creamy center. The deep frying process creates a golden, crispy crust, while the chewy dough and creamy filling inside offer a comforting, indulgent taste. Whether enjoyed as a snack, dessert, or as part of a festive meal, sesame balls are a delicious way to experience a classic Chinese dessert.
Ingredients for Sesame Balls
To make sesame balls, you’ll need a few simple ingredients that come together to create this irresistible dessert:
- Glutinous Rice Flour: The main ingredient for the dough, glutinous rice flour gives the sesame balls their chewy, soft texture. This flour is essential for achieving the perfect consistency.
- Sesame Seeds: Sesame seeds coat the outside of the sesame balls, providing a crispy, nutty texture and a beautiful golden color after frying.
- Red Bean Paste: Sweet red bean paste (also known as anko) is the traditional filling, offering a rich and slightly sweet flavor. It’s smooth and creamy, making the perfect contrast to the crunchy exterior.
- Sugar: A little sugar is added to sweeten the dough and the filling, balancing the overall flavor and enhancing the sweetness of the sesame balls.
These simple ingredients combine to create a crispy, chewy, and sweet treat that’s loved in many cultures. Sesame balls are easy to make and incredibly satisfying!
How to Make Perfect Sesame Balls
Making perfect sesame balls at home is simple if you follow these clear, step-by-step instructions:
- Prepare the Dough
- In a large mixing bowl, combine 1 cup of glutinous rice flour with 2 tablespoons of sugar.
- Gradually add water (about ½ cup) to the flour mixture, stirring until a smooth, dough-like consistency forms.
- Knead the dough for 5-7 minutes until it becomes smooth and elastic. If it’s too sticky, add a small amount of flour.
- Prepare the Filling
- If you’re using red bean paste, roll it into small balls, about 1 teaspoon each. You can also use other fillings, like lotus seed paste or sweetened black sesame paste, depending on your preference.
- Form the Sesame Balls
- Take a small piece of dough and roll it into a ball. Flatten it slightly with your hands to form a small disc.
- Place a ball of red bean paste in the center of the disc, then gently fold the dough around the filling. Seal the edges by pinching them together, then roll the dough into a smooth ball, ensuring the filling is fully enclosed.
- Coat with Sesame Seeds
- Roll each dough ball in a plate of sesame seeds, coating the outside evenly with the seeds. Make sure the sesame seeds stick well to the dough.
- Fry the Sesame Balls
- Heat about 3 cups of vegetable oil in a deep pan or wok over medium heat. Once the oil reaches 350°F (175°C), carefully drop the sesame balls into the hot oil.
- Fry the sesame balls in batches, turning them occasionally to ensure they cook evenly. They should puff up and turn golden brown in about 4-6 minutes.
- Drain and Serve
- Once golden brown and crispy, remove the sesame balls from the oil and drain on paper towels.
- Allow them to cool slightly before serving. Enjoy them warm for the best flavor and texture!
With these steps, you’ll create crispy, chewy sesame balls that are the perfect balance of textures and flavors. Enjoy this classic Chinese dessert with friends or family!
Tips for Perfect Sesame Balls
To make your sesame balls truly exceptional, follow these helpful tips to achieve a golden crust and ensure the filling is cooked to perfection:
- Achieving the Perfect Golden Crust:
- Make sure the oil is at the right temperature (around 350°F or 175°C). If the oil is too hot, the sesame balls will cook too quickly on the outside and remain raw inside. If it’s too cool, they will absorb too much oil and become greasy.
- Fry the sesame balls in small batches to avoid overcrowding the pan, ensuring even cooking and a crispy golden crust on all sides.
- How to Avoid Undercooking the Filling:
- Ensure the filling is at room temperature when placing it in the dough. If the filling is cold, it can cause the dough to overcook while trying to heat the center.
- Fry the sesame balls slowly at medium heat to give the filling time to heat up and prevent the dough from becoming too crisp before the filling is fully warmed through.
- If you’re worried about the filling not heating properly, you can always gently press the sesame balls down once in the oil to help cook the inside evenly.
With these simple adjustments, you’ll get perfect sesame balls every time, with a beautifully crisp exterior and a warm, delicious filling inside!
4. Taiyaki: The Fish-Shaped Japanese Pastry
What Makes Taiyaki So Special?
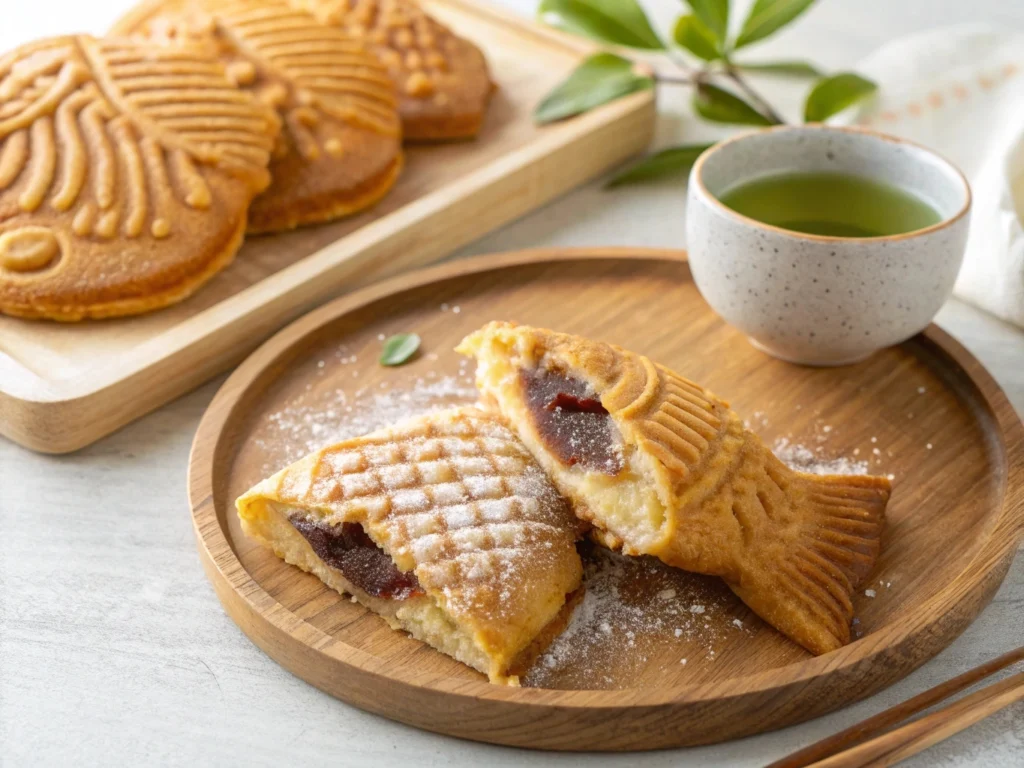
Taiyaki is a beloved Japanese pastry known for its unique fish shape, which resembles the tai (sea bream) fish. The fish shape is not just for visual appeal; it’s a nod to the traditional symbolism of good fortune and prosperity in Japanese culture. Filled with a variety of sweet fillings, taiyaki is most commonly filled with sweet red bean paste or custard, although other flavors like chocolate, cheese, and sweet potato are also popular.
What makes taiyaki so special is the combination of a crispy, slightly sweet batter on the outside and the warm, smooth filling inside. The contrast between the crispy exterior and the creamy or sweet filling creates a delightful experience for the taste buds. Whether enjoyed as a snack, dessert, or treat at festivals, taiyaki holds a special place in Japanese cuisine and continues to be a favorite for those craving something sweet and satisfying.
Simple Ingredients for Taiyaki
Making taiyaki at home is easy with a few simple ingredients. Here’s what you’ll need:
- Waffle Batter: The outer shell of taiyaki is made from a simple waffle batter. You can use store-bought waffle mix or make your own by combining flour, sugar, eggs, milk, and baking powder. This batter creates a crispy, slightly sweet exterior when cooked.
- Sweet Red Bean Paste: The most traditional filling for taiyaki is sweet red bean paste (anko). Made from red beans, sugar, and sometimes a pinch of salt, this paste has a smooth texture and a naturally sweet flavor that perfectly complements the crispy outer shell.
- Custard: For a creamier filling, you can use custard. This is often made with milk, eggs, sugar, and vanilla. It provides a smooth, rich filling that contrasts beautifully with the crunchy batter.
These basic ingredients come together to create the delicious, iconic taiyaki, with the option to customize the filling to suit your tastes!
How to Make Taiyaki at Home
Making taiyaki at home is simple with the right ingredients and tools. Follow this step-by-step guide to create your own fish-shaped pastries, either from scratch or using a taiyaki pan.
- Prepare the Waffle Batter
- In a mixing bowl, combine 1 cup of all-purpose flour, 2 tablespoons of sugar, 1 teaspoon of baking powder, and a pinch of salt.
- Add 1 egg, 1/2 cup of milk, and 1 tablespoon of melted butter. Mix until smooth. The batter should be thick but pourable. If it’s too thick, add a little more milk to adjust the consistency.
- Prepare the Filling
- If using sweet red bean paste, make sure it’s smooth and ready to use. If it’s too thick, you can slightly warm it to soften it.
- If you prefer custard, prepare it by heating milk, sugar, eggs, and vanilla on the stove, then cool it down before use.
- Preheat the Taiyaki Pan
- Heat your taiyaki pan over medium heat and lightly grease it with butter or oil to prevent the batter from sticking.
- Assemble the Taiyaki
- Pour a small amount of waffle batter into the bottom half of each fish-shaped cavity in the taiyaki pan.
- Add a spoonful of your chosen filling (either sweet red bean paste or custard).
- Top with more batter, covering the filling completely. Close the pan and lock it shut.
- Cook the Taiyaki
- Cook the taiyaki for about 3-4 minutes on each side, flipping the pan halfway through to ensure even cooking.
- The taiyaki should turn golden brown and crispy on the outside while the filling becomes warm and gooey.
- Serve and Enjoy
- Once cooked, carefully remove the taiyaki from the pan and let them cool slightly.
- Serve warm and enjoy the delicious contrast of the crispy, golden batter and sweet filling inside.
With these simple steps, you can make taiyaki at home and enjoy this iconic Japanese dessert anytime!
Customizing Taiyaki
One of the great things about taiyaki is how easily you can customize the filling and batter to suit different tastes and dietary preferences. Here are some fun variations to try:
- Other Fillings:
While red bean paste and custard are the traditional fillings, you can get creative with your choice of taiyaki fillings. Here are some ideas:- Chocolate: For a rich, indulgent twist, use chocolate chips or Nutella as the filling. The warm batter combined with gooey melted chocolate is sure to satisfy any sweet tooth.
- Sweet Potato: Sweet potato makes a creamy and slightly savory filling. Roast or steam the sweet potato and mash it with a little sugar and cinnamon for a comforting dessert.
- Vegan and Gluten-Free Alternatives:
You can easily make taiyaki suitable for vegan or gluten-free diets:- Vegan Taiyaki: Replace the egg in the batter with flaxseed meal or apple sauce, and use plant-based milk (like almond or coconut milk). Make sure the filling is also plant-based, such as a simple fruit filling or vegan custard.
- Gluten-Free Taiyaki: Substitute the all-purpose flour with a gluten-free flour blend or rice flour to create a light, crispy exterior. Ensure that the filling is also gluten-free, like sweet red bean paste or chocolate.
With these customizable options, you can create a taiyaki to suit any preference or dietary need!
5. Korean Honey Bread: A Sweet Street Snack
What is Korean Honey Bread?
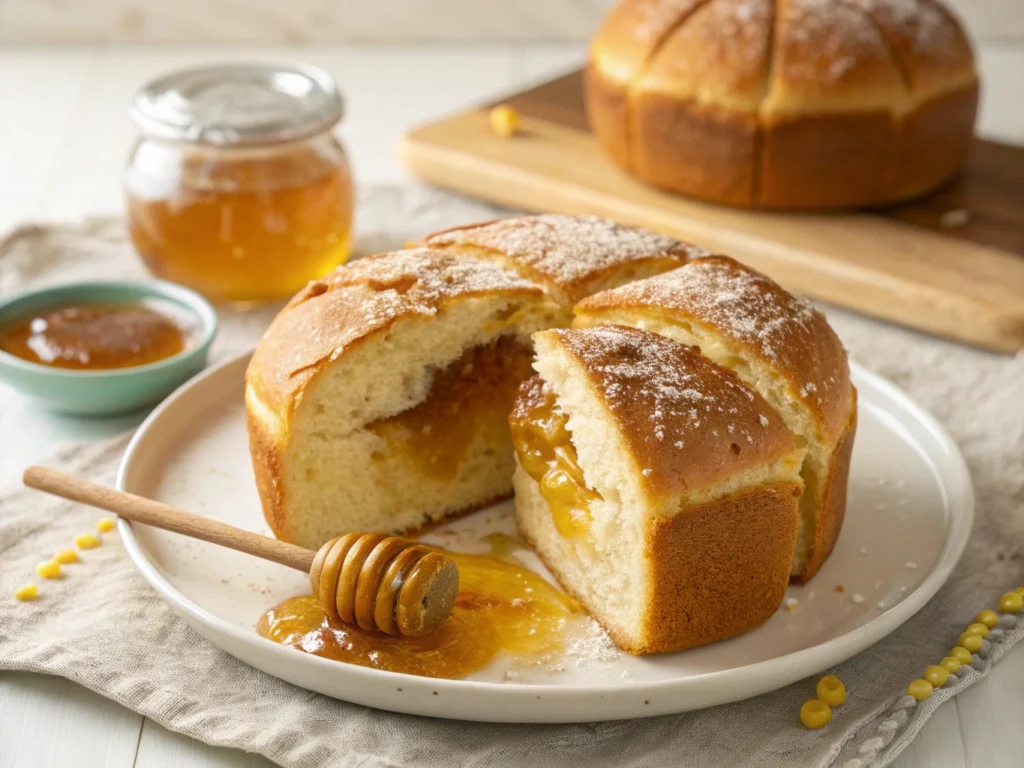
Korean Honey Bread (also known as Hotteok) is a popular street food that’s loved by locals and tourists alike in Korea. This warm, fluffy treat is made by frying dough filled with a sweet, sticky honey and cinnamon filling. The dough is soft and pillowy on the inside, while the outside becomes perfectly crispy and golden after being fried.
This delicious dessert is often enjoyed during the colder months, offering a comforting combination of flavors and textures. The rich filling, which typically includes brown sugar, honey, and cinnamon, gives the Korean honey bread its signature sweetness. It’s a favorite among street vendors, where it’s served fresh and hot, making it the perfect treat for a chilly day.
The crispy exterior and gooey interior are what make this snack truly irresistible, with each bite offering a balance of sweet and slightly spicy flavors. Korean Honey Bread is not just a dessert but a warm and satisfying experience, making it a must-try for anyone visiting Korea or craving a comforting sweet treat.
Main Ingredients for Korean Honey Bread
To make Korean Honey Bread, you’ll need just a few key ingredients that come together to create the deliciously sweet and gooey filling. Here’s what you’ll need:
- Bread Dough: The base of Korean Honey Bread is soft, fluffy bread dough. You can use store-bought dough for convenience, or prepare your own by mixing flour, yeast, sugar, and water to create a light, elastic dough. The dough should be smooth and easy to shape into discs.
- Honey: The key ingredient in the filling, honey provides a natural sweetness and helps create the sticky texture that makes Korean Honey Bread so irresistible. It melts beautifully inside the dough and forms a gooey, rich center.
- Condensed Milk: To enhance the sweetness and create a smooth, creamy texture, condensed milk is added to the filling. It gives the treat a rich, velvety consistency, balancing the flavors of honey and cinnamon.
- Butter: Butter is used to add richness and flavor to both the dough and filling. It helps to create a golden, crispy crust when fried and adds a buttery depth to the sweet, sticky filling.
These simple ingredients come together to create the comforting, indulgent treat that is Korean Honey Bread!
Step-by-Step Recipe for Korean Honey Bread
Making Korean Honey Bread at home is simple and requires just a few steps to create a delicious, crispy, and gooey treat. Follow this clear guide to make your own version of this popular Korean dessert:
Ingredients:
- 2 cups bread flour
- 1 tablespoon sugar
- 1 teaspoon instant yeast
- 1/2 cup warm water
- 2 tablespoons butter (melted)
- 1/4 cup honey
- 2 tablespoons condensed milk
- 1 teaspoon ground cinnamon
- Butter for frying
Instructions:
- Prepare the Dough
- In a large bowl, combine 2 cups of bread flour, 1 tablespoon of sugar, and 1 teaspoon of instant yeast.
- Gradually add 1/2 cup of warm water and mix until the dough forms. Knead for about 10 minutes until the dough becomes smooth and elastic.
- Cover the dough with a damp cloth and let it rise in a warm place for about 1 hour or until it doubles in size.
- Prepare the Filling
- In a small bowl, mix 1/4 cup of honey, 2 tablespoons of condensed milk, and 1 teaspoon of ground cinnamon. Stir until smooth and set aside.
- Shape the Dough
- Once the dough has risen, punch it down and divide it into small equal-sized balls (about 8-10 balls).
- Roll each ball into a small disc, about 3 inches in diameter, ensuring it’s even.
- Add the Filling
- Place a spoonful of the honey mixture in the center of each dough disc.
- Carefully fold the edges of the dough around the filling, pinching the edges together to seal it. Shape the dough into a ball again.
- Fry the Honey Bread
- Heat a pan or skillet over medium heat and add a little butter.
- Once the butter melts and the pan is hot, place the dough balls seam side down and press them lightly with a spatula.
- Cook each side for 2-3 minutes, turning occasionally, until the honey bread becomes golden and crispy.
- Serve and Enjoy
- Once your Korean Honey Bread is crispy and golden on all sides, remove it from the pan and let it cool slightly.
- Serve warm and enjoy the sweet, gooey filling inside.
This recipe makes Korean Honey Bread that’s perfect for satisfying your sweet cravings with minimal effort! Enjoy this crispy treat as a dessert or a comforting snack any time of the day!
Popular Variations
While Korean Honey Bread is delicious in its classic form, there are many creative ways to add extra flavor and make it even more exciting. Here are some popular variations to try:
- Adding Cinnamon or Chocolate Chips for Extra Flavor:
- Cinnamon: To enhance the warm, spicy sweetness of the filling, you can add extra cinnamon into the dough or the honey mixture. This gives the bread a richer flavor and complements the sweetness of the honey and condensed milk.
- Chocolate Chips: For a more indulgent treat, try adding chocolate chips to the filling. As the bread fries, the chocolate melts, creating a gooey, delicious center that combines perfectly with the honey and cinnamon.
- A Modern Twist with Ice Cream Toppings:
- For a fun twist on this classic dessert, top your Korean Honey Bread with a scoop of your favorite ice cream. The cold, creamy texture of the ice cream pairs wonderfully with the warm, crispy bread. Choose from flavors like vanilla, matcha, or even chocolate to create a decadent fusion dessert!
These variations add a modern flair to the beloved traditional treat and let you explore new combinations of flavors!
Conclusion: Why These Easy Asian Desserts Are Worth Trying at Home
Asian desserts bring together unique flavors, textures, and ingredients that make them truly special. From the chewy mochi to the sweet and creamy mango sticky rice, each dessert offers something different, yet equally delicious. The best part? These treats are incredibly easy to make at home with just a few simple ingredients, such as glutinous rice flour, coconut milk, and honey.
By trying these easy Asian desserts, you not only get to experience authentic Asian flavors, but you also enjoy the process of creating something delightful from scratch. Whether you’re making sesame balls, taiyaki, or Korean honey bread, each recipe brings its own charm, filling your kitchen with sweet aromas and a sense of accomplishment.
So, why not explore these delicious desserts and try making them at home? The ingredients are simple, the steps are easy to follow, and the results are sure to impress. Get started today and enjoy these sweet treats with family and friends!